
Learn how to use your ScanNCut in easy steps.
The Scan N Cut Basics course is a FREE course (limited offer)
Join thousands of crafters who have already enrolled in this helpful ScanNCut Basics course!

Wouldn’t you like an easy way to learn how to use your ScanNCut?
This tutorial will show you how to use your ScanNCut in easy steps.
Maybe you are new or have had your ScanNCut awhile and find it all a ‘bit scary’.
Perhaps you’ve already tried, but just can’t seem to make it work.
This will help!
Want a way to go from beginner to pro with your ScanNCut in easy steps?
Maybe you are new or have had your ScanNCut awhile and find it all a ‘bit scary’.
Perhaps you’ve already tried, but just can’t seem to make it work.
This will help!
ENJOY LEARNING HOW TO USE YOUR SCANNCUT
Over 6,000 ScanNCut crafters have now enrolled in this course, and I constantly receive great feedback from them letting me know how much the course has helped them, how easy the tutorials are to follow, and that the instructions are clear and at a speed that is easy to absorb.
Would you like to be one of them?
This video course is a step-by-step introduction to using your ScanNCut. It has been designed especially for YOU!
The course will show you how to use your ScanNCut machine from the very start with minimal fuss and bother, allowing you to create beautiful and cuttable designs.
What do you need?
- ScanNCut machine.
- 1 piece of card-stock (or more if you would like)
That’s it!!! Easy.

The truth is that the 3 biggest mistakes that you can make are..
#1. Chasing random “how-to” videos on YouTube
You can spend hours and hours trying to find out how to do what you are trying to achieve. It can be very confusing!
#2. Being too nervous to use your ScanNCut
Please don’t be! There is absolutely nothing to be scared of whatsoever. There is no point leaving it in its box… let’s use it!
#3. “You don’t know what you don’t know”
There is an old saying “You don’t know what you don’t know” and it is very true. If you don’t know what your machine can do… how can you search how to do it?
.

I’ve really learned quite a bit from your beginner class. You do an excellent job!
— Angela B
Brother ScanNCut Basics
Course Outline
- Introduction to your ScanNCut
- Changing settings on your ScanNCut
- Calibration and wifi
- Add shapes to your ScanNCut
- Duplicate on your ScanNCut
- Flip and rotate on your ScanNCut
- Loading your mat in your ScanNCut
- A look at your cutting blade
- Setting up the drawing tool on your ScanNCut
- The Universal Pen Holder for your ScanNCut
- Using zoom on your ScanNCut
- Joining Text on your ScanNCut
- Welding shapes on your ScanNCut
- How to save on your ScanNCut
- Scan and Cut
- Scan to Data
- Let’s make some projects
and more……

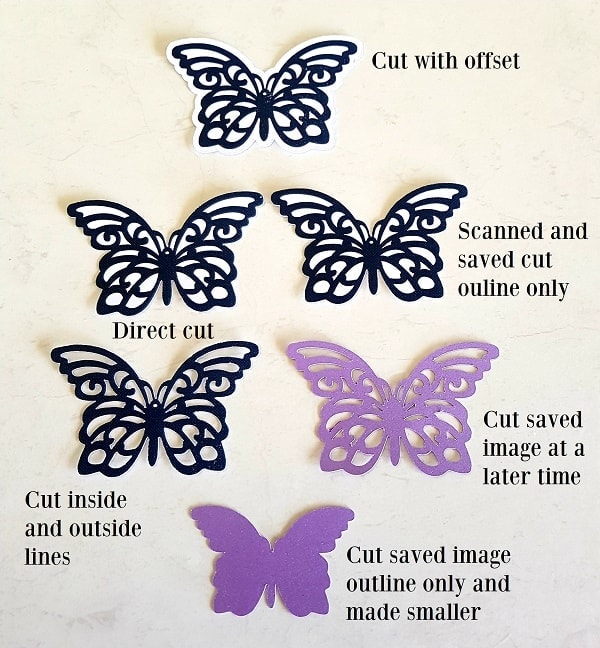
These butterflies were cut out from a pixabay.com FREE image. They were scanned, then cut out using the various features in your ScanNCut.
Join Me
Looking forward to you joining me
Other courses available
Don’t forget to check out my other courses too