We will take a look at the best stabilizers for hooping Applique projects. Welcome to the next tutorial from my ScanNCut Applique Series. When it comes to applique and embroidery, using the right stabilizer can make all the difference. In this tutorial, we’ll explore the best stabilizers for applique, discuss their uses, and help you choose the perfect one for your next project.
Video – Stabilize Your Fabric To Hoop
The video focuses on stabilizers for hooping your fabric and creating a secure base for your projects. If you’re looking for stabilizers specific to cutting fabric, check out my earlier tutorial on that topic.
What Are Stabilizers, and Why Are They Important?
Stabilizers are materials used to provide support and stability to your fabric during applique or embroidery. They prevent distortion, puckering, or shifting while stitching, ensuring your designs come out neat and professional.
Would you believe that stabilizers come in a HUGE variety of choices which can make it appear confusing when you go to purchase them? The good news is that it is not quite a confusing as it first seems. Read on to find out more!
Disclaimer: As an Amazon Associate, I earn from qualifying purchases. Links included in this tutorial may be affiliate links, Amazon or others, meaning I may earn a small commission at no additional cost. These commissions will help me continue creating content for you. Thank you for your support! Read my very boring full disclosure policy here.
Types of Stabilizers for Applique
Here’s an overview of the stabilizers I use, along with tips on how to choose the best one for your fabric and project type.
Tearaway Stabilizers
Tearaway stabilizers are a versatile option for projects like towels or fabrics where you don’t want stabilizer residue left behind. They’re easy to remove by simply tearing them away from the back of the fabric after stitching.
- When to Use: Tearaway stabilizers are best for stable fabrics and designs that don’t require ongoing support after stitching.
- My Experience: I often use tearaway stabilizers for towels, as I prefer a clean finish without leftover material on the back. You could also use the material type wash-away stabilizers as these are removed easily with water.
Cutaway Stabilizers
Cutaway stabilizers offer stronger, longer-lasting support for fabrics that need extra stability, such as stretchy or thin materials. These stabilizers remain on the fabric after stitching, keeping the design intact even after multiple washes.
- Types: You can find lightweight and heavy-duty versions, including iron-on cutaway stabilizers with adhesive backing for extra hold.
- Pro Tip: For darker fabrics, look for black cutaway stabilizers to blend seamlessly with your project.
Wash-Away Stabilizers
Wash-away stabilizers dissolve completely when washed, leaving no trace behind. They’re ideal for delicate fabrics or projects like freestanding lace.
There are few different types of wash-away stabilizers. The first is a very thin plastic type, the next is a very strong see-through plastic type and the third feels more like material however still washes away.
- Applications: I often use the thin plastic type wash-away stabilizers on top of towels or fluffy fabrics to prevent stitches from sinking into the pile. Would you believe…. I have an enormous roll of it. If ever I am in doubt whether a project needs a top stabilizer, I will add the wash-away stabilizer layer to my project just in case. My philosophy is it is better to be safe than sorry. This type of stabilizer is very easy to remove from your completed project and very inexpensive.
The clear, strong plastic type I mainly use for Free Standing Lace projects. (I love these) They are also known as FSL designs.
And then there is the wash-away that feels more material-like than the previous two that I have mentioned. - Hooping Tip: This third type of wash-away stabilizers can be hooped or used to float your project on top of. For floating you can use basting spray or set up basting stitches for your project. My machine will add basting stitches once I have placed the project and hoop in the machine. Many embroidery software packages also include the ability to add basting stitches to your design to keep your projects stable during the stitching process.
Using Basting Sprays and Floating Techniques
Why would you use the floating technique?
Sometimes, your fabric might be too big, too bulky, or too small to hoop directly. This is where floating techniques and basting sprays come in handy.
- Floating: Hoop the stabilizer into the hoop. The wash-away type stabilizer can be hooped with either 1 or 2 layers depending on the strength you need for your project. I have seen it hooped even three times… however, this is not normally required. Place the fabric on top of the hooped stabilizer without clamping it. Use a temporary spray adhesive, like 505 spray, Quilters Basting spray, or basting stitches to hold the fabric in place while stitching.
- When to Float your project: This method works well for materials that can’t be hooped securely or when working with designs close to the fabric’s edge.
Choosing the Right Stabilizer for Your Project
Selecting the right stabilizer depends on the fabric and the project. Here are a few things to consider:
- Will the fabric be washed frequently? Use a cutaway stabilizer for durability.
- Is the fabric stretchy and requires long-term stabilizing where your stitching is located? If so, the stitches may stretch and make your beautiful design look ugly and wrinkled if they are not stabilized correctly. Light weight cut away would be my choice.
- Does the fabric have a pile or texture? Add a wash-away stabilizer on top to keep stitches from sinking. Fabrics like toweling, velour, velvet, and plush type fabrics. Really, any fabric with some kind of pile. Wash-away can go underneath too if needed. Toweling I use Tearaway however, wash-away would be fine too.
- Are you working with delicate materials? A lightweight stabilizer or wash-away option might be best. Keep in mind whether your fabric needs permanent stabilization or not. If so, Cut-away will be the choice.
Common Mistakes to Avoid
As much as stabilizers can improve your results, choosing the wrong one can lead to frustration. Here are a few mistakes to watch out for:
- Using a tearaway stabilizer for stretchy fabrics that need more support. Embroidery stitches will stretch.
- Forgetting to remove excess stabilizer after stitching, especially for wash-away or tearaway types.
- Skipping the basting step when floating fabric, leads to fabric shifting during stitching.
Final Thoughts on Stabilizers
Stabilizers are a key ingredient in successful applique and embroidery projects. While I don’t claim to be an expert, I’ve experimented with many types over the years and learned what works best for different projects.
If you have questions about stabilizers or want to share your own tips, feel free to leave a comment below. And don’t forget to check out my other videos in the ScanNCut Applique Series!
Top Tip!
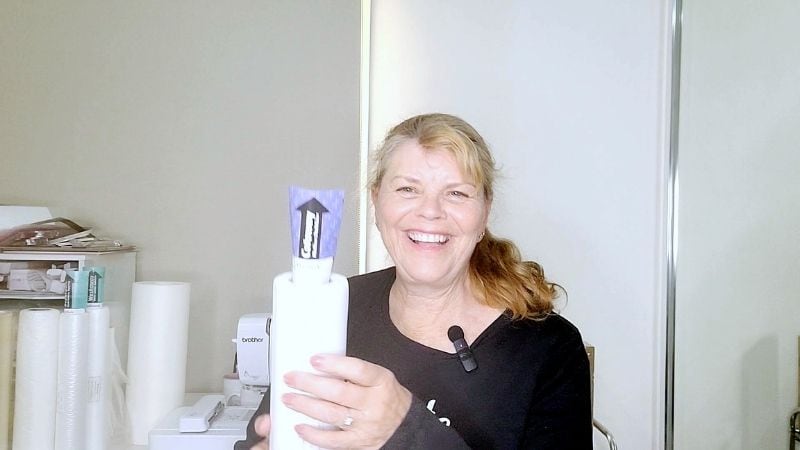
Keep the information tags that come with your stabilizer when you purchase it. These tags typically include details about the type of stabilizer and the recommended fabrics for its use. To stay organized, you can attach the tags to the outside of the stabilizer roll or, as shown in the example, tuck them inside the cardboard roll that the stabilizer is wrapped around.
My video tips for keeping track of HTV information may also help with tracking stabilizers. You will find it here.

Next tutorial – Cupcake Applique with your ScanNCut
The next tutorial in this series is the Cupcake Applique tutorial where we will cut out the Applique design with your ScanNCut and sew it with your Embroidery machine. You will find the Cupcake Applique tutorial here.
I hope that you are enjoying this series.
Happy creating,


Embroidering Cardstock: A Creative Twist for Your Craft Projects
If you’re looking for something a little different to add to your cardmaking or papercraft projects, then embroidering cardstock is a fabulous technique to try….

Cupcake Applique with your ScanNCut – Applique Series

Let’s Look At Embroidery Hoops – Applique Series

My Applique Journey – ScanNCut Applique Series

Create Faux Leather Earrings – Scan N Cut

How to Cut Fabric with your Scan N Cut

Scan N Cut Rotary Blade – Is it worth it?
Join Me On Social Media

YouTube
Here is the direct link to my YouTube videos. Remember to like and subscribe when you are on my YouTube channel so you don’t miss any new video releases.

Follow me on Facebook as well as join the group. Here is the link to my Facebook page.

Let’s not forget Instagram. You will find me there too. Here is the link to follow me.
