Video Intro to the Applique series
This video is covering my Applique journey, and don’t forget to explore the rest of the series for more tutorials and project ideas!
Introducing my ScanNCut Applique Series
Discover the art of applique with the first video in my ScanNCut Applique Series! 🌟
This series is crafted for crafters, quilters, and fabric enthusiasts who want to create stunning designs using their Brother ScanNCut machines. In this introductory video, I take you through my journey with applique, how I started in this incredible craft, and the techniques I’ve mastered along the way.
Whether you’re just starting out or looking to elevate your skills, this series has something for everyone. I’ll guide you through:
- Applique basics for beginners
- Advanced techniques to achieve polished results
- Tips for integrating your ScanNCut with embroidery projects
My Introduction into Applique
Welcome to the detailed breakdown of the first video in my ScanNCut Applique Series! If you’ve already watched the video above, thank you! If not, no worries—you can dive deeper into the topics I covered right here. This section is perfect for those who prefer reading or want a handy reference for later.
Disclaimer: As an Amazon Associate, I earn from qualifying purchases. Links included in this tutorial may be affiliate links, Amazon or others, meaning I may earn a small commission at no additional cost. These commissions will help me continue creating content for you. Thank you for your support! Read my very boring full disclosure policy here.
Why I’m Starting an Applique Series
Over time, I’ve received countless questions from fellow crafters about how to use the Brother ScanNCut for applique. You’ve asked for guidance, tips, and techniques—and I’m excited to deliver!
In this series, my goal is to demystify applique techniques and show you how to seamlessly integrate them into your crafting projects using tools like the ScanNCut cutting machine, Canvas Workspace, and even Embrilliance embroidery software.
My Crafting Journey
Applique became part of my crafting life when I wanted to combine my love for fabric and my passion for creating unique designs. Along the way, I discovered how the ScanNCut fabric-cutting machine could simplify the process, making it easier to cut precise shapes and prepare designs for embroidery.
Over the years, through trial and error, I’ve developed my skills and want to share what I’ve learned with you so that you can create beautiful applique designs with confidence.
Where my Applique journey started
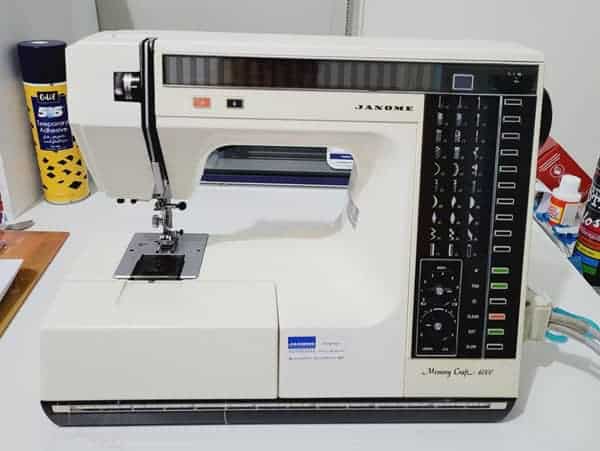
Well, I have to say…it has been a long, but fun journey. I have always been interested in embroidery however it was only when my children were little that I decided I wanted to embellish the clothes that I was making for them. Enter the world of Applique!
I used to fussy cut the designs and manually embroidered the Applique designs onto their clothes. Back then, there was no such thing as “software”. The embroidery machine I purchased was a Janome and very advanced for the era. Surprisingly, my recent embroidery machine has many of the same fancy stitches inbuilt into it. I found that AMAZING, especially when I worked out how long I had owned my first embroidery machine…it was FORTY years. I can’t believe it is 40 years ago I purchased it. Boy, does that age me LOL.
Craft Fairs and Party Plan
With my new love of creating Applique designs, a friend and I ventured out into the world of craft fairs, paddy’s markets and would you believe, a party plan model to sell clothing and crafting projects we made. Party Plan was huge back then. We would show the designs and take orders for them.
My Janome machine did all the Applique work for this. It has been a great sewing machine all these years.
My next embroidery machine
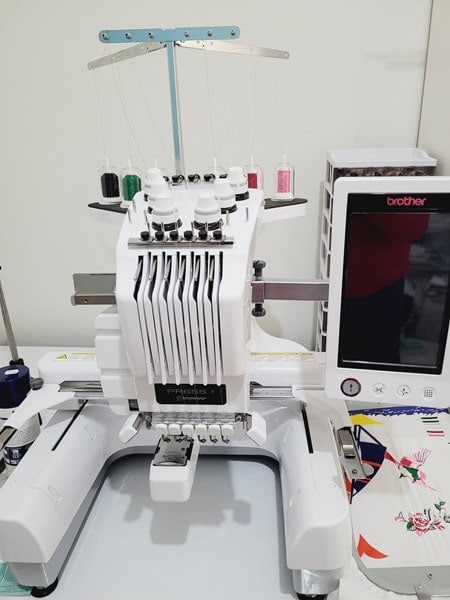
About 15 years ago, I purchased a very expensive Brother PR655 – 6 thread embroidery machine. I absolutely LOVE this machine. I enhanced it with a magnetic 200×300 magnetic hoop which was a game changer indeed.
My PR655 has also been used to create orders upon request. Not quite to the extent of going out and demonstrating the wares…but a good effort indeed.
My latest embroidery machine
Sadly about 6 months ago I got out my trusty, 40 year old, embroidery/sewing machine to sew a project and it was like it was drunk. It could not sew a straight line at all. I double-checked it wasn’t the user (me) at fault. Nope, it was definitely the sewing machine.
I asked my Facebook group their thoughts on whether to get my machine repaired or purchase a new one. There were mixed answers so I ended up purchasing a Brother M370 which is very similar to many of the low-end embroidery/sewing combination machines that Brother sells. It has a 4×4 hoop, wifi, and a few other mod cons that my trusty old one did not. I decided this machine was a great opportunity to use to assist beginners.
NOTE: Might still get my trust old one fixed yet as I am a little sentimental about it.
Tools I have been using for Applique
In the video, I talk about the tools that are key to my applique projects, including:
- Brother ScanNCut Machines: These are my go-to for cutting fabric shapes for applique, whether I’m working with fabric, vinyl, or paper.
- Canvas Workspace: Canvas Workspace is a powerful companion for creating and cutting SVG files for applique and other fun projects. There are two versions of Canvas Workspace. Find out more information here.
- Embroidery Software: I have been using Embrilliance software to design, tweak, and prepare applique patterns for cutting and stitching for this series. I do use other software packages as well so you are not limited to Embrilliance, it is a great starting point for this series though. Brother PE Design is one that I got when I purchased my 6 thread. I really like PE Design however it was time to update.
Each tool plays an important role in creating professional-quality applique projects, and I’ll cover their uses throughout this series.
What’s Coming Next?
This introductory video is just the beginning. In the upcoming tutorials, I’ll cover a variety of topics, including:
- Creating custom SVG files for applique in Embrilliance.
- Techniques for preparing fabric for cutting and embroidery.
- Tips for aligning applique pieces perfectly every time.
No matter where you are in your crafting journey, there’s something in this series for everyone—from beginners to advanced creators looking to add to their skills. Please feel free to ask if you would like me to cover something specific. I will if I can.
Why Applique is Worth Mastering
If you are new to embroidery and Applique you may be wondering why Applique is worth mastering. Applique allows you to add dimension, texture, and creativity to your projects. It’s a versatile technique that works for everything from quilts and clothing to home decor and personalized gifts. Plus, with the ScanNCut, you can achieve professional-quality results without the stress of hand-cutting every piece. Fussy cutting is out the window.
Let’s Get Started!
I’m so glad you’re joining me on this series on creating Applique and starting your very own Applique journey. If you haven’t already, be sure to watch the video above and check out the rest of the series for more tutorials. I can’t wait to see the amazing projects you’ll create!
If you aren’t already, you are welcome to join my Facebook group Scan N Cut ~ Let’s Create With Sue. You can share your awesome creations with the group, ask for assistance or simply pick up some additional tips and tricks.
Happy creating,

P.S. Don’t forget to check out other posts on the site. There are LOTS of tutorials and ideas.
Storefront
Have you checked out my Storefront? I have included some of my favorite tools and craft items and I am adding to them as I find them. You will find it here.
Embroidering Cardstock: A Creative Twist for Your Craft Projects
If you’re looking for something a little different to add to your cardmaking or papercraft…

Scan N Cut Rotary Blade – Is it worth it?

How to Cut Fabric with your Scan N Cut

Create Faux Leather Earrings – Scan N Cut
My Applique Journey – ScanNCut Applique Series

Let’s Look At Embroidery Hoops – Applique Series

Best Stabilizers – Applique Series
