Welcome! Today, we’re making a gorgeous Front Panelled Gatefold Heart Card using the Brother ScanNCut. This is such a fun and easy project, and the results are stunning. The card features a sliding band that holds it together and then opens up beautifully, making it perfect for special occasions like Valentine’s Day, anniversaries, or to send a heartfelt message. I have included a free SVG to help you with it as well.
It will be an easy card to change to suit any occasion that you need it for. Change the heart to a diamond to create a more general card. EASY!
Disclaimer: As an Amazon Associate, I earn from qualifying purchases. Links included in this tutorial may be affiliate links, Amazon or others, meaning I may earn a small commission at no additional cost. These commissions will help me continue creating content for you. Thank you for your support! Read my very boring full disclosure policy here.
Video Tutorial for the Front Panelled Gatefold Heart Card
Watch the full tutorial in detail on YouTube for cutting information and embellishment ideas.
What You’ll Need
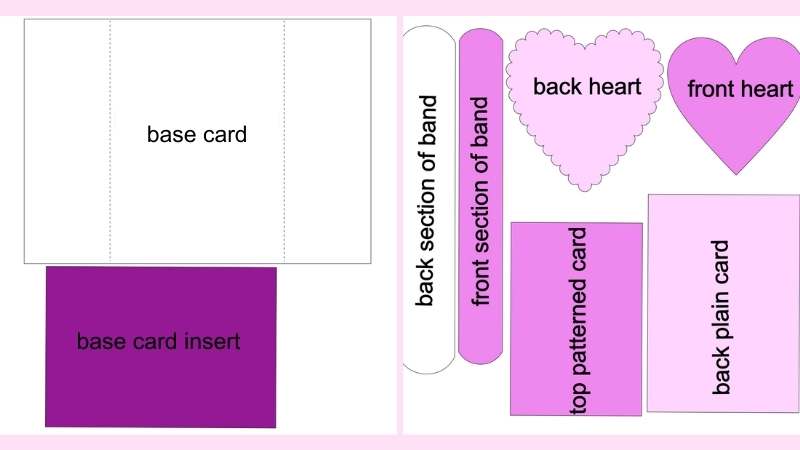
The design for this card is available in my Create With Sue Resource Library, so make sure to download it before starting. We’ll be using the ScanNCut to cut out the pieces and then assemble everything step by step.
- 1 piece of plain cardstock
- 1 piece of patterned cardstock.
- Glue
- ScanNCut or other cutting machine
- Embellishments of your choice
Preparing Your Design in ScanNCut
First, we need to bring the design into Canvas Workspace or directly into the ScanNCut machine. Once imported, you’ll want to separate the different pieces so that you can cut them in your chosen colors. This allows you to create a beautifully layered look with contrasting elements.
Once everything is sorted, send the design to the machine and load your cardstock onto the mat. Press cut, and let the ScanNCut do its magic!
Assembling the Card
Now that all your pieces are cut, it’s time to put it together. The card folds into a gatefold shape, and the band slides over the top to keep it secure. If you want to add a little extra decoration, you can ink the edges, use patterned paper, plus add embellishments like gems or ribbons.
Carefully fold along the score lines, making sure everything lines up nicely. Then, attach the decorative pieces in place. Finally, wrap the heart band around and secure it so that it slides easily on and off. Ink the edges of the card as required.

Final Touches
That’s it! You now have a beautifully crafted Front Panelled Gatefold Heart Band Card that’s sure to impress. It’s simple yet elegant, and with the ScanNCut doing most of the work, it’s a breeze to make.
For the card with the additional heart, all I did was use the back section of the heart and in my ScanNCut I reduced the size of the original. Then I created a duplicate and reduced the size further for the patterned inset.
The dots on the outer area of the heart are 3D Liquid Pearls. I love these Liquid Pearls and have used them a lot over the years.
Watch the full tutorial in the above video for a step-by-step walkthrough.
I’d love to see your creations! Share your creations in the Facebook group and let me know how your card turned out.
Happy creating


Would you like to learn all about creating your very own designs in Canvas Workspace? This course is ideal for beginners and intermediate users of Canvas Workspace (downloaded version)