
Have you ever wondered how to cut fabric with your Scan N Cut? Want to incorporate fabric into your crafting projects? You’ve landed in the perfect spot! We’ll cover the necessary tools, look at stabilizer options, and explore alternative techniques to achieve successful fabric cuts.
The Scan N Cut opens up a world of creative possibilities, enabling you to effortlessly achieve intricate cuts and avoid the need for fussy cutting your fabric. Join me in discovering tips, tricks, and tools for cutting fabric with your Scan N Cut.
Did you know that the Scan N Cut was initially designed to be a fabric cutting machine? My understanding is this is why the file extension for the Scan N Cut is FCM (Fabric Cutting Machine).
Of course, anyone who owns a Scan N Cut already knows that they are not limited by any means to only cutting fabric. This particular tutorial will focus on fabric.
Disclaimer: As an Amazon Associate, I earn from qualifying purchases. Links included in this tutorial may be affiliate links, Amazon or others, meaning I may earn a small commission at no additional cost. These commissions will help me continue creating content for you. Thank you for your support! Read my very boring full disclosure policy here.
What fabric can you cut with your Scan N Cut?
You can cut most fabrics with your Scan N Cut machine. Fabrics range from thin polycotton to thicker woven fabrics and even non-woven felt or batting. Each type of fabric will have a different texture and weave. Some of these properties may make the fabric a little trickier to cut than others.
Pictured below is Polycotton fabric. I often use cotton and polycotton fabric for Applique and usually stabilize it with an iron-on backing. You can cut this fabric without stabilizing it as long as it is well adhered to the mat. A Brayer like this one is handy to ensure the fabric is pressed firmly to the mat and ready for cutting.

Felt, in particular, maybe a challenge to cut without any preparation. This is because it is typically a non-woven fabric made by matting and pressing natural or synthetic fibers together. The fibers are kind of mushed together to form felt. Plus, it comes in a variety of types from very soft to quite a stiff, sturdy finish. Compare this to say Polycotton which is a woven thinner fabric and is relatively stable and consistent. You can see the difference.
The good news is that your Scan N Cut will cut these fabrics but may need some help. Read on for some tips.
Scan N Cut tools for fabric
Brother produces several fabric-specific tools for the Scan N Cut cutting machines. Some are suitable for both the CM range and the newer SDX models. Let’s take a look at the options.
Which mat to use for fabric
You can use any mat that you have available to cut fabric. Yep. This includes the Low Tack mat or Standard Mat for either the CM models or SDX models. The key to using these mats is ensuring that the fabric adheres firmly to the mat and is stable.
Note that the Low Tack mat is not ideal as it may not be sticky enough.
Brother CADXMATF12 ScanNCut DX Fabric Mat:
The fabric mat is specifically designed by Brother for cutting fabric with the SDX models of Scan N Cut. It has a tacky adhesive for securing fabric material for precise and clean cutting. The sticky adhesive adds stabilization to the fabric by firmly adhering it to the mat. The Beige top thin fabric blade is a good choice to use with the fabric mat although the Rotary Auto Blade is awesome for some of the more challenging fabric.
You can use any of the blades with the fabric mat.
The downside is that the Brother mats is that they do lose their sticky. You can re-glue mats, adding the level of stickiness that you choose. Check here for some great mat rejuvenation tips.
Note: the fabric mat is only suitable for SDX models of Scan N Cut.
The pictured mat is for the SDX Scan N Cut models only. There are alternate methods available for the CM models and we will go into this further along in the tutorial.

Brother CADXMATF12 ScanNCut DX Fabric Mat
TIP: When choosing a mat {any mat) you will notice that the DX model mats have “DX” in the code. You will find the DX codes at the bottom right-hand side of the mats. These are suitable for ANY DX model Scan N Cut however will NOT work with the CM model machine. There are no codes on the CM mats.
Choosing the blade to cut fabric
It may surprise you that you can use any of the blades to cut fabric. For the CM models, the blue standard blade is your best option. All SDX models come with the black top blade holder and blade which will cut fabric however SDX owners have more blade choices.
If you are cutting a lot of fabric then ideally the Brother ScanNCut DX Thin Fabric Auto Blade Holder CADXHLDQ1 (beige top) for the SDX models is a better choice than the black blade. One reason for this is the fact that you can keep it as a dedicated fabric blade. This is a bit like having dedicated fabric scissors. The blade is finer than the black top blade too which produces a better cut when cutting fabric.
You also have the option of purchasing the Rotary Auto Blade Kit CADXRBKIT1. The Rotary Blade is a bit of a game-changer as it will cut fabric without any stabilizer or fabric mat. It is only available for SDX Scan N Cut machines.
The blade holder on the left is the Thin Fabric Auto Blade Holder CADXHLDQ1 and the larger blade holder on the right of the picture is purchased as the Rotary Auto Blade Kit.

Do you need the Rotary Auto Blade kit?
The Rotary Auto Blade kit is, in most cases, an additional expense. If you are an enthusiastic sewer, love creating Applique projects, or cut lots of fabric in general, you will love the Rotary Blade. It works quite differently from the regular blades. More like a fabric rotary cutting wheel, in fact, it has a tiny rotary cutting wheel as the cutter.
Below is a close-up view of the rotary blade which in reality is quite tiny. The blade was very fiddly to photograph and this was my “best effort”.

For thicker fabrics like felt, batting, corduroy, and wool, the Rotary Auto Blade is a game changer. (you might see me mention this a few times LOL)
The Rotary Blade lifts and rolls its way around your fabric, cutting with ease.
A downside of this is that the Rotary Blade may take slightly longer to cut as it lifts and works out the best way around the fabric. Not a lot longer though.. It will depend on your design and fabric.
An upside is that when cutting fabric you do not need as much, if any, stabilizer. This is a huge benefit.
To find out more about the Rotary Blade check this post out. Or if you prefer video check out the video below.
Stabilizing the fabric
Before diving into the cutting process, it’s crucial to consider stabilizing your fabric in some way. This may simply be done by ensuring that the fabric is stuck well to the mat or by adding a stabilizer to the fabric. If you are creating an Applique or a project that suits a stabilizer then an iron-on stabilizer is ideal. Stabilizing the fabric will assist in cutting the fabric on your Scan N Cut.
There are several ways to stabilize your fabric. Let us take a look.
Iron-on stabilizers – Applique
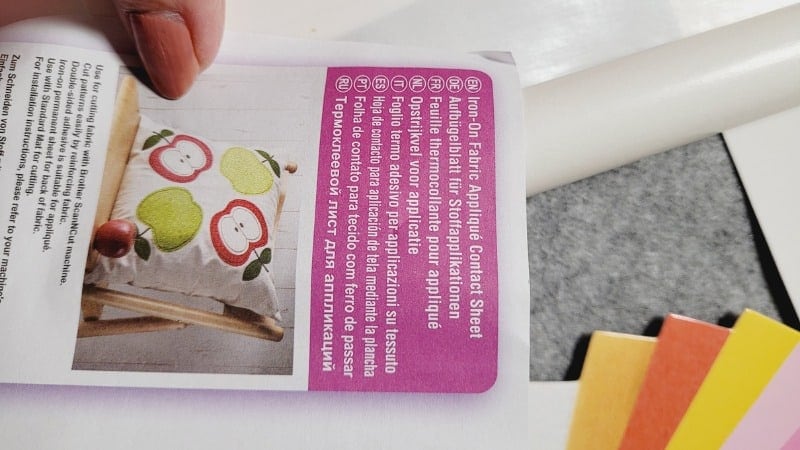
Most fabric needs to be stabilized in some way to cut them effectively and there are a variety of methods to do this. For Applique projects an iron-on product like heat n bond or steam a seam work well. I have been using the Brother ScanNCut Iron-On Appliqué Contact Sheet CASTBL1 and really like it. For me, it worked out cheaper to purchase than some of the other choices and does a great job.
You need to be mindful about how some iron-ons react with your mat. Check before you stick the iron-on stabilizer to your mat. If it sticks too firmly, you can place the fabric side down to prevent issues with the stabilizer. When placing the fabric side against the mat you need to mirror your design.
Extra care needs to be taken if you are using the fabric mat as the stabilizer may adhere too firmly to the mat and it can be very difficult to remove.
The Brother iron-on hasn’t caused me any issues when removing the backing paper and placing the stabilizer directly against the mat.
Pictured is the wrapper for the iron-on.
Cutting fabric for quilting and other projects
If you want to cut fabric for quilting projects or other fabric projects then an iron-on stabilizer may not be the solution that you are after.
There are more alternatives.
Brother ScanNCut High Tack Fabric Support Sheet CASTBL2:
The fabric support sheet simply adheres to your standard or low tack mat and provides the additional level of stickiness required to cut your fabric.
This support sheet is suitable for both the CM range and the SDX range of Scan N Cut machines. The high tack support sheet is designed to secure your fabric on your standard tack mat securely.
To use the support sheet, adhere the sheet to your mat first and then place the fabric onto the sheet. The sheets can be left on the mat and used multiple times. Once it is too worn or lost it’s sticky, simply peel it off and replace it with a new sheet. Ideally having an old mat dedicated to this works well.
CM owners may have received a sample of the fabric support sheet included when they purchased their machines (It came with mine). Samples are always great and allow you to try the products.
I only realized when writing this tutorial that the Brother code for the Applique iron-on and the High Tack Support sheet is only one digit different. {sigh}. Look carefully as you purchase as the two products look similar but work quite differently.
The High Tack Fabric Support Sheet CASTBL2 is pictured below.

Another option for this technique is to use a strong grip vinyl transfer sheet or contact.
TIP: If you have very sticky sheets or mats do not place the paper against the mat. Place the fabric side down and mirror your design. You can also choose to remove the backing paper first.
Terial Magic Fabric Spray:
Achieving crisp, precise cuts often involves preparing your fabric properly. Terial Magic Fabric Spray is a favorite among many crafters for its ability to stiffen the fabric, making it easier to cut. This product gives the fabric a paper like feel and is water soluble so it washes out.
You can probably use other starches and have good results. Comment below if you have had success with regular starch.
These are the steps to follow for Terial Magic starch.
- Spray and Press: Lightly spray Terial Magic Fabric Spray onto your fabric. Ensure that the fabric has full coverage.
- Air Dry: Allow the fabric to air dry and press it with an iron. Tip: Put a pressing cloth or baking paper under your fabric when you iron, to prevent any getting on your ironing board or heat press mat.
- Let it Cool: Ensure the fabric is completely dry and cooled before placing it on the cutting mat.
Terial Magic Fabric Spray replaces stabilizers and fusible addons for quilters and embroiderers, keeps fraying in check for scrapbookers and crafters, and gives the fabric a firmer hand for holding shapes and folds for all fabric projects.
One of the best things about fabric sprayed with Terial Magic is that the fabric does not fray during cutting or removing from the mat.
Reynolds Freezer Paper:
Freezer paper is a versatile tool for crafters, especially when working with fabric and the Scan N Cut. Adding freezer paper provides stability, preventing the fabric from moving as the blade moves through it during the cutting process.
Here’s how to use it:
- Cut to Size: Trim the freezer paper to fit your material and cutting mat.
- Iron onto Fabric: With the shiny side down, iron the freezer paper onto your fabric. This temporary bond makes it easier to secure the fabric to the mat. You may need to iron the freezer paper onto both sides of the fabric.
When you are finished cutting the fabric, the freezer paper simply peels off.
The downside of freezer paper is that it is not readily available in all countries although you should be able to purchase it on Amazon. (I did)
The upside of freezer paper is it works like magic on felt in particular.
Cutting felt fabric with your Scan N Cut
Felt can be a difficult fabric to cut with your Scan N Cut but do not be put off. The right stabilizer, tools, and felt will make a difference.
As I mentioned previously, freezer paper can solve many of your cutting problems. When I first tried it I was amazed. I initially tested the felt with it placed directly on my mat with no stabilizer. These tests were done using my CM 900 Scan N Cut and the blue standard blade holder. Unfortunately, all it did was drag the felt I was using and produce an awful result.
Next, I tested ironing the freezer paper to one side of the felt with better results. Finally, I tested with the freezer paper ironed onto both sides of the felt with much better results again.
You may have already discovered that felt ranges from soft and floppy to quite firm. The soft and floppy felt needs as much help as you can give it. The firmer felt is much easier to cut and you may get away with less assistance.
If you have a DX model of the Scan N Cut, the Rotary Auto Blade kit is a game changer for felt, thicker fabrics, batting, corduroy etc.
Cutting Faux Leather and Leather with your Scan N Cut
Many ask, “Can you cut Faux Leather with your Scan N Cut?”. The answer is yes! It does a great job of Faux Leather and lighter weight real leather. You can cut Faux Leather either shiny side down or if not too fluffly shiny or fabric side up. If it leaves “fluff” on the mat you can simply rinse the mat off under a tap.
More tips for using Faux Leather can be found in the below video. The tutorial covers all the steps from creating the design, right through cutting the Faux Leather and assembling the earrings.
Holding your fabric in place to create your project
Once you have your fabric cut out you may only need to hold the fabric in place while you sew it. For this, you can get away with basting spray or fabric glue. I have used this roll on fabric glue successfully.
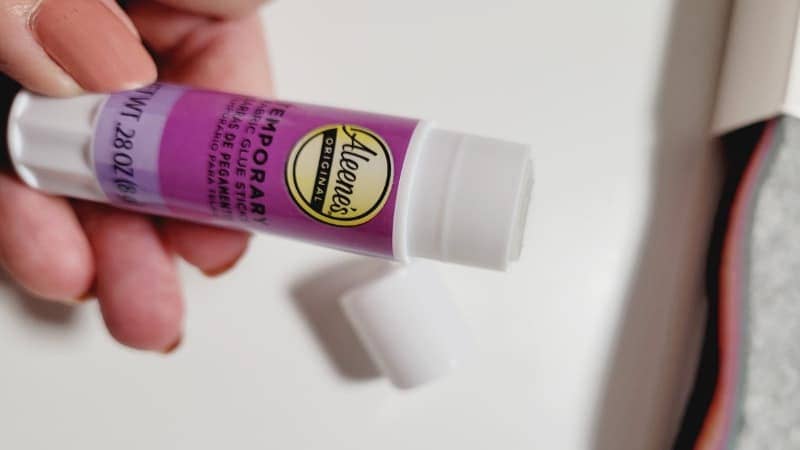
With fabric glues and basting sprays, you need to be a little careful as some brands will gum up your sewing needle.
Frequently Asked Questions
New crafters often have a range of questions when it comes to cutting fabric with a Scan N Cut. Here are some common queries that may arise:
I hope that you have found this information useful for your fabric cutting adventures with your Scan N Cut.
Happy creating,


Join me on Facebook
Join me in the Scan N Cut – Let’s Create With Sue Facebook group. It is a group of awesome craft friends sharing and caring.
I would love to see you there.
You are always welcome to say Hi at [email protected] or [email protected]. It would be great to hear from you!

Like to learn how to use Canvas Workspace? More information can be found here!


I am making a stuffed animal toy. I’m trying to cut out the pieces on my scan and cut using the gold mat. The blade lifts the fabric. Would Best Press startch help? What else could I use? Thank you.
Yes, some kind of starch product might assist. Terial Magic is always a good choice. It sprays on and the material feels like paper. Other starch products have been suucessfull too though. You dont mention what ScanNCut you have or the type of fabric. If you have a DX model the Rotary Blade is a great option for difficult fabrics. Another trick is ironing on Reynolds Freezer paper to both sides of the fabric. This works well although the Freezer paper is not readily available in all countries.
Thank you. I tried the startch on both sides of quilting cotton and it worked well. I have a DX325.
What makes the freezer paper stick to the fabric? I will look for it here in Calgary, Alberta.
I’m finding your site so helpful. Every question I’ve ever had is answered!
I am really pleased that you are finding my site helpful. Thank you for letting me know. See my reply regarding the Reynolds Freezer paper in you other query. 🙂
Thank you. I tried the startch on both sides of quilting cotton and it worked well. I have a DX325.
What makes the freezer paper stick to the fabric? I will look for it here in Calgary, Alberta.
Oh I am so pleased the starch worked well for you. The Reynolds Freezer paper has a dull side and a shiny side. The shiny side is coated with something and that goes against the fabric and you iron it on. Not really certain what the shiny side is made from however it does not appear to leave any traces on the fabrics I have tried it on. Test on your fabric just in case. (always pays to test). It is quite difficult to obtain where I am however it is freely available in the US, not certain about Canada. I know Costco normally stocks it.
how to cut fabric on the fold for toys so there is no back seam
Unfortunately the ScanNCut doesnt really like cutting double layers of fabric so you are restricted to ensuring that the design can be cut with both sides flat and the fold going down the centre of the cut file. If you can manage to hold the fabric together long enough to cut you might get away with it cutting on the fold (products like 505 temp spray might do the trick) however in these instances, I have found it is usually easier to cut the fabric by hand.