Creating beautiful home decor projects with your ScanNCut is easier than you might think. In this ScanNCut vinyl cutting tutorial, I’m going to walk you through how to resize and cut a mandala design using heat transfer vinyl (HTV) and apply it to a candle tin. This is a fun project that looks really impressive, but is simple to do once you know a few tips and tricks. This project can be made with either HTV or regular adhesive vinyl.
Let’s dive in and create this gorgeous mandala HTV candle project together!
Disclaimer: As an Amazon Associate, I earn from qualifying purchases. Links included in this tutorial may be affiliate links, Amazon or others, meaning I may earn a small commission at no additional cost. These commissions will help me continue creating content for you. Thank you for your support! Read my very boring full disclosure policy here.
Video for the ScanNCut Vinyl Tutorial – Mandala HTV Candle Project
Discover how to cut and apply a mandala design to a candle using your ScanNCut and heat transfer vinyl. This easy ScanNCut vinyl cutting tutorial covers mirroring, weeding, and applying HTV with a mini heat press for a stunning handmade candle project.
Setting Up Your Mandala Design for HTV
The first step is selecting a mandala design that you love. I have a subscription to Creative Fabrica as I love their designs. Once on the site, I searched for “Mandala SVG” to bring up Mandala designs to choose which I wanted to use for my project. If you are looking for a different type of design, include the word that describes what you want and add SVG after it to predominantly have SVG files suitable to cut with your ScanNCut in the search.
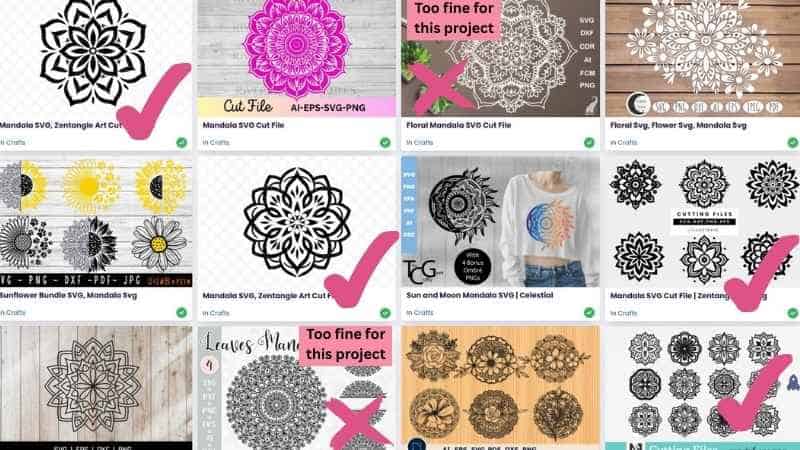
There were SO MANY designs to choose from, and I downloaded a few different designs to play with. Things to look for are slightly thicker designs so that they can cope with some major resizing.
Pictures are designs from Creative Fabrica showing some of their Mandala designs to choose from. There are ticks next to the designs that are suitable for resizing for this project, and a cross next to the designs that are too fine for substantial resizing. Here is the link to the Mandala designs.
Editing the designs in Canvas Workspace
To resize the designs in Canvas Workspace (downloaded version) you select the design, then in the Edit panel, you will see the sizing. Keep the “Maintain Ratio” ticked so that the designs keep their proportions and then adjust to the size of your project. In this case, I edited the designs to 58mm as my tins measured 60mm.
To check how the designs will look on the tins, I created a circle 60mm in Canvas Workspace and placed the 58mm design in the centre. This works like a template, and you can lock the circle in the Layers panel so that it doesn’t move around while you are designing.
Pictured below are the Mandala designs from Creative Fabrica to suit the candle tins. These have been resized in Canvas Workspace, and a template to check the size has been created. This is simply a circle set to the size of the blank candle tin. You can select a shape that suits your project for the same result.

Working with your design on the ScanNCut
Once you have your design ready, you’ll need to bring it into your ScanNCut machine. It’s really important to remember that when you’re working with heat transfer vinyl, you normally mirror your design before you cut it. This is particularly important if there is text in your design. If you don’t mirror it, it will end up backwards when you apply it to the candle, and we definitely don’t want that after all your hard work!
For these Mandala designs, I didn’t mirror them as the designs are the same either way.
Once your design is mirrored, load your mat with the shiny side of the HTV facing down. The shiny side is the carrier sheet and needs to stay intact during the cutting process. In this project, the HTV had been rolled for a while, and I had trouble keeping it flat on my mat. (The mat may have needed to be stickier too.) I taped the HTV firmly with blue painters’ tape.
HTV that I used in the Mandala candle project
For this project I used:
- HTVRont White Glitter HTV
- HTVRont Purple Glitter HTV
- Cricut gold foil, which was also a HTV
Cutting the HTV with Your ScanNCut
Now that your design is ready and your HTV is loaded correctly, you can send the file to your ScanNCut. Depending on your preference, you can do this wirelessly or with a USB. Select the Half Cut setting for heat transfer vinyl so that the blade only cuts through the top vinyl layer and not the carrier sheet. If you’re unsure, I recommend doing a quick test cut as this always a good idea to make sure the blade depth is just right.
Start the cutting process and watch as your ScanNCut works its magic on the vinyl. Intricate designs like mandalas can take a little longer to cut, but it’s so worth it once you see the final result.
Make sure you check that the HTV has been cut completely BEFORE you remove the mat from the ScanNCut. This way, if the design has not been cut fully, you can send it through for a second pass (or even a third pass, if necessary).
Weeding the Mandala Vinyl Design
After cutting, the next step is weeding out the vinyl. Carefully peel away the parts of the vinyl you don’t need, leaving only the beautiful mandala pattern on the carrier sheet. Take your time with this part, especially if your mandala has lots of tiny details. A weeding tool will make the job much easier and help you get into all those little spaces.
I normally use my fingers for the larger sections of weeding and absolutely love the Pin Pen for the more intricate areas that need to be weeded on the design. This pictured Mandala design was actually super easy to weed.
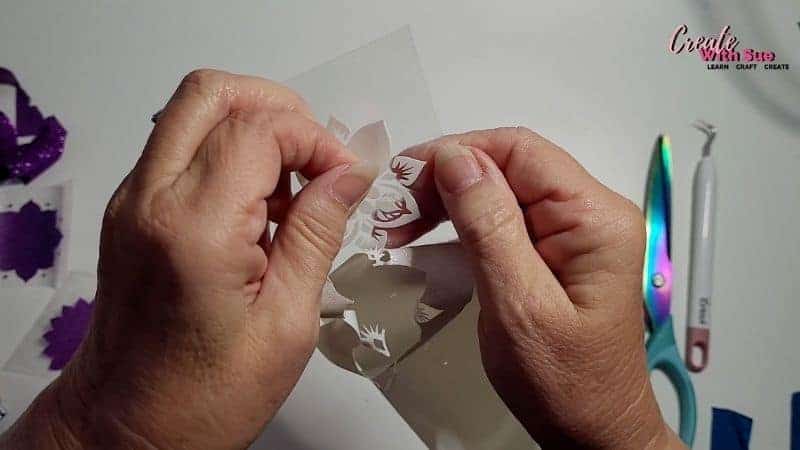
As you weed, keep checking that you’re not accidentally lifting parts of the design you want to keep. Slow and steady wins the race when it comes to weeding intricate HTV mandalas!

Above is the fully weeded Mandala design which was cut in HTVront white glitter HTV. This one was my favorite design from the designs cut during the ScanNcut vinyl cutting tutorial.
Preparing the Candle for HTV Application
Before applying your vinyl, make sure your candle tin is clean and dry. Dust and oils can stop the HTV from sticking properly. I used a lint-free cloth and Isopropyl Alcohol to clean any grime from the surface of the tins.
Position your mandala design onto the candle exactly where you want it. The sticky carrier sheet will help keep everything in place while you work. Double-check that it’s centered and straight because once we start applying heat, there’s no moving it around. Centreing the design was the most difficult part of this project for me as it is NOT my strong point getting objects straight OR centred. LOL
Applying the HTV to the Candle
For this project, using a mini handheld Heat Press is the best way to transfer the HTV onto the candle tin surface. It is also handy if you apply the design to the curved surface of the tin. Start by warming up the heat press, and then gently apply heat over the design. You want to be careful not to hold the heat press too long in one spot.
Here is my HTVRont Mini Heat Press. I use it for all sorts of projects, including most of my appliqué and patch projects. It is ideal for removing unwanted vinyl, small projects, or projects with curves like mugs if you don’t have a mug press.

Pictured above is my HTVRont Mini Heat Press, showing that the press is handheld and has a heat-proof stand to place the hot press down on. It has three heat settings to choose from.
Once the entire design has been heated, let it cool slightly, then gently peel away the carrier sheet. Keep in mind that some HTV is a hot peel, while others are cold or cool peel. The HTV that I used was cool peel.
Take your time with this step. If you find that some parts aren’t sticking properly, simply press the carrier sheet back down and apply a bit more heat to those areas.
Finishing Touches and Tips
After you peel off the carrier sheet, your beautiful mandala candle is complete!
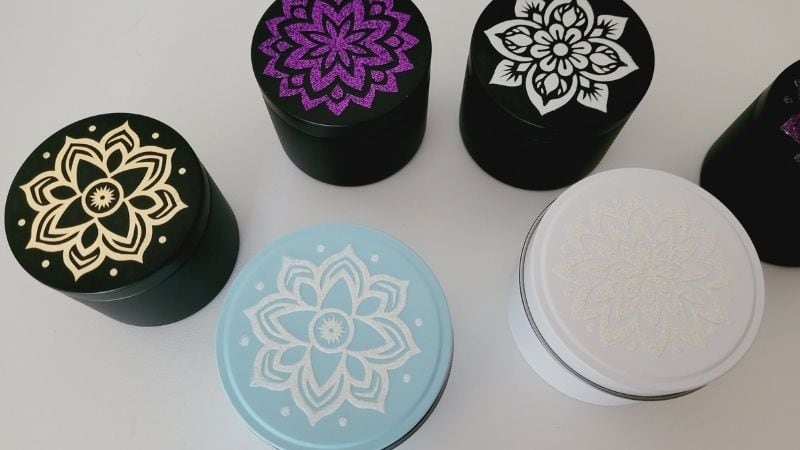
Below are the finished HTV Mandala designs on the candle tins. Shown are the designs created with HTVront brand purple glitter HTV, HTVront brand white glitter HTV, and the Cricut brand gold foil. These heat transfer vinyls are beautiful.
Final Thoughts on the Mandala HTV candle tin project
Creating a mandala HTV candle project using your ScanNCut is such a satisfying way to add a unique addition to your candle tins. While this project focused on using a Mandala design, you could add any design you want to your candle tins. Maybe an initial or monogram, or even a business logo. It’s a perfect project if you’re looking for a handmade gift idea or want to add a personalized touch to your home decor. With just a few simple steps—mirroring your design, cutting carefully, weeding patiently, and applying heat gently—you’ll have a professional-looking candle that everyone will admire.
Thanks for crafting with me today! I hope you found this ScanNCut vinyl cutting tutorial helpful. Happy crafting, and I’ll see you in the next project!
#ScanNCutvinylcuttingtutorial, #mandalaHTVcandleproject, #cuttingHTVonScanNCut, #weedingvinyl, #applying HTV to candletins.
Creative Fabrica
Do you sometimes need a little help in the creative department? You will find so many designs in Creative Fabrica to create various projects. I have a passion for all types of crafting, so when I am on the Creative Fabrica website, I find fonts, SVG files, Embroidery designs, appliqué patterns, and graphics for sublimation projects. They have so much to choose from. Here is my link to the website, where you will find that they also have many free designs and fonts to choose from.
You will even find some of my courses on Creative Fabrica. They are free to access with the Creative Fabrica subscription.