Today we are exploring the new Affinity Designer V2 software which was released on October 30th 2025. Yes, it is very new however I’ve been using Affinity Designer since Version 1 and moved through to Version 2, so Affinity software has been around awhile. When I saw Version 3 released, I couldn’t wait to take a look. This new update brings some exciting changes, a few surprises, and a couple of areas that might still need work. Here’s what I’ve discovered so far.
Disclaimer: As an Amazon Associate, I earn from qualifying purchases. Links included in this tutorial may be affiliate links, Amazon or others, meaning I may earn a small commission at no additional cost. These commissions will help me continue creating content for you. Thank you for your support! Read my very boring full disclosure policy here.
What’s New in Affinity Designer V3
At first glance, many of the tools in Affinity Designer V3 will look familiar although some of the layouts are a little different. The icons have been slightly updated, but the general tools remains much the same, so you’ll feel right at home if you’ve used earlier versions.
One of the biggest updates is that Affinity Designer and Affinity Photo are now bundled together. This integration means you can switch seamlessly between the two programs without leaving your project which a great time-saver for anyone who designs regularly.
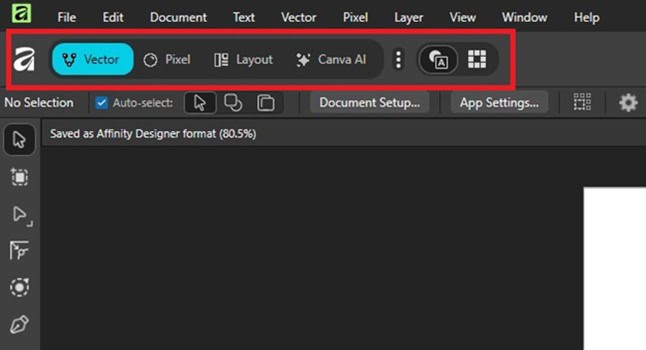
You will find the selections to move between the them up on the top left of the new Affinity Designer V3 software.
Transferring Brushes and Styles from Earlier Versions
If you’ve built up a collection of brushes, textures, or styles from Affinity Designer V1 or V2 like I have, you’ll be pleased to know that you can export them from your previous version and import them straight into V3.
For me, the easiest way was to open Affinity Designer V2 and export the brushes and styles that I had purchased. Then, import them into the new version. If you have purchased brushes from Serif you can also log into your account and access them that way.
It took me around ten minutes to transfer everything over, and it worked smoothly. This means you can start designing straight away with all your favourite tools intact.
Affinity Designer V3 and Canva Integration
One of the more unexpected (or maybe not) additions to this update is that Affinity V3 now links with Canva. The new version is free to use, but you’ll need at least a Canva Free account to access it.
If you’re a Canva Pro user (like me), you’ll also have access to Canva AI features and some premium features in the new Affinity interface. It’s an interesting combination bringing Canva’s AI tools into the powerful vector and photo editing world of Affinity.
Testing the New Tools
A few new tools have been added to Affinity Designer V3, and two that stood out straight away are Background Removal and Image Trace.
I tested the Background Removal tool first, and it worked beautifully on my first few images. It’s fast and accurate and a great improvement for anyone who does print-and-cut or digital artwork. Unfortunately, the Background Removal is a premium feature and needs a Canva Pro account to use. You can tell the premium features by a little crown next to the feature. If you already use Canva you will note that it is the same crown they use for their premium elements and tools
My first impression of the Image Trace tool didn’t impress me as much. I was really looking forward to this feature, however the first few test PNGs didn’t produce clean results and I was feeling really disappointed. I have since tested this feature more and discovered that some files are better than others. While you can remove excessive node … it is quite manual. One of my test graphics when I looked at the nodes was totally covered in nodes. Too many nodes is a cutting machine nightmare!
Hopefully a bit more practice by me, plus potential updates from Canva will improve Image Tracing in Affinity Designer V3 for cutting machine and laser cutter crafters.
My thpughts… At this stage, Canvas Workspace and Sure Cuts A Lot 6 (SCAL6) still seem to produce better/easier traces for the ScanNCut.
Should You Update Now?
If you’re currently using Affinity Designer V2, there’s no rush to switch. Serif recently released an update for Version 2, so it will continue to run well for the time being.
That said, if you’re curious and want to explore the new Canva integration and tools, Affinity Designer V3 is definitely worth a look. The fact that it’s free makes it an easy upgrade to experiment with. I have been able to use either version so far. Plus, Canva have offered some free fonts for those of us with existing Affinity Designer V2 software so that is a bonus. They have indicated that the fonts will be available over the next few weeks. (you all know I am a font junkie LOL)
Something to think about – the files saved by Affinity Designer V3 are .AF whereas V2 files are .AFDESIGN. You will already know what I am about to say… no backward compatibility. This is not unusual for software and is no different when we upgraded from Affinity Designer V1 to Affinity Designer V2. Just something to keep in mind.
Exporting SVG designs from Affinity Designer V3
I have tested a variety of settings so that the SVG designs export from Affinity Designer V2 and import into Canvas Workspace the exact size they are meant to be. One of the designs that I tested was this design below from Creative Fabrica. It actually turned out the best so far with the Image Trace feature.
The picture on the right is the silhouette of the graphic in SVG format. You will see the settings that I used to export the SVG file. (I tried all the options I could LOL). Some exports have been exact and others slightly off. This is still much better than the tiny SVG in the top left corner that some of the options give. If you find a better setting please let me know in the comments below and I will happily test that too. Those who have a Cricut, these setting should work with one minor change… Raster DPI to 72 instead of 96. I haven’t had a chance to test anything in Design Space as yet.

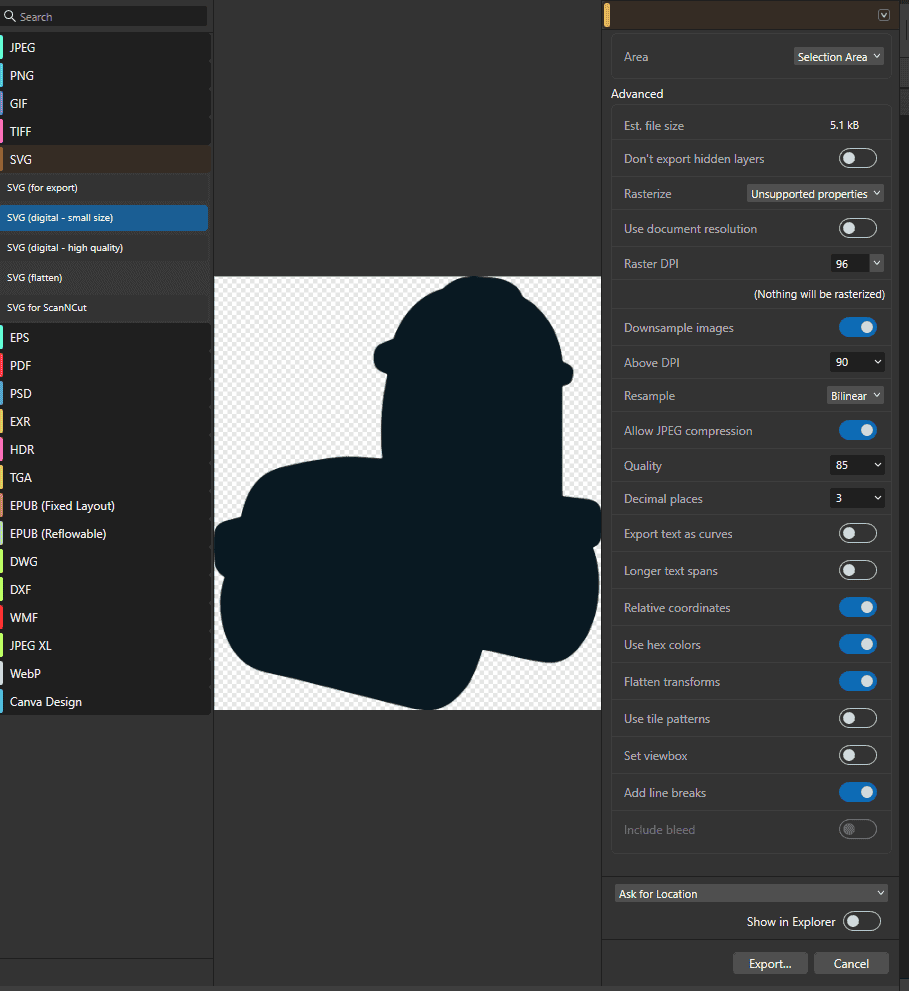
This construction vehicle came as a PNG design in a bundle from Creative Fabrica. You will find them here. (He’s cute isnt he!)
My Next Steps with Affinity Designer V3
I’ll be doing lots more testing and sharing my results, especially around the Image Trace feature to see how it performs with different file types.
Comment below if you are interested in more information about Affinity Designer and how to use it. I’ll update you with more information once I’ve explored Affinity Designer V3 in more depth and have a better sense of what’s working best for cutting machine users and digital designers.





I bought the Affinity package when it came out. I never realized Canva owned Affinity. I also have a Canva Pro account. I’m interested in hearing more of your thoughts on this & working with my Scan N Cut.
Hi Yvonne, I really like using Affinity Designer for many purposes. Canva purchased the Affinity suite a fair while back and V3 is their first release of any major updates to the packages. My understanding is that the team from Serif, who initially developed the Affinity software suite were still working with Canva on supporting the software. I am not certain if this is still the case. As far a working with the ScanNCut, I had exporting the SVG designs down pat and they imported correct size into Canvas Workspace. Then the V3 update came and I have had to tweak some of my settings. At some point I will build on this intial review.