
This Vintage T-Shirt – HTV project is a great bit of fun. I have made this one for a birthday gift and it is really easy to do in HTV however you could also create it by sublimating the design.
The T-Shirt that I have purchased is a dark color and also 100% cotton so in this instance, not suitable for sublimating but GREAT for HTV (Heat Transfer Vinyl)!
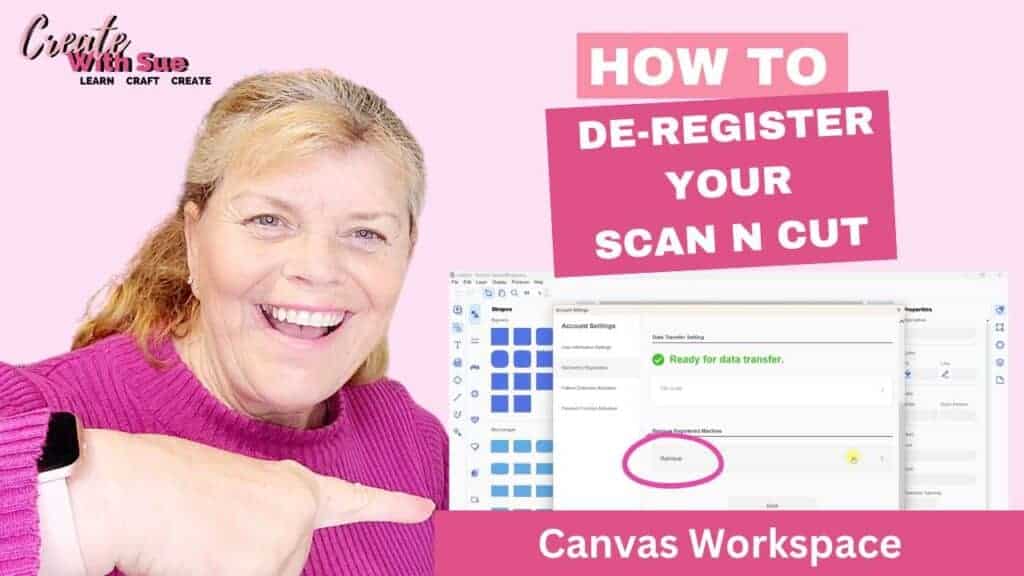
Disclaimer: As an Amazon Associate, I earn from qualifying purchases. Links included in this tutorial may be affiliate links, Amazon or others, meaning I may earn a small commission at no additional cost. These commissions will help me continue creating content for you. Thank you for your support! Read my very boring full disclosure policy here.
What do you need?
- Heat Transfer Vinyl – about 11″ or 28cms
- T-Shirt – any color and size that suits your project
- Heat Press (or iron if you have nothing else)
- Weeding tools
- Cutting machine – I used my Scan N Cut
- Design – This project is on the Vintage T-Shirt – HTV SVG design
Choose your design
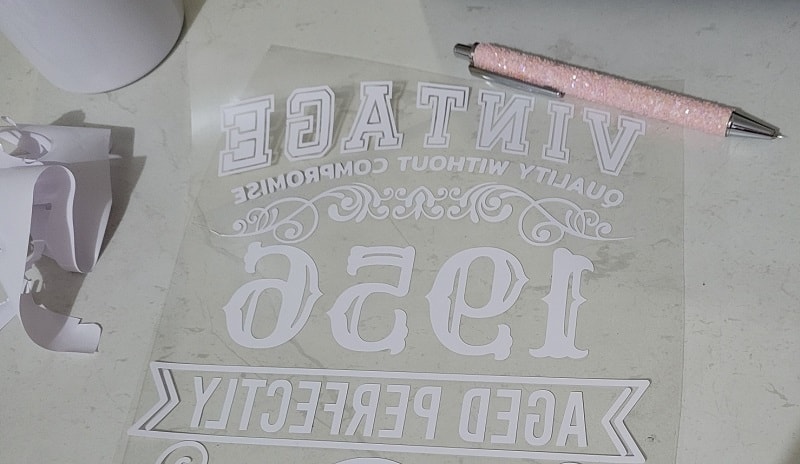
I used a Vintage 1st Edition design which is available on Etsy and selected the 1956 version. It is available in 1957, 1958,1959, and 1960 as well.
Download your design and bring it into Canvas Workspace. You can import it directly to the Scan N Cut if you prefer however my preference for checking any design is the downloaded version of Canvas Workspace.
In the software you can see clearly how to design will look and potentially cut. You can check for unwanted areas or lines that are meant to be dashed and might cut the full solid line instead and, it is marginally easier to resize if necessary too.
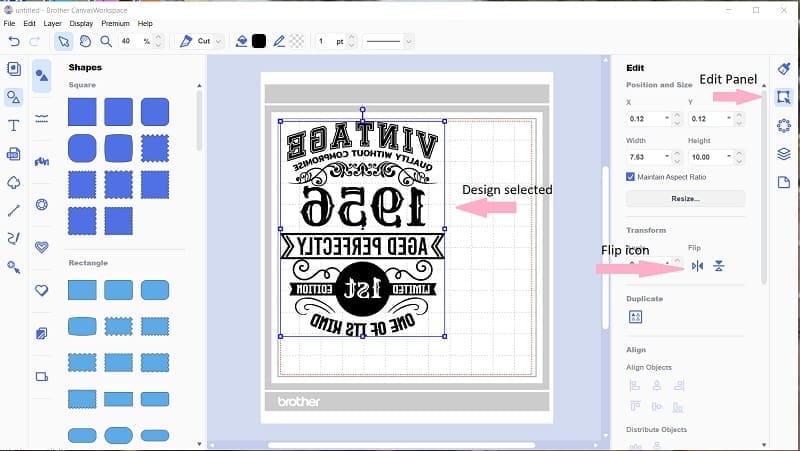
T-Shirt HTV design in Canvas Workspace
To bring the design into Canvas Workspace go to “File” and scroll down to “Import From Your Computer”. Then look to locate where you downloaded the file to. If you are having trouble finding it, in most instances, your computer will default to placing files directly into the “Download” folder.
Your file is probably in a zipped format – Most SVG files are in a zipped format to ensure that they upload to various platforms and download nicely in a .ZIP format. If you need help unzipping your design check this tutorial out.

Above is what the design looked like inside Canvas Workspace.
Things to note: – On the left, you will see arrows pointing to the File menu to import your design. There is also the option of choosing the SVG icon partway down the left-hand menu. This is a shortcut to import files if you prefer to use it.
In the right-hand menu, you will see the Edit panel where you can resize the design to suit your project. The design imported in at just over 10″ and I reduced the size to 10″ exactly. Your design will need to be selected prior to any modifications. The relative icons only activate if your design is selected and you are able to perform the activity they relate to.
To select the design simply click once on it.
Mirror your Vintage T-Shirt – HTV design (DON’T FORGET)
Thinking I am over exaggerating with the capital letters?
Nope, LOL. This is one thing that is SO easy to forget. I periodically still do it myself OR just catch myself at the last second.
You can flip your designs in Canvas Workspace or if you forget and get as far as your Scan N Cut, you can go into the Edit feature on your machine and flip there.
Phew! Lucky that feature is in your Scan N cut as a backup.
Flip is the same as Mirror however you will see in the picture above that it is called Flip in Canvas Workspace. It can be found in the right-hand Edit menu and once again, you need to select your design.
Cutting a design out of HTV your design will need to be flipped, particularly if it includes text in it.
Export to your cutting machine
In Canvas Workspace you use the “Export/Transfer FCM file” selection also found under the top “File” menu. . From there, you are able to choose HOW you send it to your Scan N Cut. I personally love sending via WiFi however if your Scan N Cut is a little older and does not support WiFi then exporting to your computer and directly onto a USB disk is perfectly fine too.
It is easy enough to take your USB flash drive to your Scan N Cut, pop it into the USB slot and choose from the main menu.
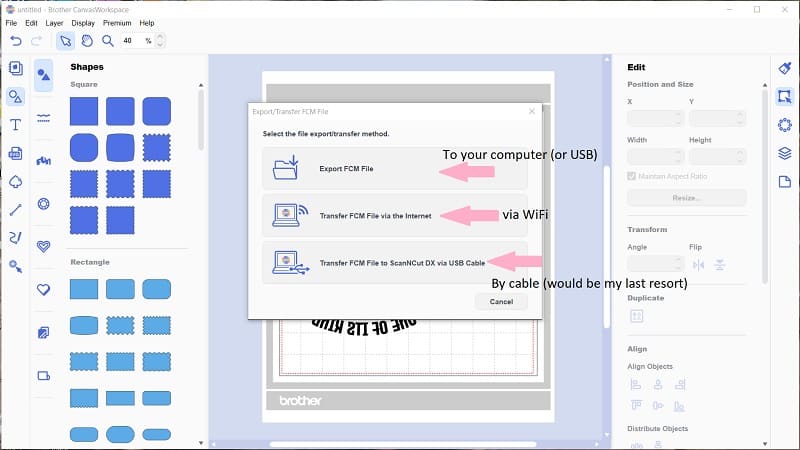
As you can see in the picture, there are basically three choices on how you send your design file to your Scan N Cut. The top one is to your computer / USB flash drive. The center choice is for WiFi and the bottom selection is for the later models via cable.
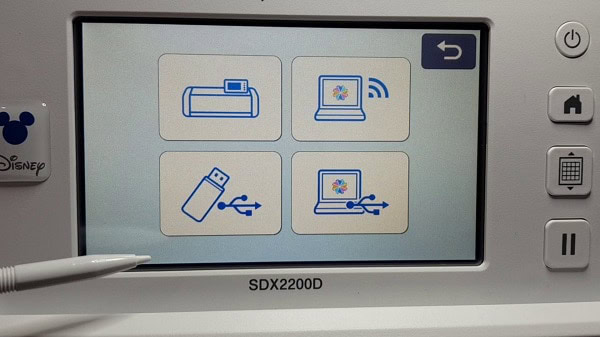
Import your Vintage HTV design into your Scan N Cut
Below are your options to import your design on the sDX2200D Scan N Cut. The top left is opening a design from within your cutting machine, on the top right is WiFi, the bottom left is from USB (my USB port is on the right-hand side of my machine) and finally on the bottom left is via cable.
And below is the screen for the CM900 Scan N Cut. As you can see, not a great deal of difference.

Placing your material on the mat
The first thing to figure out is which side of the vinyl is placed against the mat. In most instances, it is very easy to determine with the SHINY side going against the mat so that the duller side is facing up. The dull side is the side that goes against the material when you press your design on. This is the reason why you mirror or flip your design when using HTV.
You also need to ensure your mat has enough ” sticky ” for your project. I have just purchased a new SDX mat, my first in about 18 months. Too sticky is almost as big an issue as not sticky enough. It took me a number of attempts to get my vinyl onto the mat STRAIGHT. So much so that my partner came in to see what was going on! LOL
If your mat isn’t quite sticky enough check out this information on mats.
Too sticky is not a big issue for HTV as the carrier sheet is very sturdy although it may have made a good funniest home video outtake in my case. Cardstock is another thing entirely and is something to be very careful about or you may end up leaving half your cardstock on your mat. The info on mats covers that issue too.
OK, so we have the HTV shiny side down on the mat and we are ready to look at cutting the design out.
Cutting your design
Once you have your design over to your Scan N Cut and your mat loaded you are ready to cut your project out. If you have a DX model Scan N Cut, remember to choose the Half Cut option. I always do a test cut, especially if I haven’t used the particular material that I am cutting for a while or ever. The DX models do a great job of auto-selecting the blade depth however not 100% foolproof. On the SDX Scan N Cut models, you are still able to tweak pressure and speed if needed.
Pressure will adjust the cutting depth of the blade slightly and may be the difference between your material not quite cutting through far enough or a little too far. Adjusting the speed may assist you with a cleaner cut (resolving problems with materials tearing). Both of these settings can be found within the Half Cut setting.
NOTE: there are two places where you can adjust speed and pressure. The Half Cut has its own settings to tweak.
I have a full tutorial on setting up the Half Cut on the Scan N Cut DX models if you need more information.
If you have a CM model, the depth setting is created manually by you. No biggy however much more important to use the test cut feature. My advice is to start with a lower number on your blade holder, do a test cut and then gradually increase or decrease as required testing each setting.
After you have had a successful cut, write the setting down either on the back of that vinyl or in a notebook ready for next time.
Ideally, when cutting HTV or normal vinyl, you only cut through the top layer of the HTV/vinyl and not into the carrier or backing sheet.
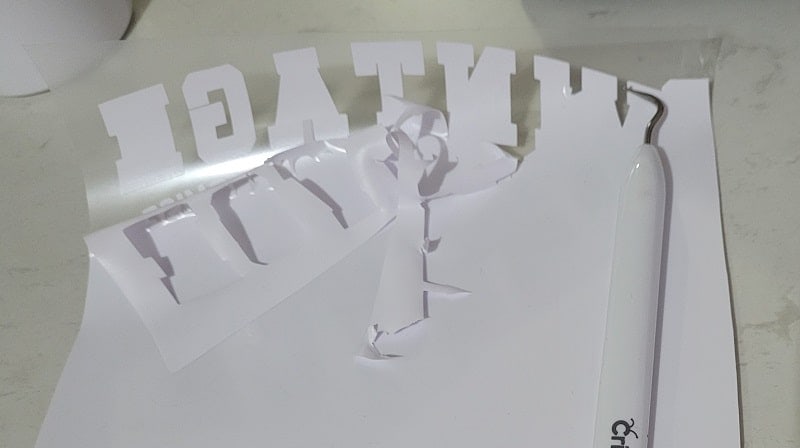
Weeding your design
Weeding your design can be quite fun. HTV is particularly easy to weed although if your design is intricate, you could easily miss weeding a small area of your design. (I often have this happen)
For a darker color HTV, you could try using a light sprinkle of cornflour or baby powder to highlight the cut lines. If you cut it in white like I used you might consider a Light Pad. I have been eyeing off this Light Pad as it has magnets to hold your work down…. still undecided.
TIP: If you have trouble with your HTV curling while you are trying to weed it you could try leaving it on your mat OR taping it down to your bench or a table. All these methods work for reducing the rolling issue but not the visibility issue.

These are my weeding tools. The bottom one is a Cricut weeding tool and is great for most weeding. The top one is called a Pen Tool… fantastic for more intricate weeding as it has a much finer point to access thinner weed areas. I am a bit of a sucker for bling …. there are many Pen tools for weeding on the market however I figured this one was blingy enough that no one would mistake it for a real pen and borrow it! So far so good.
TIP: It is really easy to miss sections of your design that need weeding. Have a picture handy of the design to help guide you to weed the correct areas.
If you make any major errors, there is probably a fix for it. Take a look at my big list of fixes when you get a chance.
Weeding order
I usually weed the larger areas first and then the smaller, more intricate areas. There are no rules for this and either way that you prefer is fine.
TIP: Cut off any extra unwanted pieces of vinyl as you are weeding them if they are getting in the way. This is particularly useful for normal adhesive as it is so darn sticky and easy to get into a sticky mess. HTV is not sticky so it is much easier and more manageable to weed.
Placement of the HTV on your T-Shirt
Working out what size to create your design for various HTV projects can be difficult so I have created an approximate guide for you. It covers various clothes sizes that you may need depending on your project.
These are approximate sizes mentioned in the guide so keep in mind that the exact size may differ depending on the brand and fit. It is always wise to check the proposed size with a tape measure to double-check it is about right.
I elected to cut my design at 10″ and the Vintage T-Shirt HTV design imported in at 10.29″. Being an SVG file you are easily able to resize the file up or down.
NOTE: Always keep in mind if you reduce the size of any design by a significant amount, it may make sections of the original design more difficult to cut out as the cut line width will decrease causing finer lines.
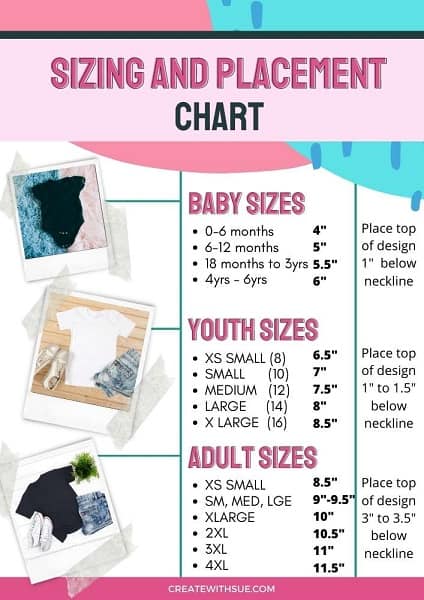
BONUS: You can find this Printable in my Resource Library so you have it on hand whenever you need it.
TIP: A lint roller can be a handy item to remove any hair or unwanted lint from your fabric. I just used a cheapie!
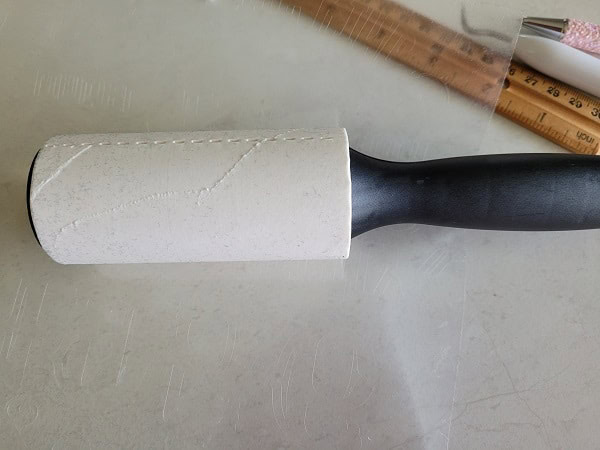
You can see there was a fair amount of loose lint on my T-Shirt.
Pressing your T-Shirt
Time and temp are two important factors when pressing any HTV design. Often you will find that the manufacturer has recommended both time and temp for their products. This is ideal for you to start with. If you cannot remember what brand HTV you have used or the time and temp, press for less time and then add more heat.
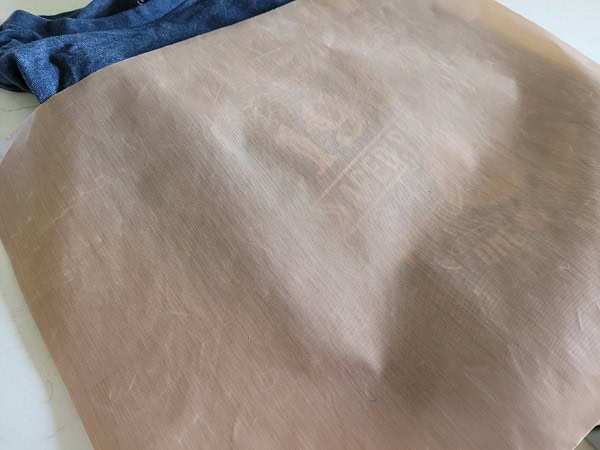
The time that was recommended for the brand HTV that I used was 15 seconds and the temp at 305F (150C). I actually ended up using a slightly higher temp and pressed for more than 15 seconds. I also pressed a second time after I had removed the carrier sheet using a Teflon sheet between the press and the project.
Different types of vinyl may need additional time. Also, some types of vinyl are cold peel and others hot peel. The one that I used today was hot peel.
Work on the principle that less is better and that you can always heat more if needed.
TIP: Write the time and temp on the back of the carrier sheet with a sharpie for easy access. It is so easy to forget these things.

I love Teflon sheets. The first one I purchased was many years ago to create Applique and Embroidery projects using iron on fusing similar to Heat n Bond. They used to be very expensive however these days… a bargain and well worth the investment if you don’t have one.
Finished – The Vintage T-Shirt in HTV
After you remove the carrier sheet, check that the HTV has adhered properly to your project then you are done!
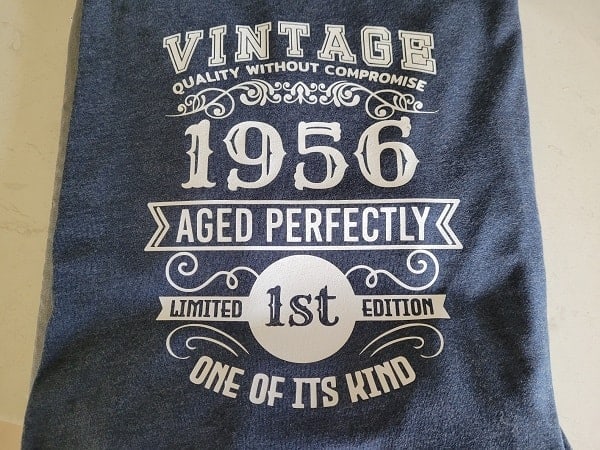
Overall I was fairly happy with my Vintage T-Shirt. Not perfect – never mind, you get that. Do not ever be too critical of the projects that you create.
They are craft!
Remember, we can be our own worst critics! This is because we know exactly what was not completed to our satisfaction.
Happy creating!!!

Join me on Facebook
Welcome to Create With Sue Facebook where you can make friends, share your creations, and ask questions for additional assistance.
Join me in the Scan N Cut – Let’s Create With Sue Facebook group.


Rejuvenate Old Jeans with HTV and Your ScanNCut
ScanNCut Vinyl Cutting Tutorial – Mandala HTV Candle Project

Personalized Money Boxes – Great Gifts – DIY ScanNCut
Personalized Money Boxes are ideal for Gifts and can be easily created with the Scan N Cut Looking for a unique and…


Hi Sue
Thank you for that imformation.It looks really great. I always wanted to know how to do that. I still want to know how to do my own Rhinestones designs.
That will be really appreciated if I could do a you tube on that.
Thank you again,
Regards
Caroline
Hi Caroline, pleased that you have enjoyed the T-Shirt tutorial. I have a couple of tutorials on Rhinestones. One is about software and ways to create Rhinestone projects and the other includes a video on creating designs using the Brother Rhinestone kit. I will look into creating a design project without the kit for you. 🙂
This one has information on creating Rhinestone projects with the Brother kit https://www.createwithsue.com/activating-the-rhinestone-kit-scan-n-cut/ at the bottom of the tutorial there is a video on using included designs that came with the Rhinestone kit and also about creating designs from scratch.
And then this one is more about software https://www.createwithsue.com/rhinestone-kit-and-the-scan-n-cut/
Thank you for such a great tutorial I’ve been wanting to try HTV vinyl for such a long time and have just ordered a heat press. Your tutorial was so informative I am now confident enough to have ago myself. Thanks again Sue you are a star x
Hi Sharon, thank you so much for your kind comments. Vinyl projects are great fun to make and I am certain you will love creating them. I have more vinyl tutorials that include tips and fixes. Check them out. AND.. “remember to mirror” 🙂 Happy creating, Sue
Hello Sue, I would like to purchase your vintage HTV pattern however I am more vintage than the oldest year offered (1950). Are other years offered. If these are vintage I am ‘Ancient/’
Hi Dorna, I also have from 1940 all the way to 1950 is that is helpful? Let me know what year you are after and I can upload it for you. If you need an earlier year I can add it to the desing collection, it will just take me a little longer to do the artwork 🙂
Thank you for a very detailed tutorial. It turned out great!
That’s wonderful to hear! Thank you so much for letting me know. I am really pleased that it turned out well for you. 🙂