Would you like to make a special thank you card? Create a thank you card with your Scan N Cut for that special person. This tutorial shows you the steps to create your thank you card and includes a free template. There is also a Scan N Cut video tutorial to show you how to work with layers using the downloaded version of Brother Canvas Workspace.
- Choosing the file
- What do you need
- Let's create a thank you card
- Upload your file to Canvas Workspace
- Online version of Canvas Workspace
- Scan N Cut video tutorial
- Ready to put it together?
- Add some depth to the card
- Embellishments
- Inside of the thank you card
- Universal Pen Holder for your Scan N Cut
- Designer envelope for your thank you card
- Join me on facebook
- Scan N Cut Basics Course
This post contains some affiliate links for your convenience (which means if you make a purchase after clicking a link I may earn a small commission but it won’t cost you a penny more)! Read my full disclosure policy.
Choosing the file
This tutorial can be used with any files that you choose to use. This includes Brothers Scan N Cut free files in FCM format files or any SVG files. If you would like, you can also choose to create your thank you card and using your Scan N Cut by downloading the FCM file from my free template from the Resource Library.
What do you need
First up you will need cardstock. I used one piece of simple white A4 card for the main section of the thank you card, highlighting the wording “thank you” with a brighter colored card. I also used some scraps I had of green for the leaves and stem and a small piece of textured white card to build the design up. Three pearl embellishments for the flower centers. The best thing about craft is that you can put whatever appeals to you on the front of your card.

Let’s create a thank you card
Either download the file from my Resource Library or use a file of your choice. Your file potentially will be downloaded as a zipped file. If you need instructions on how to unzip your file check here.
Upload your file to Canvas Workspace
Are you still a little confused by which version of Canvas Workspace is which? Read here for more information on which Canvas Workspace and the differences.
Once you have your file you then need to upload it to Canvas Workspace. If you need assistance with this step, get more information on how to upload an SVG into Canvas Workspace.
This is how the thank you card will look on your Canvas Workspace layout mat (downloaded version).

Notice that files often come in with the pieces overlaying each other. From this point, you will need to send only the pieces of your thank you card that you need over to your Scan N Cut. Using the Layers panel ( see the video tutorial below ) makes this very easy however you can do it in the online version as well.
Online version of Canvas Workspace
The online version of Canvas Workspace does not have a Layers panel so you need to manage this step a little differently. It can be done a few ways.
Separating the pattern in online Canvas Workspace
One way is to select the pattern pieces that you don’t want to cut in the first pass and delete them. Yep, delete… you need to make sure that you have a saved copy of the file and remember DON’T save over it. Send the parts that you want your Scan N Cut to the machine, in this case, it might be the main part of the card. You can send it via wifi if you have that option or using a USB. If you are using a USB the next alternative is a better option for you.

The picture above is the online version of Canvas Workspace with only the main section of the thank you card left on the mat after the other rectangles and flowers etc have been removed.
Once you have cut the first round of the pattern, hit the back button or UNDO and your deleted pieces will pop back onto your screen and you can repeat the process with the next pieces of the pattern to be cut.
Repeat until you have all your pieces cut out.
Separating the pattern on your Scan N Cut
You can achieve the above steps on your Scan N Cut as well. This is actually the method I use the most as I have wifi and the pattern is remembered. It is also the easiest way if you are using a USB.
The principle is exactly the same as the first method I went through. Bring the entire pattern onto your Scan N Cut screen and delete the pieces that don’t fit on your mat. Cut out the first round of pattern pieces and then once that is complete hit the home button and remove the pattern from the screen. Download or open from USB the complete file again and repeat the process until all the pieces have been cut out.
Scan N Cut video tutorial
Then there is the downloaded version of Canvas Workspace.
This video shows you how you can create your thank you card working with layers. You still only send the pieces of the pattern as you need them to your Scan N Cut, however, using the Layers menu makes the process a little easier to create your card.
Ready to put it together?
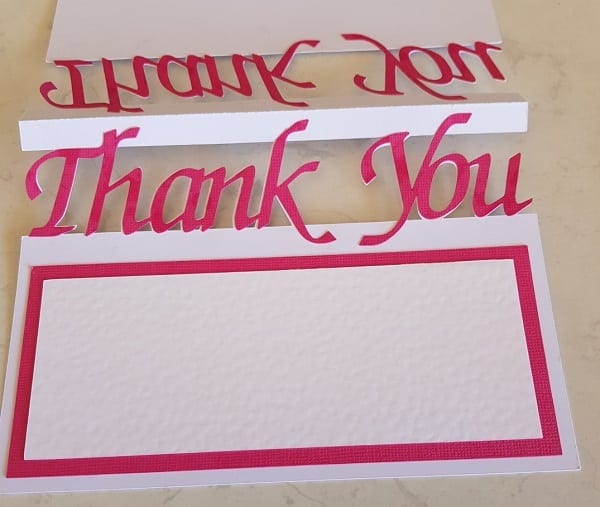
Ok, so you have all the pieces of your thank you card cut out and ready to put together. This is easy enough. Now, this particular design is a little flimsy at the top section of the card due to the fact the ‘thank you’ is quite fine with a lot of the cardstock cut away. Once you have added the next layer (pink) of ‘thank you’ it is much sturdier.
Until then, just be a little careful.
I cut out two of the pink thank you sections so that I could place one of the front of the card and the other on the back. The first was cut the right way around and the other flipped so I could place it on the back.
Another alternative would be to cut two of these the right way around and put one on the front and the other on the inside of the card. I had a hard time choosing which way to do it. Maybe that is when you create lots of the same card so that you can have it lots of different colors and embellish them all differently. LOL
Fold the thank you card in half on the dash lines and then glue the thank you pieces on. Let them dry or they will move when you do the next section.
Add some depth to the card
A great way to add depth to the card is to cut a couple of smaller shapes and build your project up. In this case, the shapes are rectangles. Add the colors of your choice to make your project POP. Another option is to use double-sided foam tape. This will lift your layers and provide even more depth. Don’t get too enthusiastic with adding higher and higher layers…. I have in the past and sometimes less is more.
Embellishments
I love this part. Get creative and add what you would like to the front of the card. I added flowers with pearl centers as photographed. Have fun with this bit!
Inside of the thank you card
Something a bit special is required for the inside of the card too. I cut another rectangle using the same rectangle pieces in the template however before I cut them, I added the sentiment to them. In the video, I show you how to change the cut lines to draw lines. Use this technique to write what you would like in the card, making sure the writing fits within the rectangle.
TIP: Note that in the online Canvas Workspace you have a choice of cut/draw, cut, and then draw. You also have a ‘fill the area with the drawing function’. This will fill in the text instead of drawing around the outside of text. If you want to know more about fonts and working with text, I have put together information where you can get free fonts. It includes how to install them, single line fonts and also some tips.

This is what I wrote in my thank you card however I always have a bit of trouble with what to say and don’t seem to be very creative in this area.
Universal Pen Holder for your Scan N Cut
While you can use the drawing tool that usually comes with your Scan N Cut, there is also the option to purchase the Universal Pen Holder which opens up opportunities to use other pens and colors. I used a bright pink pen to match the cardstock. This is what the Universal Pen Holder looks like.
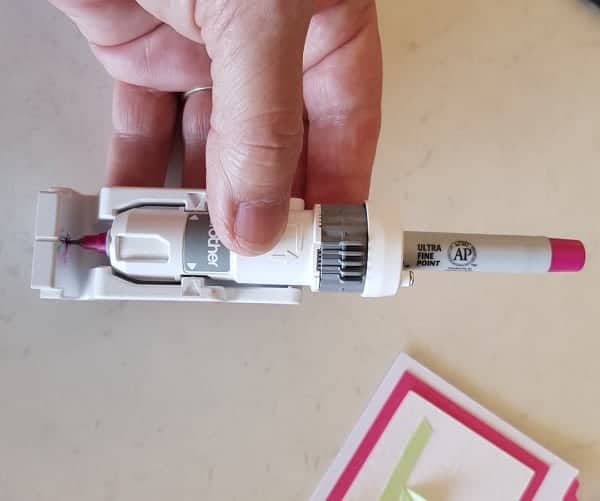
The photo is with the Universal Pen Holder in the additional piece that comes with it to enable you to set up your pen to the correct depth. The additional piece is removed once you have tightened the pen into the holder and the holder slots into the Scan N Cut in place of the cutting tool. Select draw instead of cut on your cutting machine.

And of course, I added some more embellishments. This is where I thought I should have added the additional pink thank you on the inside of the card. I possibly could have had all three thinking about it.
Designer envelope for your thank you card
In the Resource Library there is a free envelope template that can be used for this thank you card. There is also a tutorial to assist you to create your own envelope and make it larger than normal.
I hope you have enjoyed this tutorial. If you aren’t already a member of my facebook group please join me.
Happy creating,


Join me on facebook
Join me in the Scan N Cut – Let’s Create With Sue facebook group.
I would love to see you there.
Scan N Cut Basics Course
Would you like to learn how to use your Scan N Cut to gain the most from it?
A free course is available for you – check out what is on offer!