Today we will look at creating the Main Street Magic Advent Calendar SVG Bundle from Dreaming Tree. We will cover managing the design files in the downloaded version of Canvas Workspace. Now, before I go any further, I will warn you that this project is NOT for the faint-hearted. It is however AWESOME and well worth the time and effort to complete it.
There are three buildings in this project. The Couture Corner is the smallest of the three, the Gift Emporium, and lastly, Timeless Treats. I recommend completing them one at a time.
While my main focus for this project is creating it with a Scan N Cut, much of the information is relevant to other cutting machines.
Video tips to make it easier to create the Advent Calendar.
This video was created to provide you with some helpful tips to create the Advent Calendar. It focuses on downloading the files and the best way to use them in Canvas Workspace. I have included the Dreaming Tree Assembly Videos at the bottom of this tutorial for assembly. Dreaming Tree create awesome assembly tutorials however they do not cover the Canvas Workspace component.
Disclaimer: As an Amazon Associate, I earn from qualifying purchases. Links included in this tutorial may be affiliate links, Amazon or others, meaning I may earn a small commission at no additional cost. These commissions will help me continue creating content for you. Thank you for your support! Read my very boring full disclosure policy here.
Materials Needed:
- Main Street Magic Advent Calendar SVG Bundle from Dreaming Tree
- Brother Scan N Cut Machine.
- Cardstock approximately 60 sheets of 12×12 in various colors and textures
- Adhesive (glue) I like this one.
- Bone Folder for crisp folds
Finished sizes of the buildings
- The Gift Emporium – 12.5” H X 6.75” W X 4.5” D
- Timeless Treats – 13.25” H X 6” W X 4.5” D
- Couture Corner – 11” H X 6.5” W X 4.5” D
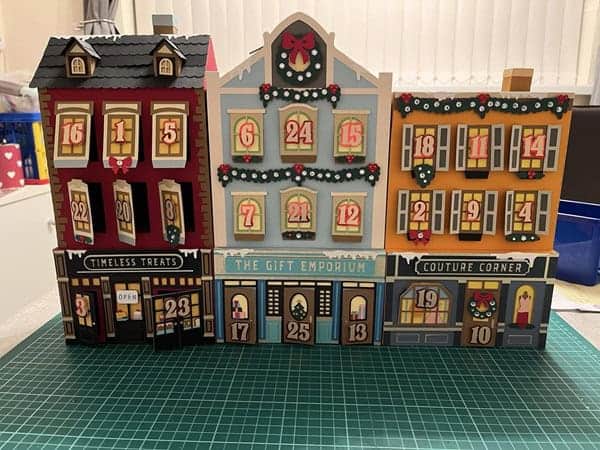
Dreaming Tree Main Street Advent Calendar
This is the Main Street Magic Advent Calendar finished project created by Mei Chen Evans. Hasn’t Mei done an amazing job of the project? It is such an amazing project to create.
Preparing the Advent Calendar files for cutting
Download and Upload SVG Files
- Download the SVG Bundle from the Dreaming Tree website.
- Unzip the downloaded files. This is demonstrated in the Video below.
Importing the Advent Calendar into Canvas Workspace
For this section, please watch the above video as the project is quite complex (which is why I made the video 🙂 )
Prepare Your Materials
Select Your Cardstock:
- Choose the colors and types of cardstock that match the design and theme you want for your advent calendar. Personally, I loved the color selection that the Dreaming Tree used however I would love to see what your project turns out like. Will you use different colors?? Share a pic in our Facebook group.
- Transfer the SVG Files to your Scan N Cut machine from Canvas Workspace. You can do this via USB, or directly from your computer using Brother Canvas Workspace over WiFi.
- Place the Cardstock on the Cutting Mat.
Setting Up the Scan N Cut
- Ensure the cardstock is securely adhered to the mat to avoid any movement during cutting. Make certain the mat isn’t too sticky. Here are tips to manage your mat and make it either stickier or less sticky. It includes information to repair it as well.
- Adjust Cut Settings:
- Check the blade depth with the Test Cut and then adjust according to the thickness of your cardstock if needed. Performing a Test Cut ensures your settings are correct and that the blade is cutting through the cardstock cleanly.
- Cut Speed and Pressure: Start with default settings and adjust as needed after test cutting.
- Ensure Fold Lines are Set Correctly: Before cutting, ensure all fold lines in the design are set to Draw or Dashed Lines. This will help guide your folds after the pieces are cut.
Cutting the Pieces
Work on one building at a time and ensure that you keep the pieces together. There are a LOT!
- Start Cutting: Begin cutting each piece of the advent calendar. Follow the instructions in the SVG bundle, cutting each design from the correct color of cardstock.
- Weed the Pieces: Carefully remove any excess paper from the intricate cuts. You can poke out pieces that don’t come out easily using your weeding tool.
- Scoring: If the design requires scoring, either use your machine’s scoring tool or manually score using a scoring board and a bone folder. The Dashed version of the file looks like a good choice.
Keeping all the pieces together is very important with this project due to the number of small pieces required for each house. Mei kept hers in a clear pouch which is a great idea as you can see the pieces the pouch contains. Make certain that you don’t mix the pieces up!

Assembling the Advent Calendar
This is a basic list of steps. I highly recommend that you watch the Dreaming Tree Assembly Videos for this project due to its complex nature. You will find the links at the bottom of this tutorial.
Basic Assembly Steps
- Fold and Crease: Use a bone folder to create crisp folds where needed, following the fold lines on each cut piece.
- Glue the Pieces Together:
- Begin with the base structure of the advent calendar.
- Attach each of the numbered boxes or compartments to the main structure.
- Use a strong adhesive to ensure everything is securely attached.
- Add Embellishments: Customize your advent calendar by adding any additional decorations or embellishments to give it a personal touch. Mei altered the clock slightly AND added a Dreaming Tree Santa Sleigh to the top of the building (not pictured). Mei placed it on the Couture Corner Building and it was such an appropriate addition.

Two of the Advent Calendar’s buildings completed by Mei Chen Evans
Finishing Touches
- Check for Stability: Ensure that all parts are securely attached and that the calendar stands or hangs properly.
- Fill the Compartments: Add small treats, notes, or gifts to each compartment for the days leading up to Christmas.
Showcase the Finished Project
Using a battery-operated Tealight candle can be a great addition to your project. I will add that extra pizzaz for a special effect. Mei’s advent calendar will look superb at night.


- Display the Finished Advent Calendar in your home or give it as a thoughtful, handcrafted gift.
- Take Photos or Videos! Remember to take pictures of your completed project to share with your online community, friends, or social media followers. Everyone will be in awe of this project. We would love to see the finished project in our Facebook group.
Conclusion
You’ve successfully created the Main Street Magic Advent Calendar using your Scan N Cut! This detailed project is a wonderful way to combine creativity with the precision of your cutting machine, resulting in a beautiful and festive holiday decoration. Enjoy the process and the joy it brings to those who receive or use the advent calendar!

This is the finished Main Street Magic Advent Calendar created by Mei Chen Evans.
Happy creating,

The Dreaming Tree Assembly Videos
Here are the links to the Dreaming Tree Main Street Magic Advent Calendar assembly videos. These are well worth watching.