The Brother ScanNCut scanning mat is a game-changer for crafters who love to turn their drawn designs or photos into cut files. If you’ve ever wished you could scan a delicate drawing, lace pattern, or even a sewing template and then cut it precisely with your ScanNCut machine, this specialized mat is designed just for that purpose. But is it perfect? Let’s take a closer look!
Disclaimer: As an Amazon Associate, I earn from qualifying purchases. Links included in this tutorial may be affiliate links, Amazon or others, meaning I may earn a small commission at no additional cost. These commissions will help me continue creating content for you. Thank you for your support! Read my very boring full disclosure policy here.
What is the Brother ScanNCut Scanning Mat?
This scanning mat is designed exclusively for scanning materials—not cutting. The scanning mat is not sticky like the Standard mat or Low Tack mat and you cannot cut on this mat at all. Unlike standard cutting mats, this one features a fixed transparent cover sheet that helps secure delicate items without sticking them to the mat’s surface.
The scanning mat makes it possible to convert vintage artwork, hand-drawn sketches, appliqué paper patterns, and other intricate designs into digital cut files that can be saved and used over and over again.
Key Features:
- Scan to Create Cut Files – Turn hand-drawn designs, photos, or printed patterns into digital cutting files.
- Designed for Delicate Materials – Ideal for scanning items that you don’t want to be damaged by the regular sticky mats for example: photos, thin papers, and precious or delicate items.
- Reusable 12” x 12” and 12″ x 24″ Mat Sizes available – Provides a decent scanning area for a variety of creative projects. NOTE: not all models of ScanNCut will scan 12″ x 24″ so it is worth checking your model before purchasing.
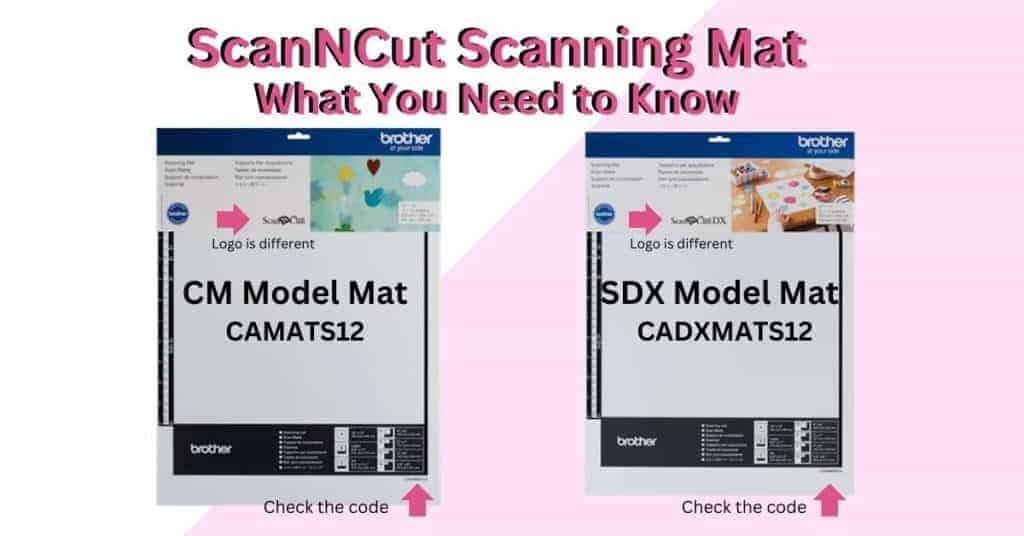
Choosing the Correct Mat
Make certain you choose the correct mat for your model ScanNCut. Below on the left is the mat for the CM range ScanNCut machines and on the right-hand side is the mat for the SDX models. There is NOT a lot of difference.
The code for the CM model scanning mat is CAMATS12 (or the number will be 24 if it is a 24-inch mat). Note the letter S then 12. This denotes “scanning” and “12×12”. Also note there are no DX letters in the code. This is important for CM owners. Do not purchase a mat or accessory for the CM models with DX letters in the code.
The code for the SDX model scanning mat is CADXMATS12 (or the number will be 24 if it is a 24-inch mat) Note the DX letter in the code, this reference means that the mat is for an SDX model ScanNCut. The letter S then 12 is for “scanning” and “12×12”. While most accessories can be used by the SDX model ScanNCut machines and may not necessarily have DX in the code, mats MUST have the DX in the code or they will not work.
In the pictures below you will see a couple of differences between the two mats. It can be quite difficult to tell the mats apart so be vigilant. Hopefully, the Vendors are accurate in their descriptions which will help you. Also, don’t pay a lot of attention to the pictures on the packaging as Brother does change these on occasion. LOOK FOR THE CODES OR LOGO.

For more information about choosing the correct mats for your ScanNCut check out this tutorial.
What You Might Love About the Scanning Mat
Expanding Your Creative Possibilities
One of the biggest advantages of the scanning mat is how it opens up so many more design options. Instead of relying on pre-made SVGs or trying to recreate a design manually in software, you can scan real-world elements and turn them into cuttable files in minutes.
Thinking out of the box, you can scan anything that will travel nicely through the scanner. You could even scan leaves from the garden without damaging them or having them stick to the mat. Imaging creating a beautiful design using a gorgeous Maple leaf as your starting point.
Perfect for Fragile or Textured Items
If you’ve ever tried scanning materials such as photos, artwork, and delicate papers. intricate paper patterns, or perhaps photos, you know how frustrating it can be when your material shifts during the scan or tears as you remove it from a regular mat. This mat’s cover sheet ensures that your material stays in place while keeping it unstuck and undamaged.
It is designed to scan materials up to 1 mm in thickness for best results and has a scanning area of 11.6″ x 11.7″ (296.7 mm x 298.8 mm). The code to look for is CADXMATS12 for the SDX models and CAMATS12 for the CM models.
Saves Time on Manual Tracing
Instead of tracing images manually, you can let the ScanNCut do the hard work for you. The scanned image can then be adjusted, resized, and cut without the tedious process of redrawing it digitally.
Cleaner Scan
The ScanNCut scanning mat’s scan area stays clean, white, and bright. This is in contrast to your regular cutting mat where you will find every cut mark and blemish will show up in the scan.
Wait – There Are A Few Drawbacks to Consider
Not for Cutting
It’s worth repeating—this mat is strictly for scanning. The Direct Cut feature is not available when loading the ScanNCut scanning mat. If you accidentally try cutting on it, you’re going to damage the mat pretty quickly. So, be mindful when switching between mats!
Design Needs to Be Re-Aligned for Cutting
If you plan to cut the design immediately after scanning, you’ll need to remove the scanning mat and place the material onto a regular cutting mat.
What Does This Mean?
It means that after transferring your scanned design to the cutting mat, you must accurately align the cut lines to match the design. While this process is relatively simple, it can be a bit fiddly, and slight misalignment may occur. Of course, this is not an issue if you are simply cutting a scanned shape and don’t need to place it around a design.
Slight Learning Curve
If you’re new to scanning with the ScanNCut, there’s a bit of a learning curve when it comes to adjusting contrast and getting the best scan quality. Some designs, especially very faint pencil sketches, might need to be darkened for the scanner to pick them up properly. Solutions include creating a darker line around your image and ensuring it is a closed
This learning curve is no different whether you are using the scanning mat or a regular mat to scan with. Here is the Scan to Data tutorial. It is filmed on a CM model however the steps are similar. At some point I will create a tutorial for the SDX model too.
Here is the Direct Cut tutorial filmed on an SDX model.
Cover Sheet Can Be Tricky
While the transparent cover sheet is a fantastic feature, it does require some care. It’s easy to get dust or fingerprints/marks/dents on it, which can affect scan quality. Keeping it in good order, clean and free from debris is essential for the best results.
Final Thoughts
The Brother ScanNCut scanning mat can be an invaluable tool for crafters who love working with hand-drawn or delicate designs. It is a worthwhile investment for ScanNCut users who want to expand their creative options.
If you love creating with delicate materials, this scanning mat is definitely worth considering!
Do you absolutely need it to Scan and Cut? No! All Brother mats will allow you to use the Scan to Data and Direct Cut scanning feature. Consider purchasing only if you are planning to scan a lot or have a specific need to scan delicate items.
I hope this information helps you determine whether you need the Brother ScanNCut scanning mat or not.
Happy creating

Join me on Facebook
Join me in the Scan N Cut – Let’s Create With Sue Facebook group. It is a group of awesome craft friends sharing and caring.