Today’s focus is on creating a charming Heart Card that’s perfect for spreading love on Valentine’s Day or for expressing affection for someone special. Plus, I’ve got you covered with a free SVG file, neatly zipped and ready to go, in my Resource Library. The zip file includes an SVG version for the Scan N Cut and Cricut. You will find an FCM file in there as well however in most instances use the relevant SVG.
If you prefer to watch how to make things you will find a video in the tutorial as well!
Let’s dive in and make something heartfelt together.
Disclaimer: As an Amazon Associate, I earn from qualifying purchases. Links included in this tutorial may be affiliate links, Amazon or others, meaning I may earn a small commission at no additional cost. These commissions will help me continue creating content for you. Thank you for your support! Read my very boring full disclosure policy here.
What do you need?
- 1x cardstock for the base
- 1x smaller piece of cardstock for the design
- Glue – I used this one
- Embellishments – any that you choose
- Scan N Cut (or Cricut)
Heart card video tutorial
Here is the video tutorial for the Heart Card. Remember to read through the written tutorials as well on my site as I often add a few more titbits plus you get an easy-to-follow guide in the written format.
Canvas Workspace
Importing the design
In Canvas Workspace you will need to use the Import option to bring in the SVG file. There are two ways to import files. In the downloaded version, the first is to go to the top menu and you will see File. Drop that menu item down and scroll to Import from your Computer.
The other way you can import SVG and FCM files is through the small SVG icon on the left-hand side menu. If you are using the online version of Canvas Workspace you will find instructions here.
NOTE: Remember to unzip the file before importing. Instructions are here if you need them.
If you are using Canvas Workspace select the file that is called Heart Valentine Card SVG. If you are a Cricut crafter and following along, select the SVG file that has the wording Cricut in it.

Once the design has been imported into Canvas Workspace you will see that there are three separate objects. The base card, the dashed line, and the front design for the card.

Grouping the Heart Card base card
I like to group the dashed line to the base card before sending the file over to the Scan N Cut. This way if you need to move the design around on your machine it is much easier. I love the precision placement scan on the Scan N Cut. It makes it so easy to place items on the material.
At this point, you also have the option to alter the dashed line to a DRAW line if you don’t like the dashed line finish. This way you use a scoring board or other tools to score your card. Check out my comparison of tools that are an option.
There are a few ways to group… yep.. more than one way to do things. Don’t you love it? Use the method that suits you best, OR the easiest at the time. I often switch depending on what I am doing.

The first option is to group multiple objects via the top menu panel and then select Group

You can also group multiple objects by selecting the Control key and the G (Ctrl + G) on the keyboard.
If you are on a Mac use the Cmd key.

Another option is grouping via the Layers panel in the downloaded version of Canvas Workspace. You will find it at the very bottom of the panel on the left side of the panel.
Export your heart card to your Scan N Cut
Once you are ready it is time to send your file to over to your Scan N Cut. I can be exported using the File menu option and scrolling down to the Export selections. You will be presented with the following box and options. The top is via USB, the middle is WiFi and the bottom selection is using a cable connected between your Scan N Cut and computer.

Flattening the edges of your cardstock
Have you ever cut your cardstock and the edge is not as crisp and flat as you would like? Different cardstock cuts better than others and you may find some brands produce a raised edge. The cardstock I used in this project often does and the solution is to press it flat again.
Using the spatula that came with your machine press along all the edges until they are flattened nicely. While I suggest the spatula however you could use anything..a scraper, the back of a spoon…. anything really.

When you are ready glue the front section of the card onto the base card. I used Art Glitter Glue however another of my favorites is this one.
Adding embellishments
Now comes the fun part. The heart card is ready for some embellishment and what you choose will be determined by the purpose of the card.
Writing a sentiment
You have the option to write a heartfelt sentiment or someone’s name on the center heart. Consider something quirky for Valentine’s Day, like your initials and your valentine’s initials – a modern twist on the classic ‘xx loves xx’ often carved into trees. Embracing a more eco-friendly approach, expressing love on a card is a charming alternative to the traditional tree carving.
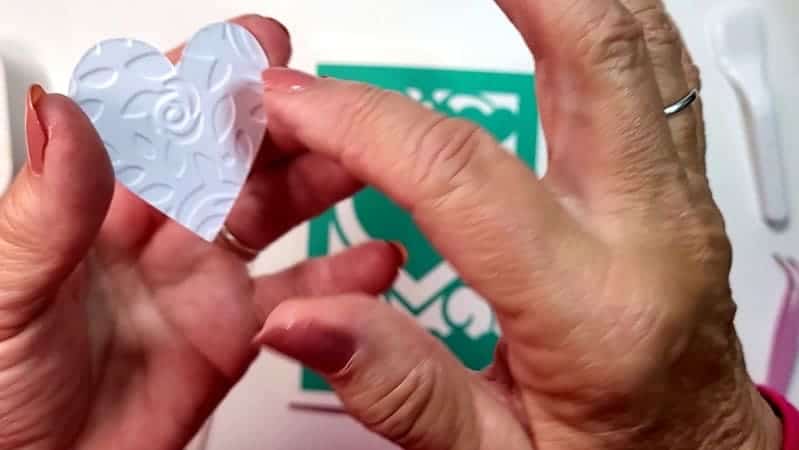
Adding dimension
Or, you could add a bit of dimension which is what I chose to do. I rummaged through my scraps and found this treasure that I created it ages ago with my Sizzix Big Shot using an embossing folder. One of my new tutorials is on using scraps… many of mine are kept.
Using foam tape lifts the embellishment off the main card and provides that added dimension.

One of my favorite things is a bit of bling. Over time I have realized that adding less is often a better option so I refrained and only added two diamontes LOL.

The pack did come with a bit of sticky on the back of the diamonte however it was a cheaper purchase and the sticky wasn’t great so out with the glue bottle again. I love the fine tip with this glue. Makes life a little easier.
My finished heart card
And here it is! I hope that you have fun creating your version of the card and I would LOVE to see what you make.

Happy creating


Join me on Facebook
Join me in the Scan N Cut – Let’s Create With Sue Facebook group. It is a group of awesome craft friends sharing and caring.
I would love to see you there.
You are always welcome to say Hi at [email protected] or [email protected]. It would be great to hear from you!

Like to learn how to use Canvas Workspace? More information can be found here!
Embroidering Cardstock: A Creative Twist for Your Craft Projects
If you’re looking for something a little different to add to your cardmaking or papercraft…
How to Make an Easter Bunny Card – A Step-by-Step Guide – ScanNCut

9th Birthday Card – Create an Age-Shaped Card – ScanNCut

How to Create a Money Pocket for a Card with the ScanNCut
Make a Layered Birthday Card with ScanNCut