
Make a rose card in this tutorial using the Brother Foil Kit, Canvas Workspace, and, your Scan N Cut. The tutorial demonstrates how to use the Brother Foil Kit which I have had so much fun playing with. I have created a free card template that is available in my Resource Library for this project.
Disclaimer: As an Amazon Associate, I earn from qualifying purchases. Links included in this tutorial may be affiliate links, Amazon or others, meaning I may earn a small commission at no additional cost. These commissions will help me continue creating content for you. Thank you for your support! Read my very boring full disclosure policy here.
- What do you need?
- Grab the template
- Import the foil rose card file
- Adding the rose to your card template
- Resize the foil rose design to fit the card
- Add the sentiment
- Export your rose card to the Scan N Cut
- Retrieve the data on your Scan N Cut
- Glue pen in the Brother Foil Kit
- Let's foil!!
- End result after removing the foil
- Video making the rose card using the Brother Foil Kit
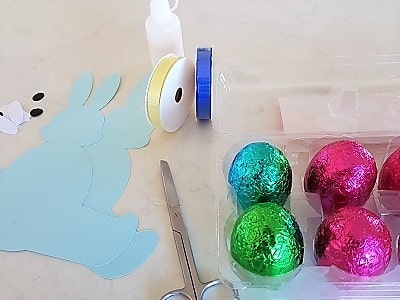
What do you need?
- Solid Core Cardstock to make the card. (similar to this one on Amazon)
- An accentuating color cardstock for the insert
- Brother foil kit
- The foil to use to foil your card
- Scan N Cut cutting machine
- Rose card template from my Resource Library – or you can make your variation of the card
- Any other embellishments you choose to make this card your own
I have included a video tutorial on how to create the foil rose card using the Brother Foil Kit. If you prefer this method, scroll down to find the video tutorial further along in this tutorial or use the Table of Contents to take you there.
Grab the template
The first step is to go and grab the rose card template from the Resource Library. The rose card template is only the basic shape of the card and does not include the foil rose. The rose design is part of the Brother Foil Kit included designs that can be found in Canvas Workspace once the Foil Kit is activated.
Once you download the template, it will need to be unzipped. If you need help with this I have a tutorial on how to unzip a file on a PC that will help.
Import the foil rose card file
Import the foiled rose card template file into the downloaded version of Canvas Workspace. As you can see in the picture, the card is shaped to suit the rose.
To import a file, go to the top Menu and choose File and then scroll down to Import File from Computer.
Look for the file where you saved it on your computer and click on it choosing Open.
The picture below is how it will look once imported. Note the layers on the right hand side panel. We will work through these in the tutorial

Adding the rose to your card template
Next, go to the left-hand menu panel and click the shapes section (the icon with the circle and triangle shapes). This will pop out the shapes selection menu.
Where the arrow is pointing in the picture below you will see the icon for the foiling designs that come with the Brother Foiling Kit. Select that icon to view all the foil designs that came with the Kit.
NOTE: The foil designs are located in the new foil icon which is only added to Canvas Workspace once you purchase and activate the Brother Foil Kit.
For this foiled card, select the rose shape. Once the foil rose is selected it will pop over onto the Canvas Workspace mat as shown in the picture below.

To fit the rose design to the card template, use the flip feature (see arrow above) and flip the rose so that it is the right way to fit into the card shape.
Resize the foil rose design to fit the card
Place the foil rose design so that the peaked out petal is aligned on the peak part of the card. Grab the corner resizing handles and resize the rose shape. Alternatively, you can resize the rose in the right-hand Edit menu.
The size is approximately 3.55 inches wide by 4.70 inches high however as long as the rose sits nicely along the edge of the card you can resize it to the size you choose.

Add the sentiment
Add the sentiment. Choose a sentiment that suits the occasion that you are making the foil card for. There are a number of sentiment that you can choose from.

Export your rose card to the Scan N Cut
Once you are happy with the placement of your foil rose and sentiment on your card template you can export the design to your Scan N Cut machine.
On the right-hand side of the picture below, you can see the Layers panel selected. In this panel, all the layers of the file live and you can manage how you send them to your machine in here. The files are grouped and you can use the Eye icon to hide and unhide the various layers or groups to be sent.
Select the square insert section of the card which is located underneath the main foil card so that it is highlighted. This will highlight in the right Layers panel as well. Hide the insert and then export only the card file to your machine.

To export the file go to the top menu and select File then scroll down to Export/Transfer FCM File. You will be presented with the above screen to send your file.
- The first selection will export the FCM file to your computer where you can either save it or pop it on a USB to take it to your Scan N Cut.
- Second selection will send it via the internet to your Scan N Cut (this is via WiFi) If you need help setting up your WiFi check the tutorial out on setting it up.
- The third selection is via cable directly connected to your Scan N Cut.
Retrieve the data on your Scan N Cut
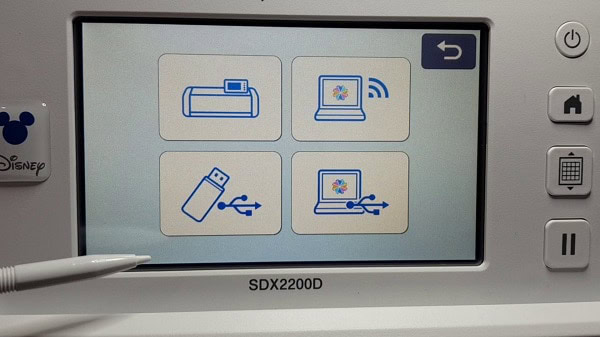
Head over to your Scan N Cut and select Retrieve to bring your design into your machine.

The below picture shows the options to retrieve the file. They include pulling it in from your Scan N Cut, via the internet, USB, and via cable.
When you are happy with the placement of your file, click on OK to start the foil process.

Glue pen in the Brother Foil Kit
When you have added your Foil Kit activation code in Canvas Workspace you can then add the Foil selections as shown below to your Scan N Cut.
The first step of the foiling process is to choose Foil1(glue).
The Foil option can be seen below.

The Scan N Cut steps you through the process really clearly. In your Brother Foil Kit you have a glue pen with numbers measuring the glue level and the Scan N Cut has a matching glue pein on the screen. Match up the level in your glue pen to the one on the screen.
You can see I have adjusted my screen to the number 2 setting to match the glue left in my glue pen using the arrows on the screen.

You can just see the instructions peeking out from behind my glue pen. The Foil Kit provides very good instructions to help you with the process.
Install the glue pen in the holder and load the mat with the cardstock on it into the Scan N Cut.
Click on the Ok and it will start glueing.
NOTE: I usually check on a bit a scrap paper that the pen is releasing glue OK before placing it in the holder.

The area being glued is quite difficult to see. Once your machine has completed the entire design you will need to allow some time to let the glue dry.
Time for a coffee!!!
Let’s foil!!
Place the foil on the glued area. If your design is a bit larger than the sheet of foil you can cut the foil to fit or add more from another sheet.
Brother has provided a blue plastic sheet which you place over the entire foil area and tape it down. I used masking tape to tape it down which is very effective. The blue plastic sheeting protects the foil and stops it from tearing.

Remove the glue pen from the holder and add the ball end tip into the bottom of the holder and add it into the carriage holder.

Back in the selection panel, you can see there is the option for Foil2. This will rub the ball end methodically across the entire area of the foil design, pressing the foil onto the glue.

End result after removing the foil
Do not remove your mat once the foil process has been completed. Remove the A4 protector sheet and then the foil sheet to reveal the design.

Continue on to cut out the rose card and then, cut the included rose card insert if you choose to add that to your rose card project.
Video making the rose card using the Brother Foil Kit
Here is the video tutorial showing all the steps to make the rose card using the Brother Foil Kit.
The video walks you through importing the rose card template to Canvas Workspace, adding the Brother foil rose design that comes with the Brother Foil Kit and also, how to resize and place the foil rose design to fit the card template.
Watch and it demonstrates how to use the Brother Foil Kit on your Scan N Cut cutting machine. I do hope that you enjoy the video.
I hope that you enjoy making this foiled rose card and I would love to see what you make. You can post any projects that you make in my Facebook group Scan N Cut – Let’s Create With Sue.
If you are not a member already you are more than welcome to join.
Happy creating.


Like to learn how to use Canvas Workspace? More information can be found here!


Hi Sue, That is so beautiful, love how it turned out, TFS, Cheers Anna.
Thank you Anna, I am pleased that you enjoyed making the card. x