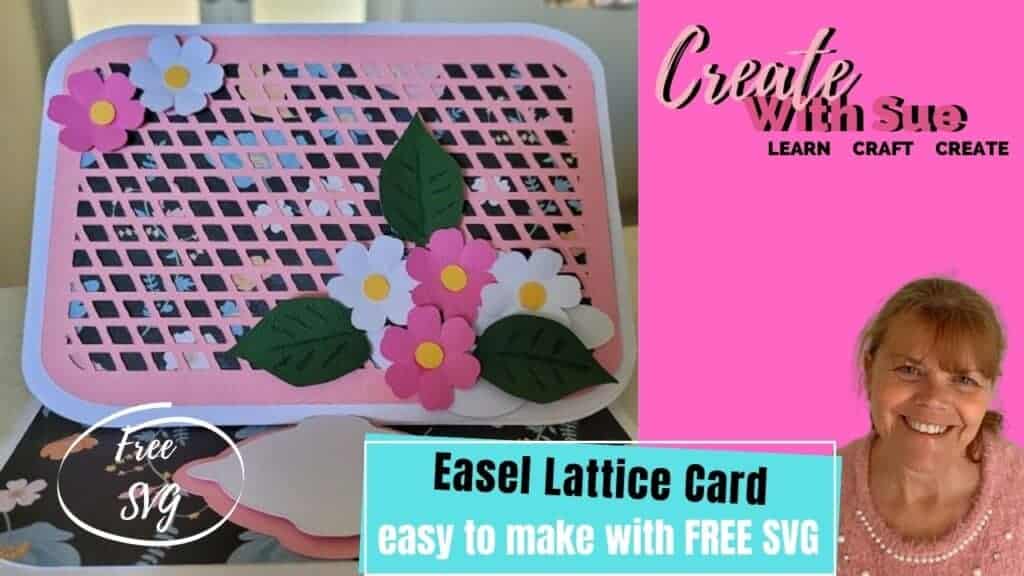
This Easel Lattice card is really easy to make and a lot of fun. Included in this tutorial are instructions and the FREE SVG Easel Lattice Card template for you to use. While I have included the flower embellishments, you could add your own bling to the card.
You will love how easy it is to make this card – all you need is a few basic supplies that you may already have on hand. Plus, there are so many possibilities for customization with this design. Add your own flair and personality to create a one-of-a-kind masterpiece.
Follow the instructions below to get started on your very own Easel Lattice Card today!
Disclaimer: As an Amazon Associate, I earn from qualifying purchases. Links included in this tutorial may be affiliate links, Amazon or others, meaning I may earn a small commission at no additional cost. These commissions will help me continue creating content for you. Thank you for your support! Read my very boring full disclosure policy here.
What do you need?
- A few sheets of various colored cardstock. – I like this brand.
- Template from the Resource Library (SVG)
- Glue and/or double-sided tape
- Double-sided foam tape (optional)
- Scan N Cut or Cricut cutting machine
Download the Easel Lattice Card template
Head over to the Resource Library to download the Easel Lattice Card SVG template. When you download it you will find it is in a zipped format. If you need help with unzipping the file you will find a tutorial here for a PC.
Forgotten the password to the Library? – you will find it at the bottom of all my emails.
There are a few files in the download including an SVG folder for the Scan N Cut and a separate SVG folder for the Cricut.
The finished card size is designed to be 7 inches wide by 5 inches high.


Cut the card template out
As pictured, cut the various section out of the card colors of your choosing. I selected the blue floral patterned cardstock to accent the lattice however there are many options to choose from.

Making your Easel card
This card is really very easy to put together. Here are the steps below.
Add the insert color
Add the insert to the inside of the base card. It will be slightly smaller than the main card for effect. For this, I used the patterned piece of card to provide an accent on the inside of the card

Create the top layer
Attach the lattice layer to the matching-sized section of the card (patterned in my version).
Below shows a picture of the pieces of Easel Lattice Card with the lattice top layer glued to the pattered section underneath.
I only applied glue to the outside edge of the lattice piece and also in random spots of the lattice. An alternative could be adding more dimension by using double-sided foam tape. I chose not to do this as often less is more.
The fold has been made on the easel card base ready for the top section to be attached.

Attach the bottom half of the front lattice section to the folded bottom section of the base card. This will allow the front to flip up and lay down flat again as required.
Embellishing the card
Use double-sided tape to join the support shape and then add the second smaller section on top to make the area a little thicker. I used double-sided foam tape for added dimension to assist the easel card front section. This will provide support for the front of the card while it is in the easel position when opened.


Adding the flower embellishments
Next, I added the flower embellishments. You can do these steps in the order that suits you best.

While you could add the flowers flat, I chose to create some dimension and bend them slightly. You will note there is a battery in the picture below.
Yep, I used that to create the shape. LOL. I looked around for a pen or similar and there was the battery. Perfect!
Originally I planned to color the inside section of the flowers with a yellow sharpie. Then, at the last minute, decided to cut yellow circles as the middle section for a bit more POP. I have added them to the SVG template for you although they are very easy to make directly on your cutting machine.
The pink flowers were cut from my favorite cardstock and the white is from some cheaper cardstock that cuts reasonably well and is great for testing as it is very inexpensive. The card does, however, often produce a raised edge where the Scan N Cut cuts.
If this happens to you, then the edge can be flattened with either the spatula that comes with the machine or the edge of a pair of scissors or a scraper.
Finishing the card
Place the flowers and leaf embellishment onto the front of the card. On the leaf section of the template, there are dashed lines included to form “veins” on the leaves. Fold these dashed areas to add shape to the leaves. I then used a green sharpie to accentuate the vein lines of the leaves.

The embellishments on the easel lattice card also showing the sharpie that I used to highlight the green leaves.
NOTE: This size sharpie will also fit into the Universal Pen Holder so that you can use it in your Scan N Cut for drawing directly onto the cardstock.
And the design is now finished.
Choose alternative embellishments for the front of the card to vary the look. There are lots of options.
Happy creating

Join me on Facebook
Join me in the Scan N Cut – Let’s Create With Sue Facebook group. The group is full of awesome craft friends sharing and caring.
I would love to see you there.
Feel free to ask any questions that you need in the group. While you are on this website, please take the time to wander around as there are heaps of tutorials aimed at helping you along your crafting journey.
Feedback to improve the site is ALWAYS welcome and you can contact me at [email protected], I would love to hear from you.


I’ve been trying to get a file of the lattice card I used the pw :creative
It doesn’t work, it just keeps taking me. Ack to the website.
Thanks
Cheri
Hi Cheri, I have emailed you to assist you further. Checking the website and it appears to be working ok. You can try clearing your browser cache as this can cause this issue and clearing it may resolve the issue. Please check your email for more information.