
Why doesn’t my SVG work? This is the question I often get asked and the answer is simple. Not all SVG files are created for cutting machines. Even worse, not all SVG files are created to suit Canvas Workspace and the Scan N Cut.
Sad, but true.
Let’s look to see the reasons why your SVG file doesn’t work and how this can be fixed.
Disclaimer: As an Amazon Associate, I earn from qualifying purchases. Links included in this tutorial may be affiliate links, Amazon or others, meaning I may earn a small commission at no additional cost. These commissions will help me continue creating content for you. Thank you for your support! Read my very boring full disclosure policy here.
What is an SVG?
For newer crafters, you may be wondering what an SVG file even is! SVG is the acronym for Scalable Vector Graphic file and is GREAT file format for graphic design and cutting files. The reason is that vector graphic files can be resized easily and still maintain their quality. File formats like PNG or JPEG / JPG are raster-type files as opposed to vector and will pixelate as you increase the size.
To find out more about the differences between PNG and SVG files you can check out Adobe’s descriptive page here.
Why doesn’t the SVG file work
The Scan N Cut will use most SVG files happily…. until you try one that doesn’t.
There are many reasons why and amongst them are:
- Created in software that is primarily designed for a different cutting machine.
- The designer was using SVG format to create a printable or picture type project and never meant for the SVG file to be a cut file.
- Vendors export a design to SVG and NEVER test whether it cuts ok in any cutting machine.
- Designer may use a particular brand of cutting machine and don’t have the opportunity to test it in various brands of cutting machine.
That last reason is very common and not really the designer’s fault. You cannot really expect a file to be tested in EVERY cutting machine on the market.
How do I tell whether an SVG file will work
First up, look at the design that you are purchasing or choosing to download and imagine it as a cut file. Imagine your cutting machine working its way around the shape.
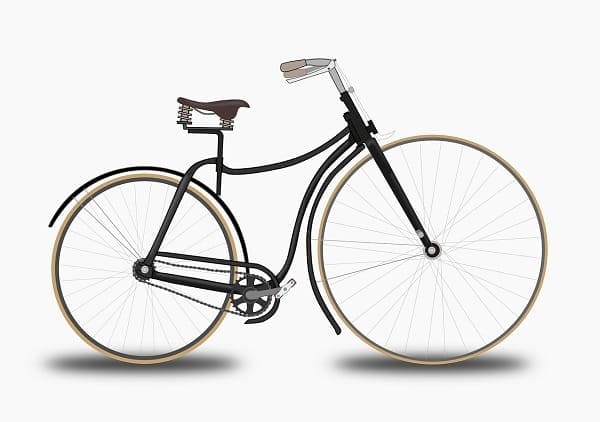
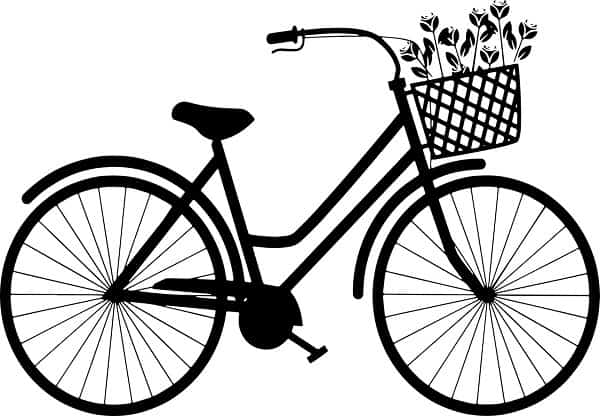
Take a look at the two bicycle pictures below. BOTH bicycles are available in SVG format. The bicycle on the left would be very difficult to cut if not, impossible. The bicycle on the right has a reasonable chance of successfully cutting out although it would be dependant on size and maybe only in vinyl.
NOTE: The bicycle spokes still may give you grief in either but I am hoping you get the idea about looking at the differences in design.
My SVG is definitely a cut file and doesn’t work
This brings us to the next range of problems. You have purchased or downloaded an SVG that is meant to be a cut file however when imported into Canvas Workspace.. it doesn’t look right.
This is often a fixable problem.
NOTE: If you have purchased a specific SVG cut file you can always go back to the vendor and let them know you are having problems. They can often assist you.
Easy to fix SVG problems
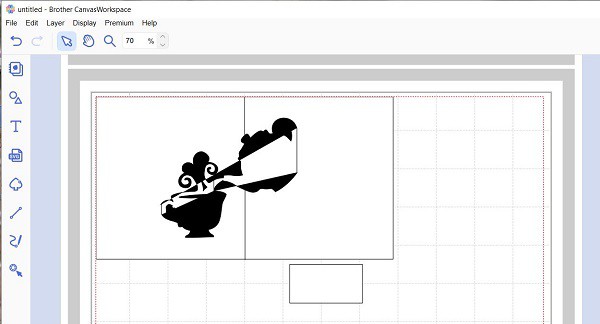
The easiest to fix problem, is when your SVG file imports into Canvas Workspace and it is ALL BLACK. This is a fairly common issue.
See what the file will look like in Canvas Workspace.
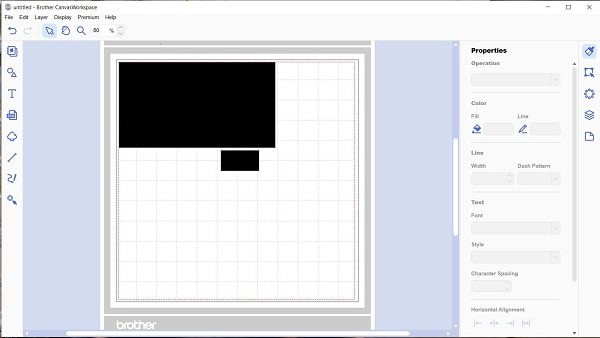
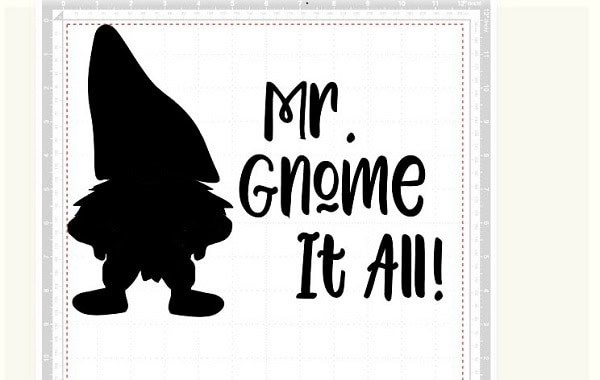
Both of the above files were created by very talented designers of amazing cut files. NEITHER SVG file has imported into Canvas Workspace nicely. And.. the fix is simple.
First the reason why these SVG files didn’t work properly. The design was interpreted incorrectly and the Fill part of the design imported in black. This may be caused by the software that the file was created in, by the designer’s choice of colors, or whether they used a Mac or a PC. Whatever the reason, it may be confusing when you first encounter it.
You will often find in this instance.. that the stroke (line) of the file is transparent and not visible. See the picture below.
NOTE: Remember that files consist of code that computers read or interpret. There are many types of code, similar to how we have many different languages. They don’t always understand each other. (sorry, a bit of tech talk)
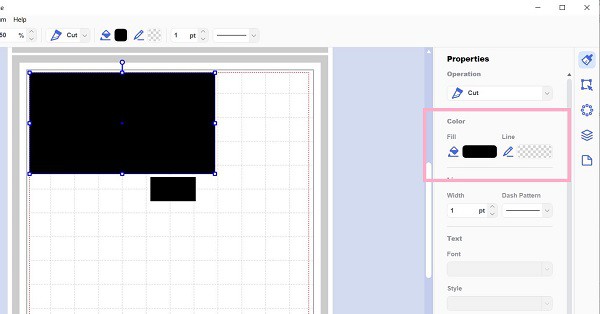
The easy fix
For these SVG files that don’t work, the fix is simply to go into the Edit panel and change the Fill color to either a diferent color OR to transparent and the Stroke or Line to black. Voila!
In most cases this works a treat.
Video demonstrating how to fix the SVG
The below video demonstrates how to create this Gnome file similar to the one pictured above. It shows the steps to change the Fill and the Stroke colors.
NOTE: The site where the file was sourced from is no longer available as Maggie, the designer was presented with a new opportunity and her website diverts to another website.
You will find the full HTV (Heat Transfer Vinyl) tutorial here.
What if the above solution doesn’t work
OK, in most instances importing the file and altering the colors of the Fill and Stroke works. The other design I used as an example wasn’t quite as simple to repair.
When it imported into Canvas Workspace it looked like the picture on the left, while the picture on the right-hand side has been repaired. Can you see the difference? The diagonal lines shown in the left-hand picture WILL cut. Oops.
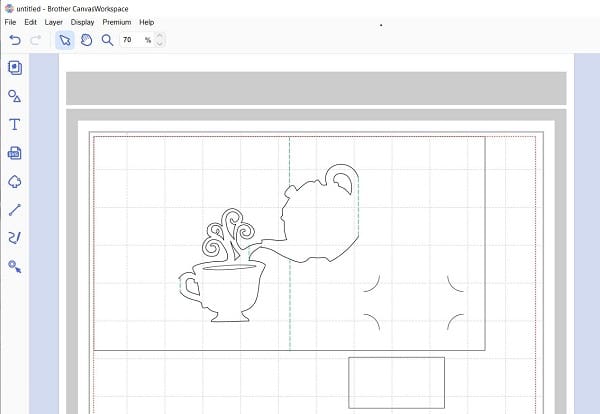
To fix this file, I ended up importing it into SCAL5. In SCAL5 I noted that the file also needed to have the fold lines changed from a score line to a Dashed line. These score lines would have cut out as a cut line.
An alternative to this is to change the lines that need to be fold lines to a Draw line and either use a scoring board or a scoring tool in the Universal Pen holder.
Once I was happy with the design, I exported it as an SVG file and then imported into Canvas Workspace perfectly.
NOTE: It is important to check the fold lines of ANY SVG file that you import as they may import as a cut line. If you miss this, your file could end up with many more pieces to it than you intended. Very frustrating.
Another reason why an SVG doesn’t work
The next issue is to do with dpi. You may be familiar with dpi (dots per inch) when using pictures. For example, a picture may be 300dpi or 1200dpi. The 300dpi is a smaller picture than the 1200dpi.
What does this have to do with the Scan N Cut and SVG files? Well, everything really.
Various cutting machines use different dpi. For example, Design Space, the software for Cricut cutting machines, uses 72dpi and Canvas Workspace uses the larger 96dpi for the Scan N Cut. This is similar to the example above where the pictures are larger or smaller due to dpi.
Have you imported an SVG file into Canvas Workspace to find that it is too small? Blame the dpi!
Some SVG designs cope perfectly well coming in to Canvas Workspace as a smaller version of the design. It may even be the size you prefer for your finished project. Other SVG files coming in too small can be a disaster! They may not cut as expected or end up much smaller than you intended. Design features lost.. all sorts can be wrong.
Take another close look at the two pictures I showed you before of the teapot file in Canvas Workspace. Both pictures were at 70% zoom when the snapshot was taken however the picture on the left-hand side is smaller than the picture on the right-hand side.
The size on the right is the correct size that the designer intended the file to cut out however the file on the left is correct for a Cricut cutting machine. The teapot file on the left is in 72dpi and the file on the right I exported from SCAL5 suitable for the Scan N Cut at 96dpi.
It is a bit like playing the game “spot the difference” isn’t it.
Resize your SVG files to fix your SVG
Another easy fix for this problem. You can resize the file to the correct size OR the size you would like your project to finish up.
The easiest way to resize a design is to select ALL objects in the design and then go into the Edit panel and and alter the size of the file.
In this particular design, you would need to select all the pieces of the design and resize all the objects to maintain ratio. Then select only the card area and confirm the size of the actual card is the size you are after for your project.
If you need to adjust further, make sure that you select all the objects again and resize accordingly.
Where to find the files that I have shown?
The gorgeous teapot and cup pop up card was from Carol at https://www.extremepapercrafting.com/
My attention was drawn to this file while I was helping one of my students. She discovered it on her travels and was struggling to import it into Canvas Workspace. My student badly wanted to use this lovely file. I can’t blame her…. it is a pretty cute design!
Carol has numerous free files on her website.
Please note: I have not used or cut out any of Carol’s designs and not affiliated in any way with her. You now know how to fix the designs if you decide you would like to try any of them and have issues in Canvas Workspace.
Using a Cricut? This file imported perfectly into Design Space for me which is how Carol would have tested it.
Maggie’s Gnome files
Unfortunately Maggie no longer has her website and the URL (Uniform ReLocator) redirects to another website. I still occasionally keep in touch with Maggie and if you are desperate for it, I may be able to source the Gnome for you.
Want more free SVG files?
I have created a really big list of places you can source free SVG files. *I must go and add Extreme Paper Crafting onto the list…. and sadly remove Maggie’s site.
You will find the Free SVG post here. Many of the crafters are Cricut crafters so take note of the solutions above just in case of any issues.
Need information on how to manage SVG files? Find more information here.
Wondered about converting PNG / JPG / JPEG into an SVG for your cutting machine? There are a number of ways and I have explored most of them at some point. The tutorial can be found here.
Phew, there is a lot of reading in this post. I hope that you survived it.
Until next time
Happy creating


Join me on Facebook
Join me in the Scan N Cut – Let’s Create With Sue Facebook group. It is a group of awesome craft friends sharing and caring.
I would love to see you there.
Don’t forget to ask any questions that you need.
Other tutorials that you may like
Exploring the New Affinity Designer V3 — My First Impressions
Today we are exploring the new Affinity Designer V2 software which was released on October…
Cutting Cardstock: Tips for Better Results
Cutting cardstock with your ScanNCut can produce beautiful results, but sometimes you may notice issues…

Rejuvenate Old Jeans with HTV and Your ScanNCut

Would you like to learn more about how to use Canvas Workspace? You can find more information here!


What a very informative article
and as I am the lady with the original problem I was very pleased to get so much information and help from Sue
Thank you Ronda. I am so pleased that I was able to help you. xx
I cannot get colour on a colourd svg file. When I bring it into canvasworkspace it is black and white (black lines and white space No colour to all the layers?
Hi Yvonne, yes, this can be normal. Occasionally an SVG will import into Canvas Workspace with all black interior of the shape and transparent lines. You may be able to add color however it is not necessary. If you are using the downloaded version of Canvas Workspace, check the layers panel to see if the pieces of the design look correct. If the lines of your design look reasonable, try exporting it to your machine. The cut lines should cut ok however you could practice the cut on a plain piece of card. I always keep a Rheem of cardstock just for this purpose. It is an economic way to check designs are going to cut ok.
Hi Sue,
Your after weeks of increasing frustration and deepening depression, in seeking a, working for me, jpg – svd converter, the advice in your article has saved my sanity.
Heartfelt thanks
Alan
I am really pleased that the information has helped you :-). Thanks for letting me know! Happy creating, Sue
Help!
I printed off a copy of the 3D Hot Air Balloon design from Silhouette Studio. I then scanned it into my Scan-n-Cut and although it cut the main design nicely, it didn’t cut the crease/fold lines, despite them being as clear as the outer lines. What can I do to resolve this problem? They are dash lines.
You can add some dashed lines, like these dashed fold lines, by creating them in Canvas Workspace and sending them over to your machine. You get the option to Add and you can retrieve additional objects to add to your design. With the scanned image visible you can place the lines where you need them. My guess is that you did the right thing and chose the outline selection for the scan and these lines are part of the inside area of the design. If you change the selection to inside and outside you may scan more than just the fold lines. This, of course, depends on the design and is another alternative if viable for a design. A third option is to use the Scan To Data selection and export the file to Canvas Workspace to edit further.
Sue,
I am so glad I found you! I LOVE your website! It is soooo informative!
I’m a 3D SVG designer who tests on Silhouette and Cricut but I don’t yet have a Scan N Cut😔. I have so many wonderful customers who have had various issues with my SVG files in Canvas Workspace and now I know I can send them to you. (I just now sent a customer named Charla to your website).
I would love to collaborate somehow with you. For instance, would love to give you (or your followers) some of my 3D SVG designs in exchange for your expert feedback. My Etsy shop is https://bellacartadesignsvg.etsy.com.
Please contact me. I would LOVE to collaborate.
Laura Shirley
[email protected]
http://www.bellacartadesign.com
Thank you Laura. I am really pleased that you have found the site helpful and always happy to help anyone you send to ask advice. Looking through your Etsy shop and you have created some lovely designs. Happy creating, Sue