In this tutorial, you’ll learn how to create and adjust shapes in Sure Cuts A Lot 5 (SCAL5). Whether you’re new to SCAL5 or looking to enhance your skills with cutting machines like Cricut, Brother Scan N Cut, or Silhouette, this guide will walk you through step-by-step.
Video Tutorial on How To Create & Manipulate Shapes in SCAL
Welcome to Create With Sue’s Video Tutorial on How to Create & Manipulate Shapes in Sure Cuts A Lot (SCAL5)! This in-depth guide is perfect for anyone looking to master SCAL5 tools and techniques, making it easier than ever to design unique shapes for cutting machines like Brother Scan N Cut, Cricut, and Silhouette. In this tutorial, we’ll walk you through adding basic shapes, using the shape manipulation tools, resizing, rotating, and much more. Hit play and learn how to transform simple shapes into intricate designs, taking your crafting skills to the next level with Sure Cuts A Lot 5!
As always, read on and see the step by step guides to work through your projects with.
Disclaimer: As an Amazon Associate, I earn from qualifying purchases. Links included in this tutorial may be affiliate links, Amazon or others, meaning I may earn a small commission at no additional cost. These commissions will help me continue creating content for you. Thank you for your support! Read my very boring full disclosure policy here.
Opening the shape Library in SCAL5
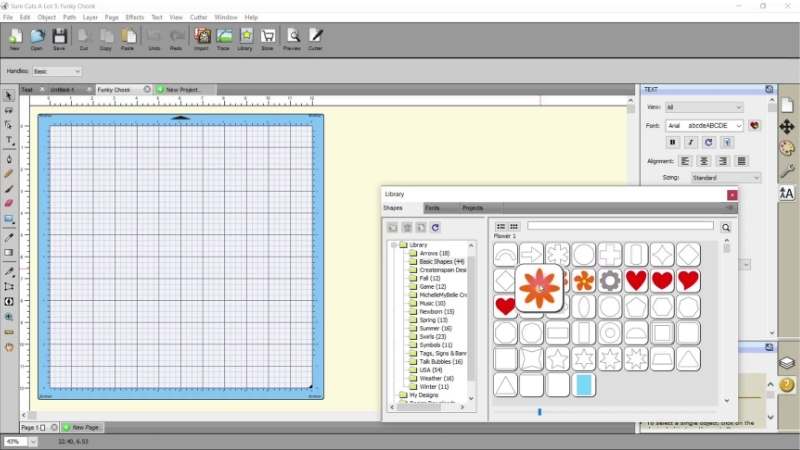
To create a shape in SCAL5, you can open the Sure Cuts A Lot Library. There are two ways to access it: through the top menu icon with the wording Library under the icon or via the Window menu in the top dropdown and select Library. The shape Library contains various pre-built shapes, including basic shapes like stars, flowers, squares, and circles, as well as more specific shapes for occasions, such as baby and fall-themed designs.
Have a look through the library as it has some fun shapes.
You can also add basic shapes on the left-hand menu where you will see a rectangle box style icon about halfway down.
Selecting a basic shape
For this tutorial, let’s start by selecting a basic shape like a square or rectangle from the Library. Once selected, the shape will appear on your mat, where you’ll have several options for adjusting it.
To move the library I grab the top bar and drag it so that it is barely showing, alternatively, click the Close button at the top. This allows more space to work with your design on the mat.
Adding color to shapes
Creating designs with a clear shape can be a bit difficult. Adding color to your designs make it a whole lot easier. You can see clearly the shapes and what you are trying to achieve, plus, it will give you a great feel for how the design will look once completed. You can select colors similar to the materials that you plan to cut your design out in. At a glance, you can tell whether it is going to look good.
You will find the color panel in the Fill and Stroke panel on the right-hand side menu. The Fill is the inside color that will fill the entire shape. The Stroke is the line around the outside edge of the shape. In most instances, you will use black as this is the cut line and no color is exported to your cutting machine. It is just a cut line and coloring it is just so that you can see it.
However, you may want to create a PNG or JPG picture file in Sure Cuts A Lot. Yes, it will do that too! In this instance, color the stroke in a color that meets your design requirements.

Navigating the shape adjustment tools
Once the shape is on your mat, SCAL5 offers several tools to help you manipulate it. You’ll see arrows at each corner of the shape that allow you to resize and rotate it:
- Move Icon: Use the four arrows icon in the top left-hand corner of your shape to move it around the mat without altering its size or shape.
- Rotate Icon: You will find the Rotate icon on the top right-hand side of the shape. It is the one that looks like a curve with an arrow on each end. Rotate the shape by dragging the corner arrows in the direction that you choose. It moves around very easily.
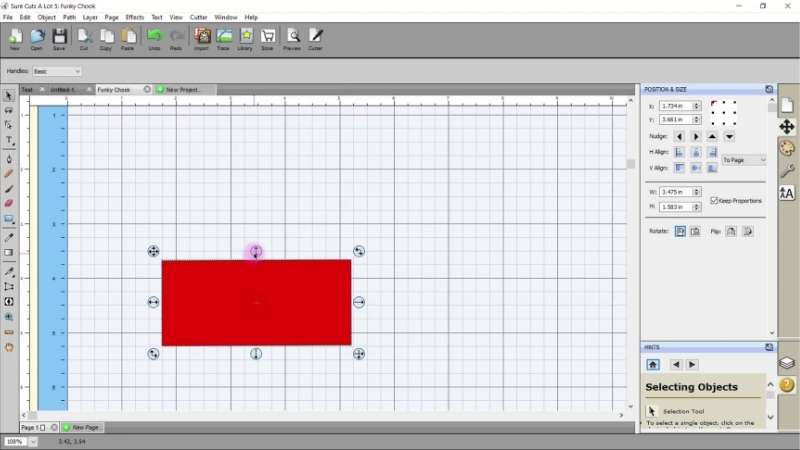
- Double Arrow Icon: There are two double-ended straight arrow icons on the shape. The double arrow icon at the top will move the shape up or down the mat only. The double arrow icon on the left-hand side of the shape will move the shape to the left or the right only. This is a great way to ensure alignment.
- Single Arrow Icon: To adjust the size of the shape you can use the single arrow icons to increase the width or height of the shape, depending on how you would like to enlarge it.
- Bottom Right-Hand Arrow Icon: This icon will adjust BOTH height and length of the shape. You can adjust the shape freely by dragging the icon around on the mat. If you want to resize the shape proportionally, hold down the Shift key (or Command key on a Mac) while resizing.
These tools make it easy to position and rotate shapes precisely.
Resizing shapes in SCAL5
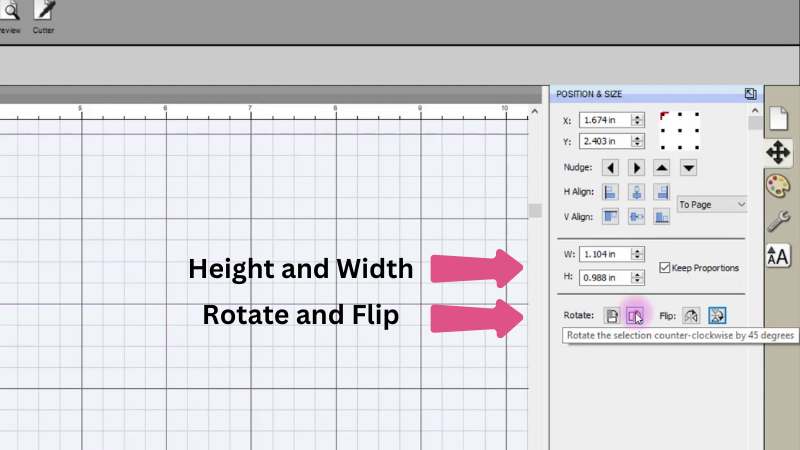
To resize a shape in SCAL5, you can use the corner arrows to stretch or shrink the design as we have just covered. You can also adjust the size by using the Position and Size toolbar on the right-hand side. This toolbar shows the exact measurements of your shape, including Width (W) and Height (H), which you can adjust manually.
You can check the Keep Proportions option in the toolbar to ensure the shape stays consistent when scaling. Alternatively, uncheck the box and adjust the height and width to the size you need. If you need an exact measurement then this is possibly easier than using the handles on the edge of the shape.
Rotating and Flipping Shapes
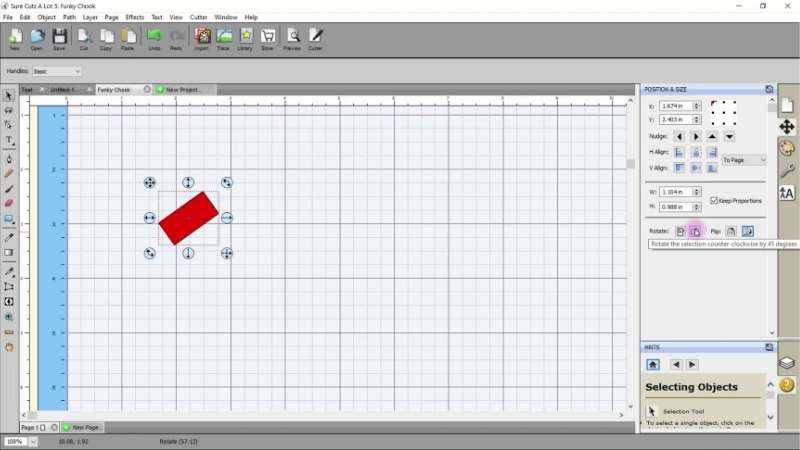
In addition to manually rotating the shape, SCAL5 provides options to rotate it incrementally. You will find the Flip and Rotate tools in the Position and Size menu on the right-hand side of Sure Cuts A Lot. Use the Rotate by 45 Degrees buttons to rotate clockwise or counterclockwise. You can also use the Flip tools to mirror your shape horizontally or vertically, depending on the needs of your design.
Understanding Snap-to-Grid and X/Y Axis Movement
SCAL5 features a Snap-to-Grid option, which aligns your shape with the gridlines on the mat. This is useful for maintaining precise measurements and alignment. The X and Y axis display your shape’s position on the mat, allowing for exact placement.
As you move the shape around, the X/Y coordinates update in real-time. This feature ensures that your design is positioned exactly where you need it on your cutting mat.
Using the Spiral and Star Tools
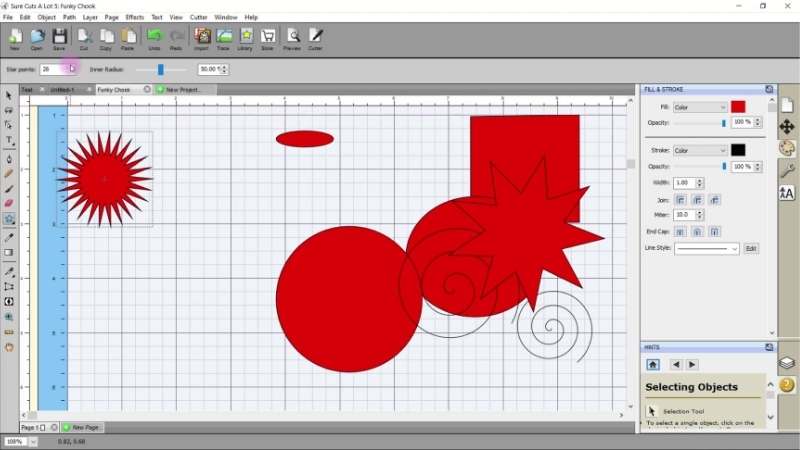
SCAL5 has several fun shape tools, including the Spiral Tool and Star Tool. To create a spiral, select it from the shape options and adjust the settings for Radius, Divergence, and Turns. This creates a spiral that will cut as a series of lines.
With the Star Tool, you can customize the number of points on the star, from 5 points to 15 or more. Experiment with different shapes and settings to create unique designs for your projects.
Customizing Shapes in SCAL5
Once your shape is on the mat, and you have changed its color for better visibility, make the adjustments you need to meet your design requirement.s
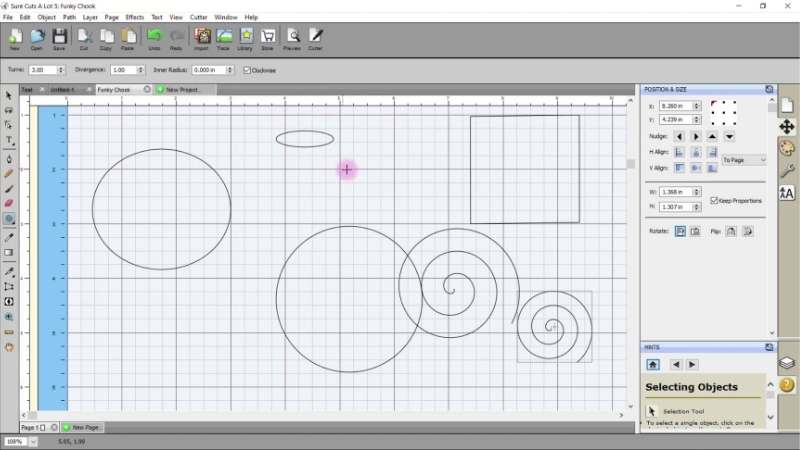
Once you have completed your design you can check where your cutting machine will actually cut. This is a cool feature and while this feature is available in the online version of Canvas Workspace, it is definitely lacking in the downloaded/offline veriosn.
To see the cut lines clearly in Sure Cuts A Lot, go to View and select Show Outline Only. This mode reveals the exact lines that will be cut, helping you ensure accuracy before sending your design to the cutting machine. Cool hey! This provides you the opportunity to remove any unwanted lines or add missing lines before you get to your cutting machine and find out the hard way.
Conclusion
Now that you know how to create and manipulate shapes in Sure Cuts A Lot 5, you can start designing custom shapes for your cutting projects. The flexibility of SCAL5’s shape tools allows you to get creative with your designs, whether you’re making simple squares or intricate spirals.
If you like the look of Sure Cuts A Lot here is my link to the software. It takes you directly to the website.
Join me on Facebook
Join me in the Scan N Cut – Let’s Create With Sue Facebook group. It is a group of awesome craft friends sharing and caring.
I would love to see you there.
I hope that you have found this quick overview of SCAL useful. Please feel free to ask any questions that you need.
Happy creating