This is a really cool vinyl sign to make. This post will include a link to the free template and the tutorial for you to make it super easy.
Before I get started on the tutorial I have a sad story to go with this sign that occurred when I made the sign. Well sort of sad, it was sad for me but perhaps a tip for you all.
I made the sign and was really pleased how it turned out, took the photos so I could post them on here but just needed the last bit done to finish the project. Anyway, I asked my partner to drill the holes in the top of the signboard so that I could finish it and thread the rope through the top to hang it up.
I measured exactly where I wanted the holes and marked them and waited. He was busy for quite a few days so I just waited patiently. Then late one night he took the sign and put the drill holes in it for me, exactly as I requested, in the right spot…..all good.
Not sad yet you reckon?
Well, the sad bit was that he brought the sign back in and placed it on a stool that we had hats and horse halters sitting on (none of which should live on the stool) and I didn’t notice that it was on a lean. The next morning I vacuumed and knocked the stool with the vacuum nozzle and…..yes, you guessed it! The sign slipped down onto the floor!
The good news was it didn’t break apart, the bad/sad news was it took a chunk out the corner where it landed. I am off to hunt for some paint that I can touch it up with.
So the moral of my story is to watch where you place your signs so they don’t land on the ground. 🙁
I am certainly going to be more careful with the NEXT sign that I make. Luckily this one was for me and not a gift.
OK, let’s get started.
What Do You Need!
- Vinyl of your choice. I used black permanent (but fairly cheap) vinyl.
- Transfer tape/sheet. Cheap clear contact is an economical solution.
- The free template from my library to cut out and put on your board. (or use your own file)
- A board to put your project onto – read below on how I did my very cheap option
- A small piece of rope to hang it with
Step 1 – Download the free template
Download the template from my library. Don’t forget to unzip the file. This seems to be a problem for so many people. I see on the various groups the question on why an SVG file will not upload to their software. The answer often is that they have simply forgotten to unzip it!
If you need assistance with this step check out my instructions here.
Step 2 – Into Canvas or Design Space
Upload the file to your software. If you are using Canvas Workspace, I have included the .fcm file for you to reduce any potential issues that you may come across. If you are using a Cricut or Silhouette then select the .svg file. If you don’t want to use Canvas you could simply place the file on a USB and take it to your machine.
If you need assistance uploading the file to Canvas Workspace check out my instructions for Adding an SVG/FCM file here.
Step 3 – Sizing
Once in Canvas Workspace, you can resize the file if you wish or make any other changes you might like. Send it to your machine and cut it out.
Don’t forget your test cut!
Step 4 – Weeding
Weeding is the next step. If you are new, there is a post about weeding here however this project is so simple you shouldn’t have any issues. Make sure you do this step BEFORE you do step 7 which is putting on the transfer sheet.

A couple of things I do when weeding. I will leave it up to you whether you do it this way.
1. I cut away with scissors ANY excess vinyl that I can before I start weeding so I don’t get in a mess. You wouldn’t believe some of the messes I have gotten into.
You can see in the photo on the left that I have cut some pieces out that I won’t need and aren’t a part of the project. (If you look closely you will see that I had two attempts at the test cut to get the blade position exactly the depth I wanted.)
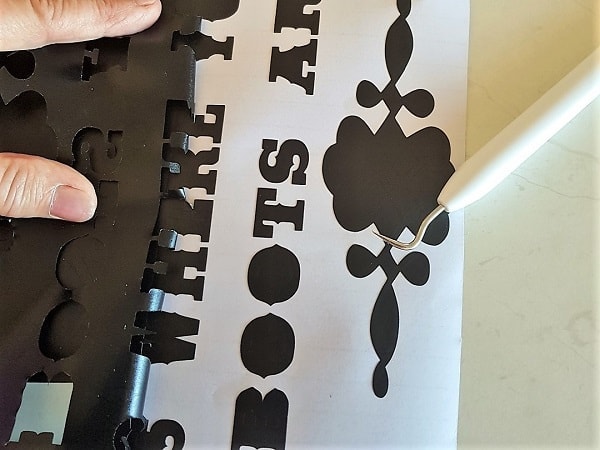
2. The photo above is the project partly through the process. Note the inset pieces I have weeded last. I usually do them last to keep the vinyl on the backing paper with a bit more stability and removed the middles last. You are able to do it in whatever order is the easiest for you.
3. I use the pointy hook tool for the harder to grab pieces. I have the Cricut tool, Brother has one available too however toothpicks, sewing needles or anything with a bit of a point that you can find will work. For the larger pieces I often just use my fingers.
Step 5 – Backing Board
This step can be done anytime in the previous section. You could do this first if you wanted to and then make your vinyl sign the size to match. There are no rules as long as you can cut it out.
I was very economical with making the board for this vinyl sign. I have used leftover flooring planks. You know….the type that you click together and lay on your floors that have a wood look. Mine has a greyish look about them and of course, match my house!
They were leftover from when I had the bedroom floors done and I only needed two small pieces of the plank and just cut them to the same size ~ removing the outside edges that I didn’t want left on. I then glued the two pieces together. (even though they lock together, they won’t stay together if you put them on the wall as this isn’t what they were designed for)

Step 6 – Check placement
This is where I check that the design looks good on the size board I have put together.

Step 7 – Transfer design
Now for the transfer tape, transfer paper, transfer sheet. I never really get which to call it but …. transfer sheet seems more appropriate in this instance.
Whatever we call it…. this is the section for it!

Place your transfer (stuff) carefully over your weeded area starting at one corner (like you might be covering a school book… I still remember that… JUST!) Press and rub the transfer sheet down so it lays flat on your design. You can see in the photo as I am lifting it off of the backing paper.
If it doesn’t come off the backing paper just place the transfer sheet back down over the project again and give the area another rub.
Method 1 of transferring your vinyl sign
There is actually a couple of ways you can do this section. One is to leave it on the backing paper and lift a corner of the backing paper off as you are laying the transfer sheet onto your board.
Advantage: is that it is much easier to manage not to stick it in the wrong spot or accidentally to itself.
Disadvantage: is that it is a little harder to make sure you have the design positioned exactly where you want it, straight, centered, etc as you can’t see through the backing paper. You need to work out a manual method to align.
OR
Method 2 of transferring your vinyl sign
Remove the backing paper entirely and then carefully lay the entire project down. Doing it this way you need to be careful that the transfer sheet and vinyl don’t stick together or in the wrong spot as the bigger the project you are working on, the more likely you are to have difficulties.
Advantage is that it is much easier to align the design because you can see where you are putting it.
Disadvantage is that it is so easy to stick your transfer sheet to itself… Just ask me. I am and expert at having it stick to itself LOL.
Step 8 – Finishing Up
This is just a finish up stretch. By now you should have your design on your board. Hopefully straight 🙂
Give it a few extra rubs to make sure the vinyl is really stuck down well and there are no bubbles. (if you have an issue with bubbles you can sometimes remove them with heat or a small pinprick and press the air out. Air bubbles can be really frustrating)
If you haven’t already put the two holes in the top of the board ready for the rope, do that now.
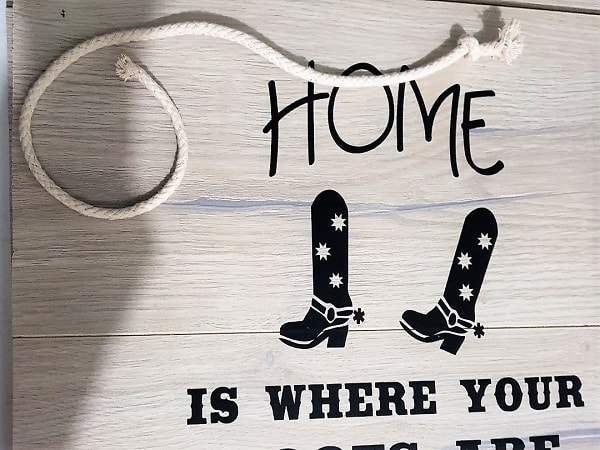
Add your rope to your vinyl sign and hang it up. TAKE A PICTURE!
I would love for you to post a picture of your project on my Facebook page.
Create With Sue
https://www.facebook.com/createwithsue1/
Hope you have enjoyed this project.
Happy Creating,
Sue
P.S. Don’t forget to grab the free template from the Resource Library. If you ever forget what the password is, I always include it at the bottom of all my emails I send out. If you aren’t on my mailing list yet then simply complete the form below which will give you access to all the free files in my Resource Library.


You may like some of my other projects ~ the above all have free templates.
Monthly Planner
Exploding Box
Super Cute Little Boxes
Join me
Join our Facebook group which is full of awesome crafty friends like you. You can share your creations with others who also love to create with their Scan N Cut or Cricut machines.
Scan N Cut !~ Lets Create With Sue
Jennifer Maker Marx
Are you loving your cutting machine?
Thought about learning to create your own SVG files?
My friend Jennifer Maker has a fantastic course that you may be interested in.
More information on her course is here with links to THREE free learning videos.

To be sure…… I won’t let it happen again!.
The good thing about making mistakes is you learn something new. Never be afraid to make mistakes especially with crafting projects. xxxx
Like it Pin it!