
Here is a short step by step tutorial to assist with changing your Scan N Cut mat settings from 12″x 12″ to 12″x 24″. Oh and back again when you are ready.
Note* Some Scan N Cut models do NOT have the option to the larger 12′ x 24″ mats.
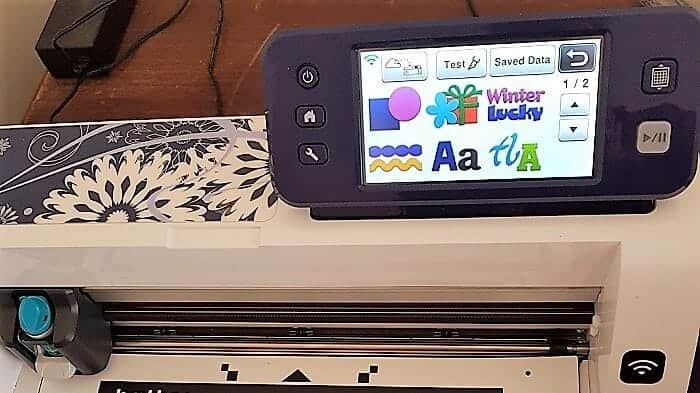
Below is the screen of my Scan N Cut which is a CM900. You may have a slightly different view however most models have similar functions. If yours does not match these instructions at all then please search another tutorial to suit your specific model.
Step 1
After you have selected what you wish to do with the machine you should be presented with a similar view. Selecting the left hand bottom ‘spanner’ icon (circled in the next photo below) will take you to the next screen.
You have the ability to change all the setting for the machine in this area including millimeters to inches, blade pressure and speed. Spend some time scrolling through the various screens and familiarize yourself.
Note* Most settings within the ‘tools’ area are set as factory default settings. You will need to return to this area to return them back to original. This is especially in the case of altering the cut size area from 12″x 12″ (298 x 296) to 12″x 24″ enabling the machine to use the larger cutting mat.
Step 2

I have circled the ‘Cut Area’ where you select the ‘tools’ icon. The Scan N Cut has been provided with a stylus to make changes on the LED screen. While you can use your finger, it is much easier with the stylus.
NOTE: ‘Cut Area’ is your mat setting. It will be presented in either millemetres or inches as per your choosing.
Step 3
You will be presented with this next screen which is where you make the change to the Scan N Cut mat setting your require.
You will see both options, 12″x 12″ and 12″ x 24″. Select the option that you need for your project.
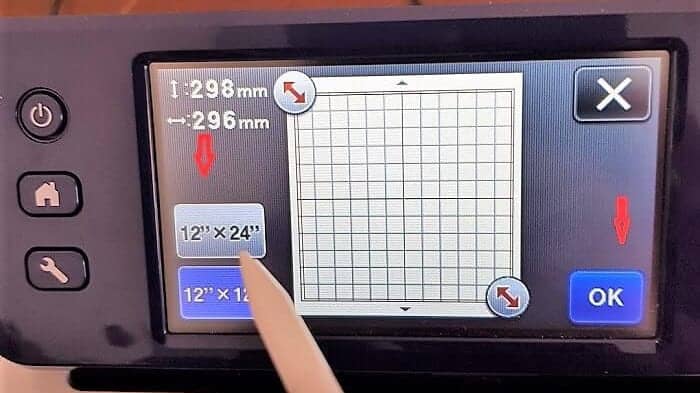
Step 4
Once you have selected the option you require for your project click the ‘OK’. Continue to select ‘OK’ until you are back at the first screen.
NOW ….you are ready to create.
TIP: Aim to change your Scan N Cut mat setting BEFORE you start your next project. Much easier than partway through (which is my normal trick and a great nuisance). If you get to the cutting stage and get an error message saying that you have the wrong size mat click on the back arrow at the top of the screen and you will be able to go in and change to the correct setting.
I have so much fun with this machine and have tried all sorts of projects. I hope you will too.
Remember – Don’t forget to change the setting back before your next project (unless of course it needs the same mat size LOL) It is sooo much easier before you start the project.
Happy creating,

P.S. Don’t forget to check out the other posts on the website. There are a lot of helpful tips and some free projects. There is a Resource Library attached to the site too.
- BIG Changes for ScanNCut Owners – You Need to Know This!
- Exploring the New Affinity Designer V3 — My First Impressions
- Cutting Cardstock: Tips for Better Results
- Rejuvenate Old Jeans with HTV and Your ScanNCut
- Embroidering Cardstock: A Creative Twist for Your Craft Projects
Join Me
If you haven’t already please join me in my Facebook group Scan N Cut – Let’s Create With Sue and like my page Create With Sue.
You can also find me on Pinterest, Instagram and Twitter


I have read and read and read this and can’t find a price.
Hello, I am not certain what price you are looking for? The tutorial is on changing the mat setting. This is a feature of both the CM range and the SDX range. If you cannot see the option to change the mat from a 12×12 to 12×24 then the model you have may not support that size mat. Hope this helps.