
This post will show you how to clean the scanner glass on your Scan N Cut. We will look at both the DX models of the Scan N Cut and the CM model as it is slightly different on each.
Certainly! Here’s a more professional and friendly version of your sentence:
This comprehensive tutorial provides step-by-step instructions accompanied by a video guide, catering to both the CM and DX models of the Brother Scan N Cut. Whether you prefer detailed written guidance or a visual walkthrough, we’ve got you covered!
Why do we need to clean the Scan N Cut scanner?
When do you need to clean your Scan N Cut scanner? Luckily, it isn’t that often however you will know when it is needed as things don’t quite work as they should.
One very common reason is that you may receive a scary message on your Scan N Cut machine that states your mat cannot be recognized and won’t load. The cause?? most often it is something stuck on the scanner glass.
How can you tell the Scan N Cut scanner is dirty?
The first way is you may notice unusual or unwanted marks when you scan something. Another telltale is you may become aware when you are scanning an image that it is not ‘seeing’ the image as well as normal.
Below is a picture of my CM900 model. I knew mine needed cleaning when I made one of my tutorials. There was a dark line down the scanned area which indicates there is something on the scanner glass.
Let’s clean it!
Cleaning your SDX Scan N Cut scanner
Here is the video showing how to clean your SDX Scan N Cut scanner and following that are the written step-by-step instructions to guide you through it. The first few steps of the written instructions are identical for both the CM models and the DX models.
Cleaning your SDX Scan N Cut Model Video
Unplug your Scan N Cut
Unplug your Scan N Cut from the power and move it to where you have a bit of room to maneuver your machine. You can remove your blade as well, though this may not be required on some models. I don’t do it on my SDX2200D as it stays in place perfectly.
Flip your Scan N Cut so the base is at the top
Place the display screen back down flat and close the front cover. Carefully pick up your machine and flip it over so that the base is facing you. You may need to hold onto the LED screen otherwise this may pop open and get damaged. Make sure that you lay it down carefully.
Removing the scanner cover on the DX model
Once you have your Scan N Cut lying over with the base facing upwards, you will see a separate section underneath. Once you have found it once it is much easier the second time. LOL
Below is the bottom view of the DX2200D Scan N Cut.

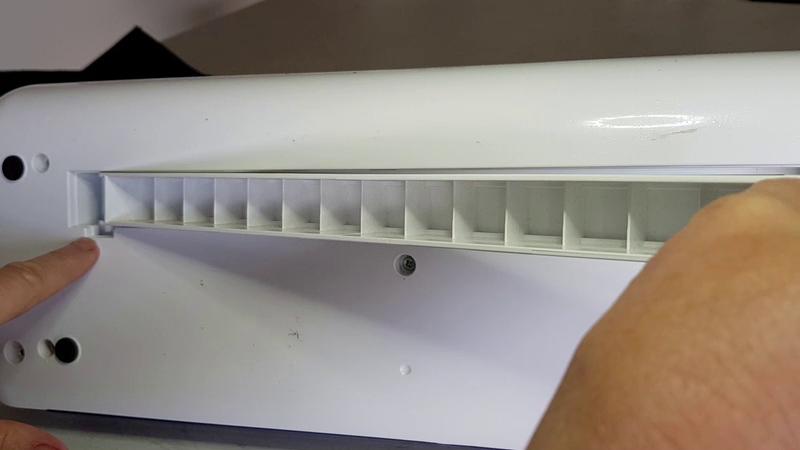
To remove the scanner cover you first slide out the mat guide to reveal some small grips to assist you.

You will see a small catch on the right-hand side which you pull back while leveraging the grips to slide the scanner cover off. If the cover starts going skew whiff, straighten it back up and have another attempt.

Once you have removed the scanner cover you will be able to see if anything is obstructing the scanner. In most instances it will be very obvious however I have had an occasion where there was a small object right on one edge partially covered by part of the machine. If you don’t see anything at first glance take a look right at the edges.

This is what I found, a small piece of of tape that I had used to hold foil down on one of my projects. I normally advise a longer length of tape. The problem when foiling though is your limited space as you do not want the foil to touch the mat and you do not want the tape to interfere with your project.
Here is a link to the foiling tutorial that caused this scanner issue. https://www.createwithsue.com/tips-for-foiling-with-your-scan-n-cut/
What to use to wipe your scanner
Make sure you use a lint-free cloth to wipe down your scanner glass. Either a microfibre or alcohol-free baby wipes will be fine. In the picture below I used alcohol-free baby wipes. I normally wipe down my entire Scan N Cut while I am at it. Seems a timely chore.

Putting your Scan N Cut back together
When you are finished cleaning, replace the scanner cover and turn your machine back over so it is right side up. Plug in and turn it back on. You can check whether your mat loads… and your scanner scans nicely.
Here is the cause of my mat not loading. Seems weird that this tiny piece of tape will stop a mat from being recognized.

Cleaning Your Scanner CM Model Video
This video demonstrates how to remove the scanner cover for the CM model Scan N Cut.
Removing the scanner cover on the CM model
The CM Scan N Cut model looks a little different than the DX model. It has a long thin lift-off cover over the scanner glass. In my opinion, it is much easier to remove the scanner cover and clean the scanner glass on the CM models.
Follow the same steps listed for the DX Scan N Cut. Turn off your Scan N Cut and unplug it. Then lay down the display so that it is flat and flip the machine over so that the base is facing upwards. On my CM900 the display is a little loose so I normally hold it shut so that I don’t damage it.
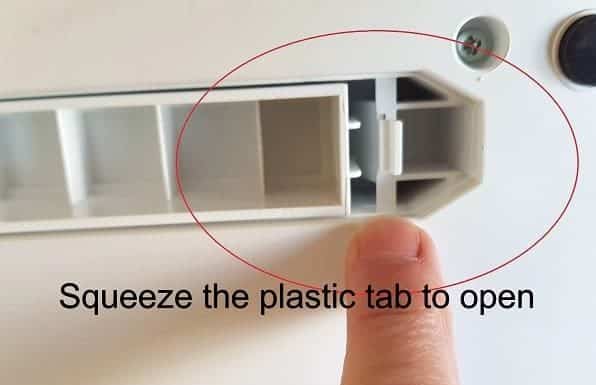
Your scanner cover on the CM model Scan N Cut
You will see a long thin section nearly the full length of your Scan N Cut. This is the scanner cover.
On the right-hand side of the cover, there is a plastic tab that you squeeze together which will allow the section to be removed. It simply lifts upwards.
Once you remove it you will be able to see the scanner glass.
Step 4
Use a lint-free material to clean your scanner glass. I used a microfibre cloth when I filmed the CM model video and alcohol-free baby wipes filming the DX model video. Both are lint-free. DO NOT use a paper towel or anything that will leave ‘bits’ on the glass.
If you use a microfibre cloth, dampen one corner of the cloth, make sure it is only damp and not wet. Wipe the Scan N Cut scanner glass gently with the damp cloth.
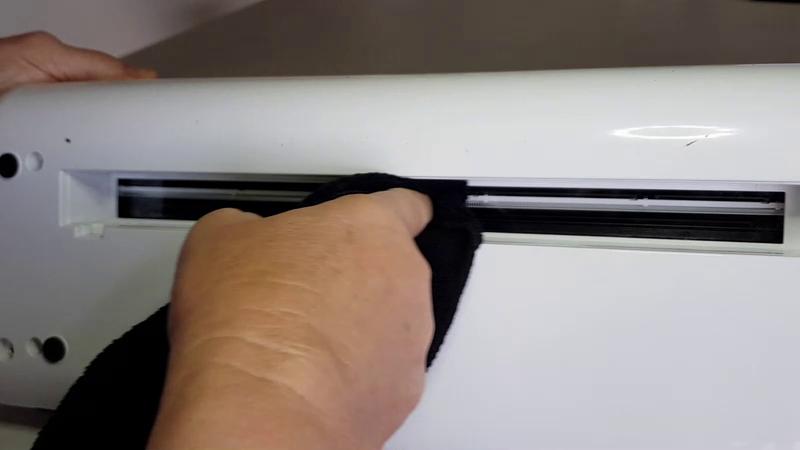
When you are happy with how clean it is dry the scanner glass with a dry area of your cloth.
Placing your CM scanner cover back on your machine
Put your Scan N Cut scanner cover back onto your machine. Note there is a little piece that slips into a slot. Pictured below.
Turn your Scan N Cut back over
Flip your Scan N Cut back over carefully. Again, watch out for your LED screen as you flip it. Clean any other areas that may need a bit of a wipe.
And you are done!
Wasn’t that easy!
I hope that you found this tutorial useful.
Happy creating,

P.S. Remember to check out some of the other posts on this site while you are here.
- Exploring the New Affinity Designer V3 — My First Impressions
- Cutting Cardstock: Tips for Better Results
- Rejuvenate Old Jeans with HTV and Your ScanNCut
- Embroidering Cardstock: A Creative Twist for Your Craft Projects
- How to Delete Saved Files on Your ScanNCut
Join Me
If you haven’t already, come and join the facebook group Scan N Cut ~ Let’s Create With Sue.
And like my Facebook page Create With Sue

Scan N Cut Cheat Sheets for the SDX models
Are you at a bit of a loss with what all the icons in your cutting machine are for? I have a solution for you… Cheat Sheets. These cheat Sheets suit all models of the SDX Scan N Cut machines.
Cheat sheets for your Scan N Cut can be a great help.


Thank you Sue. I read this before and remebered it when “something went wrong”. It wasn’t the glass – a piece of paper had torn off and got stuck over the glass. Following your instructions I managed to find the end of the paper and grab it with a pair of tweezers. All fixed! And now that’s another part of the machine that doesn’t intimidate me anymore.
That is excellent news Janet. It is very easy for things to get stuck on the glass or just caught up in that area. I am so pleased to hear you sorted it out.
Brilliant tutorials
Thank you
Glad you are enjoying them. Thank you 🙂
Thanks Sue, I watched this so that I am prepared when something happens. Having the knowledge in advance makes me feel more able to deal with an issue that, lets face it, will happen at some point. Jo
Yes, advanced knowlege is very helpful. Often the cause of a mat not being recognized is that something is either stuck to the scanner glass or just caught up in there. Knowing how to clean the glass is a possible quick solution for the problem. :-). Sue