The Scan N Cut background screen is a really great Scan N Cut feature. It is available on both the CM range of Scan N Cut machines and of course, the DX range. We will look at what it does and where it lives in both ranges.
Disclaimer: As an Amazon Associate, I earn from qualifying purchases. Links included in this tutorial may be affiliate links, Amazon or others, meaning I may earn a small commission at no additional cost. These commissions will help me continue creating content for you. Thank you for your support! Read my very boring full disclosure policy here.
What is the background screen
The background screen or “feature” can be a bit of a lifesaver. If you scan lighter or darker materials on your mat, often it can be hard to see where exactly to place the design. The good news is that you are able to change the background screen color to suit the color material you have just scanned.
You can also turn it off too however that kind of defeats the benefits of using it in most instances.
How to find the background screen – DX
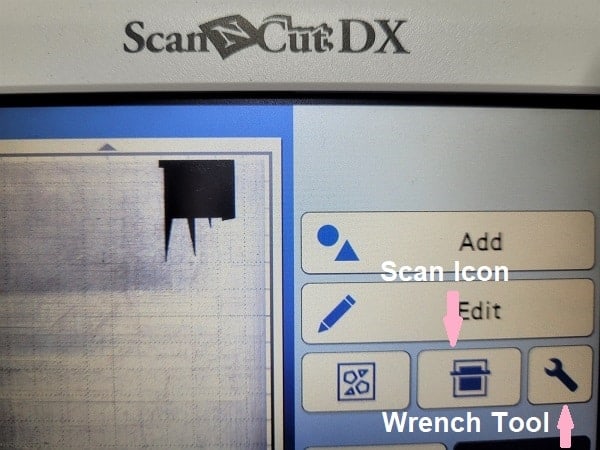
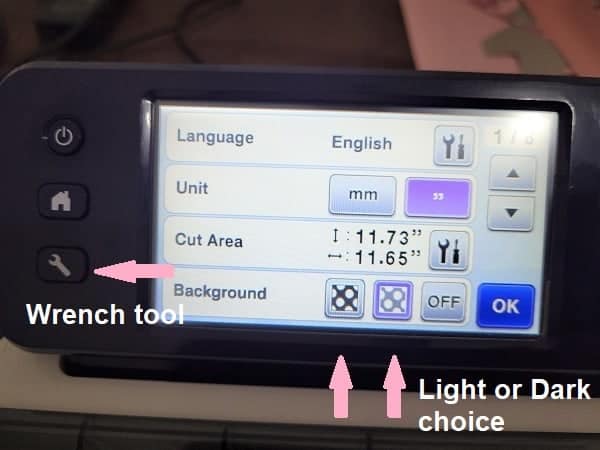
To change the background screen is actually very easy. On the DX models, you will find a wrench icon that sits on the bottom right-hand side of the LCD screen after you have imported your shape or design.
View of setting with the dark screen
If you have dark material on your mat it is near on impossible to see where you have placed your design. As you can see below, I have scanned my piece of scrap cardstock and placed the design onto it. I bet you cannot see it – I certainly couldn’t.
The solution is to change the background color to a lighter color (or darker if that is a better choice).
To change the backing go into the wrench tool.
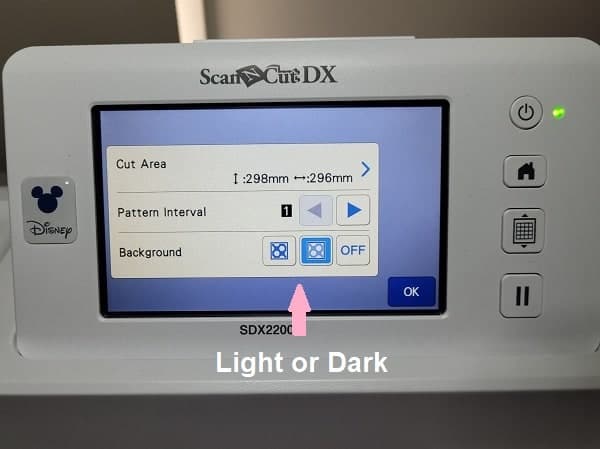
Choose the light or dark icon
This is the screen you will be presented with. Click on either the lighter or darker icon setting highlighted. Select OK and check the difference. In most cases, there will be a HUGE improvement.
View of mat with the light setting
Here is a view of the background screen with the light setting. As you can see, it is so much easier to see the design and move it into the exact placement. I call this precision placement. If needed, you can select the Edit icon and zoom in to either 200% or 400%.

How to find the background scan – CM range.
The CM range background scan feature works exactly the same as the DX range. The biggest difference is where to find the wrench tool.
It is located on the main screen and not in the LCD panel like the DX. You can see where I have highlighted it below.
More information on scanning materials on your mat
I love the fact that the Scan N Cut has the ability to precisely place your design. This feature allows you to utilize any scrap pieces leftover from other projects. You may have already noticed from some of the earlier pictures that I use lots of little pieces. They come in very handy.
The tutorial on how to cut multiple colors on one mat covers all the steps from bringing your design right through to completion.
Other tutorials
The site has been designed to assist you. While you are here, remember to have a look around and see if there are any other tutorials that interest you. Topics range from how to do various tasks with your Scan N Cut, using Canvas Workspace, and lots of projects.
Happy creating,


Join me on Facebook
Join me in the Scan N Cut – Let’s Create With Sue Facebook group. It is a group of awesome craft friends sharing and caring.
I would love to see you there.
Remember, you are always welcome to say “Hi” at [email protected] or [email protected]. It would be great to hear from you!

Need to learn how to use Canvas Workspace? More information can be found here!