Do you get to the store and wonder which Scan N Cut mat you need? This tutorial will help you tell the difference between the mat so you don’t purchase the wrong one.
Are the mats compatible with all Scan N Cut models
Disclaimer: As an Amazon Associate, I earn from qualifying purchases. Links included in this tutorial may be affiliate links, Amazon or others, meaning I may earn a small commission at no additional cost. These commissions will help me continue creating content for you. Thank you for your support! Read my very boring full disclosure policy here.
Brother make many mats to suit your Scan N Cut cutting machine. This is great!
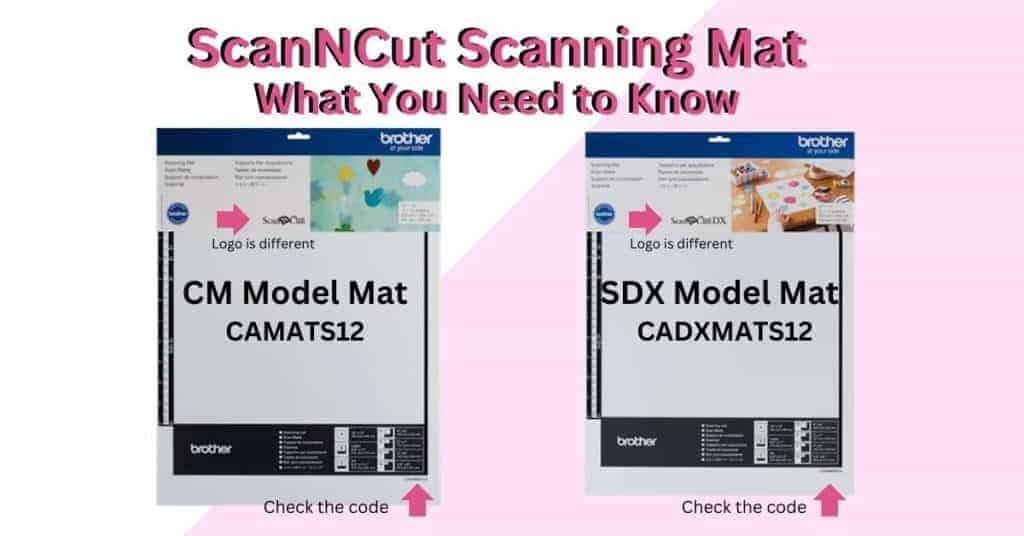
The main problem is that the mats are not compatible between the CM range of Scan N Cut cutting machines and the new DX range.
But wait, that is not the only problem. Nope! Brother has used exactly the same color coding for both series. Yup…… This makes it much more of a challenge to know which mat to purchase when you are in the store.
Not only that, but even if you know the difference, if you have both series at home it can be so easy to inadvertently pick up the wrong mat without thinking. Of course, your Scan N Cut is very clever and knows straight away that you have tried to load the wrong mat and say nope… not recognized.
Fortunately I have a few tips that will help you…. read on!
What mats are available for your Scan N Cut
First of all, let us have a quick look at what mats are available in the Scan N Cut range.
Note: links are my affiliate Amazon links in this section
Scan N Cut DX range
Note: codes may vary between countries
- Standard Mat 12″ x 12″ – general purpose mat for vinyl and cardstock – CADXMATSTD12
- Low Tack Mat 12″ x 12″ – for more delicate paper-type materials as it is not quite as sticky – CADXMATLOW12
- Standard Mat 12″ x 24″ – general purpose for larger projects – CADXMATSTD24
- Low Tack Mat 12″ x 24″ – for larger projects out of more delicate materials – CADXMATLOW24
- Scanning Mat 12 x 12″ – this is to scan only. You cannot cut on this mat. It is designed to provide a clearer scan – CADXMATS12 – S after the T denotes Scanning. The code is very close to other mat codes so look carefully
- Scanning Mat 12 x 24″ – for scanning larger areas. NOTE: not all models scan 24″ – CADXMATS24
- Fabric Mat 12″ x 12″ – for use with the thin fabric blade to cut fabric pieces or applique (DX ONLY) – CADXMATF12
- Paper Piercing Mat 12″ x 12″ – for use with the Paper Piercing kit (DX ONLY) – CADXPPMAT1
My biggest tip when purchasing a mat is if you have a DX look for the product code CADX when ordering. This is easy to remember as the DX model has the DX in its product code for the mats.
Scan N Cut CM range
Note: codes may vary between countries
- Standard Mat 12″ x 12″ – general purpose mat for vinyl and cardstock – CAMATSTD12
- Low Tack Mat 12″ x 12″ – for more delicate paper-type materials as it is not quite as sticky – CAMATLOW12
- Standard Mat 12″ x 24″ – general purpose for larger projects – CAMATSTD24
- Low Tack Mat 12″ x 24″ – for larger projects out of more delicate materials – CAMATLOW24
- Scanning Mat 12 x 12″ – this is to scan only. You cannot cut on this mat. It is designed to provide a clearer scan – CAMATS12
- Scanning Mat 12 x 24″ – for scanning larger areas. NOTE: not all models scan 24″ – CAMATS24
None of the Product codes for the CM models have DX in them. If you see the lettering DX in any Scan N Cut product you are purchasing, it will not work in a CM model.
List of supplies for Australian crafters
A detailed list of accessories is available on the Brother site. When you follow this link it will take you to the Australian Brother site where you choose the Scan N Cut as the product type and then your model Scan N Cut on the next screen.
List of supplies for US crafters
Here is a detailed list of what Brother provides for American crafters. You will be able to filter on the particular supplies that you are after.
List of supplies for UK crafters
The UK site is a little different than the AUS or US sites. It has some interesting variances though and is worth a stroll through. Check it out here. Enter your model so the correct accessories can be presented.
How to tell the difference between mats for the DX
Fortunately, there are some subtle differences between the mats for the DX range and the CM range.
- The DX range has a small diamond cut out at the bottom edge of the mat. The CM range does not. At the bottom of the CM mat is a black painted on triangle shape…not diamond and not cut out.
Pictured is the DX and the CM standard 12″ x 12″ mats placed on top of each other to show the difference of the black triangle versus the cut out diamond shape of the DX.

2. I highlighted the mat’s codes in the above section and fortunately, the DX mat code is actually printed on the bottom of the DX mats. There are NO codes on the bottom of the CM mats.

3. Remember – the DX mats have the DX lettering in their code to make it a bit easier which one to purchase.
4. The black markings are also different on the mats however unless you have a photographic memory (I certainly don’t) then this method isn’t the friendliest to work out the Scan N Cut mats. The size of the colored area is smaller on the CM too, however, again, not friendly to work it out from this.
Ideas to keep track of which mat is which.
There are ways to keep track of which mat is which. Having said that, I STILL inadvertently grab the wrong mat if I am using both my CM900 and DX 2200D at the same time. When this happens the Scan N Cut will not recognize the incorrect mat. It is a pity that Brother did not color code them differently. … ah well.
My favorite tip to identify which Scan N Cut is which
My very favorite tip is to create a vinyl design and place it on the clear mat cover. This makes it easily identifiable. It also provides a couple of other bonuses.
- identifies what the mat is at a quick glance – eg standard, DX
- you can find that pesky clear cover easily as it is no longer clear – a bit like putting the markers on sliding doors so you don’t walk through them.
- I don’t know about you but I always have trouble working out the right and wrong side of the clear cover. You know …the dusty side and the not dusty side. LOL (we live in a very dusty country area)
- it is fun. When I first got my Scan N Cut I labeled everything. I wasn’t wise to stand still in my place. It follows suit that I would label the clear cover.
I have created some for you or you could design your own. Grab the one below from my Resource Library.

More information to help you manage your mat
Check out these tutorials for more information to help you manage your Scan N Cut mats.
Revive your mat and get it sticky again.
Stop materials moving on your mat.
Change mat settings on your Scan N Cut.
Happy creating,


P.S. Don’t forget to pop into our Facebook group and say hi. I love hearing from you! The group is full of awesome crafty friends like you and is where you can share your creations and any issues you might have.
You are always welcome to say Hi at [email protected] or [email protected]. It is always
great to hear from you!


Hi hoping you can help me.
my 12×24 mat code os camatp24. this will not work in my cm550 model scanncut.
Do you know why?
Thank you.
Hi Joanne. 🙂 The mat is the correct code for the CM550 so there shouldn’t be an issue with it unless there is some damage to it. eg corners, registration marks etc. The other problem which cause mats not to load is a dirty scanner. Try cleaning your scanner and check that nothing is stuck to it.. pieces of tape/vinyl/card etc. Here is a link to a tutorial if you need help with this. https://www.createwithsue.com/clean-your-scan-n-cut-scanner/. Let me know how you go. Sue
Hi Sue, I have a Brother ScanNCut CM350. I am looking for a fabric mat that will work with it, any suggestions?
Hi Rose, as far as I am aware, the CM range did not have a fabric mat created for it. If you do not want to stabilise the fabric, either with a starch type product or iron on backing there are a couple of other options. One is the High Tack Adhesive Fabric Support Sheet which is designed for cutting fabric and can be used with the Standard Mat. This is a Brother product. Another alternative is to sandwich the fabric between freezer paper (Reynolds brand or similar).
Just found your website and look forward to further checking it out. I have a question loosely about mats. I have the embossing kit but why does the scan n cut require the foam mat when no special mat is required with a circuit to emboss? Doesn’t make sense. Thanks!
Hi Rhonda, you can use it without the padded foam that comes with the kit however the foam enables a deeper/better emboss. I use mine sometimes to place the scoreline on cards and dont use the foam padding. If you have an old mat you can add the foam padding to an old mat and leave it ther.
I just bought a used CM350 and will be starting from scratch…I’m glad I found your website and tutorials and looking forward to learning from you. I basically bought it for Fussy Cuts in Junk Journal kits I have bought. Wish me luck!
Hi Cathy, the CM range of Scan N Cut machines are very sturdy and you will have a lot of fun with it. Let me know if you need any help.
I was given a ScanNCut CM350 and I’d like to cut fabric letters. Can you please let me know what mat to buy? I learned by your previous response that they did not make a mat for this model. Can you still cut fabric with it? I know nothing, so any (specific) information you have would be great!! I also joined your facebook group and signed up for your tutorial!
Hi Karen, I am pleased you have joined the Facebook group. It will be easier to provide you more detailed assistance as it is needed. To answer your question about cutting fabric with the CM350 – ABSOLUTELY you can. Tips to have successful fabric cutting is:
1. The mat needs to be sticky enough to hold the fabric.
2. Some fabric may require stabilising. I have tutorials on how to do this and depending on the type of project you are making, you need to choose the best stabiliser for that. eg Applique, Quilting etc
Here is a good starting place. Once you get the hang of it you will find it easier and easier. 🙂 https://www.createwithsue.com/cutting-fabric/