
This tutorial will give you tips for foiling with your Scan N Cut. We will look at the difference between the Brother Foil Kit and the WRMK Foil Quill tool. It will also cover the different types of foils, best designs, precautions, and lots of tips.
Disclaimer: As an Amazon Associate, I earn from qualifying purchases. Links included in this tutorial may be affiliate links, Amazon or others, meaning I may earn a small commission at no additional cost. These commissions will help me continue creating content for you. Thank you for your support! Read my very boring full disclosure policy here.
What are the different foil types for the Scan N Cut
Cold Foil
There are basically two types of foil that can be used with your Scan N Cut. The first is cold foil which is utilized by the Brother Foiling Kit.
The Brother Foil kit is an optional add-on for your Scan N Cut which adds additional features to your Brother Scan N Cut and some selected designs to Canvas Workspace for you to create in foil. The system uses specially designed glue pens which will add glue to the areas of your design on your project. You let the glue dry for a few moments and move on to the next step where your machine will press the cold foil onto the glued areas to create the finished design.
Here is a tutorial on using the Brother Foil Kit.
Hot Foil
Hot foil is the next type of foil that can be used. There are a number of methods to transfer the heat activated foil onto your project to create an awesome design. These include purchasing a special foiling machine like a Minc Foiling Machine, printing the design onto paper/cardstock with a laser printer then placing the foil on the design and running it through a laminator. Probably with your heat press too..(must try that). Remember to protect your equipment with paper or similar over the foil.
Then there is my favorite hot foil technique, the We R Memory Keeper Foil Quill commonly referred to as WRMK Foil Quill. You can purchase these individually or in an all-in-one kit. The kit includes 3 USB heat pens, standard tip (1.5mm), bold (2.5mm), and fine (0.5mm) plus adapters for the pens to suit the Scan N Cut, Cricut, and Silhouette cutting machines.
Tips for using foil
Use the correct foil type
The first tip is fairly obvious. Make sure you use the correct foil type to suit your tools and project. Whether the foil is heat-activated or cold foil is usually written on the packaging when you purchase it. I have found that the various brands of heat-activated foils are usually well documented on the packaging however, the cold foil…. not so much. Of course, this might be just the cold foil brands that I have found.
American Craft (makers of the WRMK Foil Quill) make heat-activated foil to use with their kit and of course, Brother has cold foil in various colors to suit their Foil Kit.
****When using heat-activated foil always check that the material will withstand the heat.

Heat activated foil used by the WRMK Foil Quill

Cold foil by Brother for the Scan N Cut foil kit
Designs suitable for foiling
You may be wondering what type of designs are best suited for foiling projects. The best choices are designs that are specifically for foil projects OR lines embossed projects. Yep, you can use most lined embossed designs to foil your projects. Single-lined fonts and designs work really well. Two of my favorite places to find single-lined fonts are here and on the website Single Lined Fonts which has both fonts and suitable designs.
There are many designs available to purchase. One of my favorite places to find designs is Creative Fabrica where I have a subscription. Even if you do not have a subscription the designs are quite inexpensive to purchase. You may even be lucky enough to find some for free on there.
Here is a quick link for locating foil designs.
You can also create your own designs in Canvas Workspace or a Vector Graphic program. They are a LOT of fun. Adding a touch of foil to a card, for example, can add that extra pizzazz to your card.

Securing the foil
My next tip is to make sure that you secure the foil down ensuring that it is fairly taut and flat. For the Brother Foil Kit, you will find a sheet of plastic to place over the foil which holds the foil in place. I secure the plastic sheet with long pieces of painter’s tape holding it down directly to the mat. The longer the tape the less likely it will come off and end up in your machine.
For the WRMK Foil Quill, l I use smaller pieces of painter’s tape at the four corners to hold the foil in place. If you plan to stick the tape to your actual project, please check that it will not take a layer off the material when you remove the tape. Smaller pieces of tape can be risky as small pieces can easily come off your project and get stuck onto your scanner. If this happens don’t panic, the tape can be removed by removing the panel in the base of your Scan N Cut and cleaning your scanner. (don’t use clear sticky tape as it is way too hard to find again)
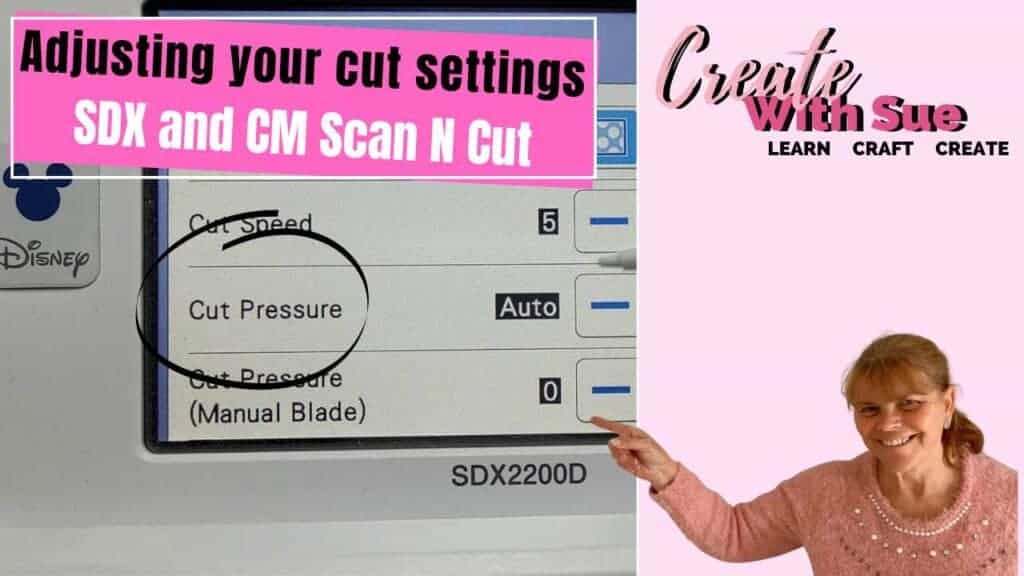
Adjusting pressure on your Scan N Cut
To create a foil design with your Scan N Cut, you set the design to Draw rather than Cut. You can adjust the depth or pressure setting for the Draw feature in your machine. At this stage, I haven’t needed to adjust the pressure when using the Brother Foil Kit. This may depend on the thickness of the material you are planning to foil. I predominantly foil cardstock.
For the WRMK Foil Quill, you will need to check the pressure to ensure that the tip of the pen does not press too heavily on the foil and tear the foil as it moves around the design. This is easily set up in the Draw settings after you select the Draw option when you start foiling your project.
I have a tutorial that will assist you with adjusting the depth or pressure of your machine. While the tutorial primarily focuses on adjusting the cutting depth of an SDX Scan N Cut, the adjustment is very similar for either Cutting or Drawing. Find the tutorial here. Remember that testing is your friend.
Checking for foil coverage
How do you know your foiling has good coverage? My recommendation is to leave your mat in your machine and have a peek. Slowly lift the foiling sheet up and reveal your design. Did it turn out how you expected? If so, excellent. If not, you have a couple of options.
You can either place a new piece of foil onto your design or move the piece you just used around slightly. As long as you have a fresh patch of foil to transfer and haven’t removed your mat from the Scan N Cut, you can do a second pass on your project—or third, or fourth—however many times you need to gain a good result.
I recently created a card using my WRMK Foil Quill and used a pretty blue foil. Unfortunately, it did not turn out nearly as vibrant as I had planned so I decided to go over it with gold foil. The first pass in gold was a reasonable coverage however you could see small areas of the blue still showing. This actually looked super cool but I wanted this card to look really special so I did another pass and then one more again. FOUR passes in total and the result was really nice. The blue had covered nicely and the gold stood out well.
What is the difference between the WRMK Foil Quill and the Brother Foil Kit
We have already covered the biggest difference between the two foiling tools: one is cold foil, and the other is heat-activated foil.
The next difference is that the Brother kit is kind of a two-step process where you draw the design with glue and then the second step is to press the foil onto the glue using the kit’s special tool. The WRMK Foil Quill is a one-step process where you heat the tool up and place it in your machine holder and using the Draw function, heat the foil in the shape of the design onto your project.
The third difference is the finish. While both are very shiny foil finishes, the Brother Foil kit is not quite able to achieve quite as fine, and cleanly edged finish as the WRMK Foil Quill.
Both tools can struggle with thicker blocks of foiled design however you can use the Bold tip pen in the WRMK kit to gain more coverage. Creating large blocks of the foiled area with the Brother Foil kit can turn out with notable lines and a bit patchy.

This Mandala was created using the Brother Foil Kit and cold foil. This was a good comparison for tight, fine work however the Brother kit can do a nice job with many projects. I pick and choose which projects I will use each tool for.

Mandala created using the WRMK Foil Quill. The finished result is a little finer than the cold foil technique.
How do you manage the WRMK Foil Quill tool when hot?
I had spent a few years juggling the hot WRMK Foil Quill tool when it suddenly dawned on me that you could use the small holder tab to hook onto the edge of most SDX Scan N Cut models’ flip-down covers. The tool gets very hot, and I do not recommend placing it into the machine’s holder until the very last minute before pressing go on the machine. Set up your mat, alter your settings, and get ready to foil before placing it in the holder.

Can I use the USB port on my Scan N Cut?
While you can use that port it really does not seem to produce enough power to do a nice job with the WRMK Foil Quill tool. I always plug the tool into a direct power source and not into my machine.
Does the WRMK Foil Quill work on all models of the Scan N Cut
YES! yay!. The WRMK Foil Quill will work on both the CM models and the SDX model Scan N Cut machines. I used mine on my CM900 for a few years before I ventured to use it on my SDX2200D Scan N Cut.
The first reason was when I purchased my Foil Quill I only had the CM900. Then, it took me quite a while before I was ready to risk using the heated tool in my brand new Disney model. What…. you thought you were alone in worrying about wrecking your Scan N Cut?
Nope, I was too.
You definitely need to use the WRMK Foil Quill with caution. It gets fairly hot. You don’t want to burn your mat, machine, or your fingers. My precautions are that I do not put it in the holder until the last minute and I take it out again the second the foiling is done. The tool is removed between passes if I do a number of passes too. This is one benefit of the Brother Foil kit over the WRMK Foil Quill. The Brother kit is an approved Brother product and it uses cold foil technique. NO HEAT.
Projects with the Brother Foil Kit
Making this rose card using the Brother Foil Kit, Canvas Workspace, and, your Scan N Cut was a lot of fun indeed. This tutorial demonstrates how to use the Brother Foil Kit and uses one of the designs from the Brother Foil Kit after activating it. I have created a free card template to suit the rose which is available in my Resource Library for this project.

More about the WRMK Foil Quill
Would you like to find out more about the WRMK Foil Quill tool?
I have a full tutorial on it which you can find here.

Above is the WRMK Foil Quill and the various adapters that were included with it. The tool can be used with the Brother Scan N Cut (both CM and SDX range) Cricut Maker and Silhouette cutting machines.
Happy creating,

Join me
Join me in the Scan N Cut – Let’s Create With Sue Facebook group.


This is not easy to see as your headings are covering most of the instructions.
Hi, I have checked the tutorial on my phone and PC and both are showing ok. Are you able to send me a snapshot of what you are seeing please? That way I will know whether it is something that I can fix. Please email [email protected]. Thanks, Sue