Have you wondered how to add glyphs to Canvas Workspace?
Adding that special something to the text is called by several names depending on where you are from. It could be Glyphs or Flourishes or maybe Characters. This video will demonstrate how to access these special characters and add them to your projects in Canvas Workspace. Once created you can Cut them or Draw them with your Scan N Cut cutting machine and add them to cards, vinyl projects, stencils.. any project you are working on that suits a script font with these added features.
In this tutorial, I have written instructions on adding glyphs to Canvas Workspace AND the video to watch. We are using the downloaded (offline) version of Canvas Workspace.
Disclaimer: As an Amazon Associate, I earn from qualifying purchases. Links included in this tutorial may be affiliate links, Amazon or others, meaning I may earn a small commission at no additional cost. These commissions will help me continue creating content for you. Thank you for your support! Read my very boring full disclosure policy here.
Video – Adding A Glyph or Flourish to Canvas Workspace
I hope that you like the video and remember to hit the subscribe button and give a thumbs up so you never miss out on any of my videos. Read on for more information as I have included lots of additional tips in this tutorial.
What is a glyph – flourish – special character?
In the crafting and design space, a glyph, flourish, or special character refers to those awesome, unique elements that enhance your text or design projects. You know, the super swirly extra bits on the font.
A “glyph” is a stylized symbol or character with decorative features, while a “flourish” adds a touch of artistic flair, often in the form of ornamental flowers, hearts, curves, or loops. These fall under the broader category of “special characters,” which are non-standard characters that go beyond the basic alphabet.
Software to add a special character to Canvas Workspace
There are numerous software packs around that will manage fonts, glyphs, and special characters. These include:
Adobe Illustrator: A widely-used vector graphics editor that allows you to create and manipulate glyphs and is suitable for various design projects.
Inkscape: Inkscape is a free, open-source vector graphics editor and is a good alternative for those who prefer open-source software to design in. It supports scalable vector graphics and is capable of handling glyphs and special characters.
FontLab: FontLab is another professional font design software that supports the creation and manipulation of glyphs. It provides advanced features for font editing.
Sure Cuts A Lot: SCAL is software that I use regularly and is so easy to use for adding glyphs, flourishes, and any special characters that are included with a font.
I won’t cover them all however let’s look at a few of them that I mainly use.
Sure Cuts A Lot (SCAL)
Now, I really like SCAL and have both SCAL5 and the newer SCAL6. Unfortunately, SCAL has a few glitches that annoy me so for Scan N Cut projects, my “go-to” is Canvas Workspace because it just works with the machine. However, SCAL has some super cool features that Canvas Workspace does not have, one is being able to export in SVG and other formats AND … using Glyphs!
It is unbelievably easy in SCAL and at some point, I may do a tutorial on it. While SCAL is very inexpensive, it is not free so I am not covering it in detail today.
The picture below is using Sure Cuts A Lot (SCAL6) and shows the font panel. As we move through the tutorial you will understand why this way is my favourite. If you own SCAL this is the way to go. Let me know if you would like some tutorials.

MainType Font Manager
MainType Manager is free software that will manage your fonts as well as managing special characters. It does much more than just adding glyphs to Canvas Workspace.
A few years ago I was using this software to sort out and manage my huge number of fonts (I think I might be classified as a font junkie). In the software, I was so organized and very pleased with myself indeed. BUT… I upgraded my computer and never worked out how to transfer all the hard work I had put into sorting my fonts and couldn’t be bothered doing it over again. {sigh}
While I no longer use this software is it worth mentioning. Here is the link to the website that has MainType software to download for free.
Please note that I am not affiliated with this software in any way and have only experienced it from a user point of view.
In the picture below, you can see the wording Barbie and how it looks in the various fonts. This is one feature of the software that is fun as you can see what the font will look like before using it. You can also segregate commercial use fonts from personal fonts. I found this was beneficial to me.
Another advantage is that MainType is available for both Mac and PC computers.

Character Map for PC’s
Last but not least is the Character Map software which is a great option for adding glyphs in Canvas Workspace and other software programs where you may need to add a glyph. This is free software that is installed by default on all Windows computers. Bonus!
Character Map is the software that we will be using for this tutorial as it will be readily accessible to all Microsoft Windows users.
There are some disadvantages to using the Character Map. One big one is that I have not found a way to increase the Character Map’s size. The windows adjustment handles do not appear and the regular icon on the top right-hand side is greyed out so that you cannot expand to full desktop size.
This means that it is a bit difficult to actually see what you are trying to add. Compared this to SCAL where the box is very adjustable and the glyphs are clearly visible.
On the plus side…. it works! Yeah!
Below is what it looks like.
Choosing a font
These special characters are normally associated with a script font. Not all script fonts have glyphs included.
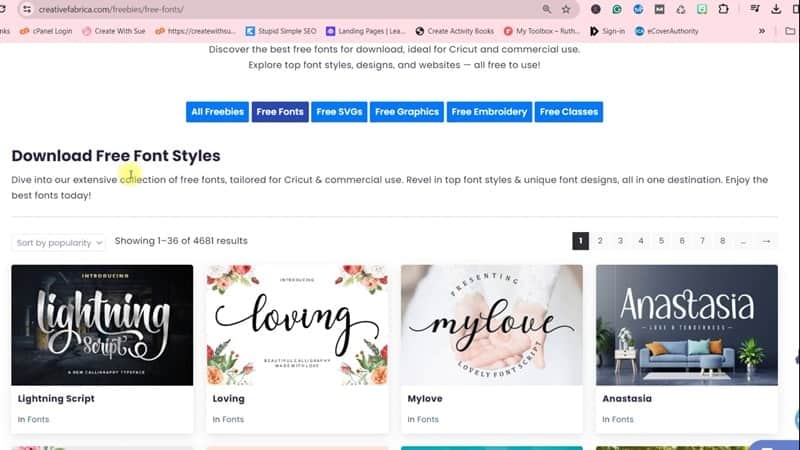
A great place to find free fonts is Creative Fabrica. They have LOTS of free fonts and they can be used for commercial or personal use. This search brought up 4,681 free fonts which is a lot of fonts to choose from.
The Lightning Script font at the top left of choices below is a new one that looks great for cutting machines.
TIP: If you click into a font, scroll down the page and you will find an area to test the font and see the additional characters that are included in the file. To test the font, simply type in text that has lettering that you will potentially use. I often type my name – Susan – I am fussy with the S lol.
I didn’t see any glyphs in the Lightning font when I checked although I only had a quick look at it.
The Barbie Script font
When I went to grab the link for the Barbie Font, no joke, there must have been 30+ fonts called “Barbie”. You will find the Barbie Script Font that I used here however I don’t think it was a free font. If you have a subscription, which I have, then it is included in the subscription.
Free Fonts from Creative Fabrica can be found here so look through and you may find a free one to suit your project.
To find out more about the special subscription offer for a free trial with Creative Fabrica head here;
Other places to locate free fonts
There are many other places to get free fonts and of course, I have a list. Check out this tutorial on Tips For Finding Free Fonts to find out more choices. In the tutorial, you can also find help for installing fonts if you need it. Scroll to near the end of the post.
Adding text in Canvas Workspace
The first step to adding your glyph to Canvas Workspace is to add some text.
Click on the large T icon in the left-hand menu and then click on the screen mat and type your wording. When you click away from the text you will not see the top menu selections.
Click back on the text and the blue box will appear and so will the top menu that works with text. Along the top you will see:
The top menu bar
Here are the icons on the top menu and what they are for. If you are familiar with Canvas Workspace don’t skip this section as I have added some great tips. You may find something useful. 🙂
- The icon to change your font from Cut to Draw.
TIP: These selections are available in the right-hand menu as well and use the exact same icon. - Ability to add the Fill color to your font.
- The next icon is to manage the “stroke”. This is the outline color of a design or font.
TIP: Occasionally purchased SVG file’s import with the stroke transparent and the fill black. This can make it difficult for you to work out how to use the SVG. Simply go into the Properties panel on the left and change the stoke to black and the fill to transparent and you will find it much easier. - Adjacent, the next icon is the stroke pt size. Apart from occasionally using it for design purposes, I rarely use this one. It does not change your cut file at all.
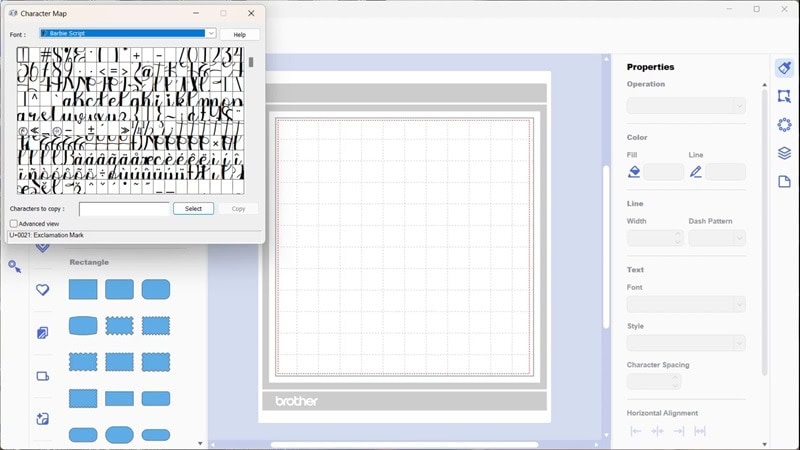
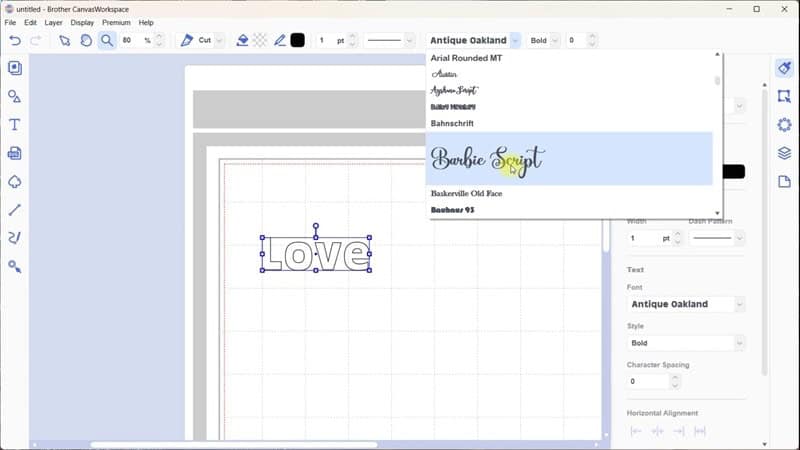
TIP: If you need to thicken your design or font use the offset feature in the right-hand menu. - Then we come across the very important font selection drop-down. This is super as it shows you what the font looks like as you scroll down. In the picture, I am selecting the “Barbie Script” font which is the font I am using to demonstrate adding glyphs in Canvas Workspace.
TIP: Fonts installed on your computer are displayed in this section. Some installed single-lined fonts may not show up clearly or at all. They are often located under S for SLF (single-lined fonts) - Some fonts have the option to choose regular, Italic, bold, bold italic and there are others. Then, some fonts have no options available at all.
TIP: It is worth noting that if you have any problems with welding a font, changing it back to regular may resolve the issue.
In the font drop-down select the font of your choice. We are using the Barbie Script font.
Adding the glyph to Canvas Workspace
Now we have added the text and changed it to a font that includes glyphs or special characters, it is time to add the glyph.
Opening Character Map in Windows
First up, head to the search icon on your Windows PC and type Character Map in the search bar. It will pop up as the first selection so click on it and open the software. Find the font you are using, in this case, the Barbie Script font however any font you have chosen in the previous step.
Click around the Character Map and you will notice that the boxes pop open slightly for you to choose the character you would like to use. Once you have found the character that you want, it can be selected by pressing Select and then Copy.
Back in Canvas Workspace to add the glyph
Ok, so we are ready to add a glyph to our font. Select the text box in Canvas Workspace click on the letters and remove the letter if you wish to replace it with a glyph letter with the swirl attached. Alternatively, click after the letter to add just the swirly bit to the end of your letter.
In the picture below, the original “e” has been deleted by using the Delete key. Then right-click to use the Paste feature from the pop-out menu to add the glyph e. You can also use Ctrl+V to paste.
TIP: Ctrl+C = Copy in Windows, Ctrl+V = Paste and on a Mac use the CMD key instead of control.

TIP: Do not weld, divide, subtract, or use the process overlap feature before choosing your font or adding glyphs to your text.
Adjusting letters that are not attached
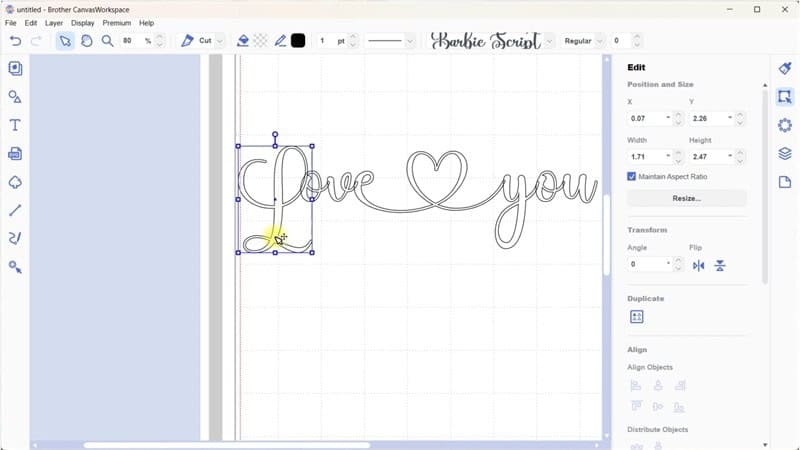
After adding the additional glyphs to your word it is time to join the letters if that is the result you are after. You may prefer to have separate lettering however in this particular font, one letter cuts into the next letter.
Have a look at this picture closely. It is a close-up I took before I added any special characters. The areas that overlap into the v and the e will cut out and you will be left with holes in your lettering. This particular font will need to be welded for a nice finish but don’t do it until the very end. After you have the wording exactly how you want it.
The next thing to decide is the capital L? Did you want to attach the L to the o?
As the wording is now, you need to separate the L to move it over. For fonts, often it is easier not to use the Subtract or Divide features. You can adjust the L by simply deleting it from your original block of letters and clicking on the T to add a new block of text then type the L. This way you can move the L freely wherever you think it looks good.
You can utilize the grids on the mat to align text where it makes sense. For this font, you could choose to place the original block of letters on the line and align the L appropriately.
I decided to place my L randomly on the original block where I thought it looked nice and hooked into the next letter enough to weld. LOL. Remember, there are no rules, only options and choices. This is crafting. 🙂
Welding your font
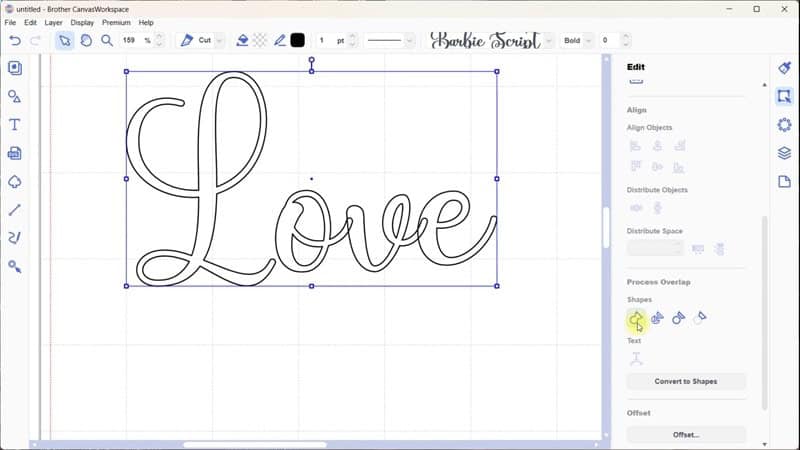
Once you have finished adding the glyph/special character, and adjusted any lettering you can weld the letters together.
When placing your text to weld, you need to ensure that the letters overlap slightly as shown in the picture on the left below.
To Weld your lettering together, select the objects so that they are highlighted with the blue box then go to the right-hand menu in the Edit section, scroll down to the Process Overlap section, and choose the icon on the left…. Weld.
Below is the before picture on the left and the after welding picture on the right. Looks fun right?


What if you use the online version of Canvas Workspace?
Many of you ask about using different fonts in the online version of Canvas Workspace. There are built-in fonts however they are a bit limiting.
So, I had the bright idea of seeing if I could use the same technique for adding special characters in the downloaded version but in the online version. Alas, no luck. The copy and paste just brought back the original font chosen in the online text menu.
To add additional fonts to the online version of Canvas Workspace you can use Brother’s Type Converter to bring in fonts that you have installed on your computer. Check the website for the tutorial. https://www.createwithsue.com/brother-type-converter/ I haven’t checked to see if it supports adding glyphs to the Brother Type Converter as yet. If you test it comment below and let me know how you go.
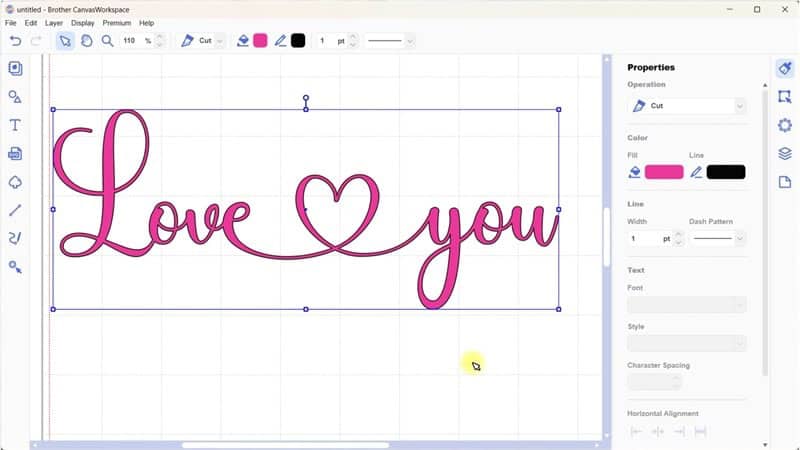
Finished project
Here is my completed font. I will add it to the Resource Library so you can use it if you choose OR better still I would love you to create your choice of wording using the special characters of the glyph!
Happy creating


Join me on Facebook
Join me in the Scan N Cut – Let’s Create With Sue Facebook group. It is a group of awesome craft friends sharing and caring.
I would love to see you there.
You are always welcome to say Hi at [email protected] or [email protected]. It would be great to hear from you!