Have you ever looked at your mat after cutting a design and wondered what could you do with your cardstock scraps? I certainly have. Discover inspiring ways to repurpose those leftover cardstock pieces. Turn ordinary scraps into extraordinary creations and make the most of every cutout.
This is particularly relevant when you lift your project from your mat and the remaining cutout pieces are equally awesome. Make sure you read down the list to find out how to use these beauties.
NOTE: I talk about cardstock scrap cutouts from the Scan N Cut throughout the post. The same cardstock scraps are created by the Cricut cutting machine as well so read on 🙂
Disclaimer: As an Amazon Associate, I earn from qualifying purchases. Links included in this tutorial may be affiliate links, Amazon or others, meaning I may earn a small commission at no additional cost. These commissions will help me continue creating content for you. Thank you for your support! Read my very boring full disclosure policy here.
Types of cardstock scraps
Scrap materials come in various sizes and forms, each holding its unique potential. There are sizable remnants that can be repurposed into entire new projects. Then, there are those charming smaller pieces leftover from your main design—tiny hearts or intricate shapes that are too delightful to discard.
Let’s not forget the awesome cutout scraps that remain on the mat after lifting your project. In this guide, we’ll explore the creative possibilities of these diverse scrap types, turning what might seem like leftovers into valuable elements for your crafting ventures.
Large pieces of cardstock scrap
This section is pretty easy to cover as the larger pieces of cardstock scrap can easily be used for another project. I usually trim the unwanted areas off the main leftover piece if they aren’t useful. These pieces are a little less exciting as they are simply small pieces of cardstock. Often worth the effort of saving still. It is entirely up to you what you choose to save.
Aim to store the cardstock scrap flat as it is much easier to use if it isn’t crumpled or bent. I store mine in a clear pull-out drawer where I can open the drawer and look for that perfect piece of scrap cardstock to complement my project.
Uses for the larger cardstock scraps include;
- Mini cards
- Gift tags
- Embellishments
- Written inserts
- Bookmarks
- Cut strips for quilling
- Decorative banners
- Adding a highlighted color to your next card
- Create a colored backing for another card
- Sentiment strips
- Gift card holders (I like these)
- Scrapbooking and journalling additions
- Place cards
- and more………
There are many more uses as the above is just a few quick examples. You are welcome to add more ideas in the comments section of the tutorial.
The Scan N Cut is perfect to use smaller pieces of cardstock and you can easily Cut out or Draw on these pieces of scrap with the help of your placement scanner tool. I LOVE, LOVE, LOVE this feature. What you can create from your cardstock scraps is only limited by its size.
You will find a tutorial on how to use the precision placement scanner here! You can also cut multiple pieces at once. Even if they are an unusual shape! Very cool indeed.
Smaller pieces of scrap cardstock
I have many smaller pieces of scrap that are the most delightful shape so I save them in case I can use them at a later stage. Often they are a cute shape like a heart, butterfly, diamond even a circle. Fun shapes that could be added as an embellishment on another project.
These beauties were the scrap from a wedding favour box that I made. Aren’t they pretty? I can picture them on the edges of a card embellishing it beautifully.

These types of shapes I store in smaller containers. Ideally, a clear container, perhaps a box, that is fairly easy to see and access the shapes when needed.
Here are more odd shapes that I have saved. The oval shapes were left from the 80th birthday invitations that I created for my Mum. I inserted my Mum’s picture on each invite.. hence the oval scraps. These will make great gift tags along with the scrap Christmas tree shape.

My problem is I create more beautiful leftover shapes than I can find a use for LOL. Still, they don’t take up a lot of room.
Below is what I once used to keep my scraps. It is a semi-clear plastic folder and I had an entire series of them for scraps, embellishments … all sorts. You can see peeking through that I kept a heart shape for a stencil. Clear containers are definitely a better option but this one worked well too.

Awesome design left on the mat
Now, this is the super fun part. That awesome design which is almost as nice as the main project.
The below design is from Creative Fabrica and is an example of a design that would look great as a card cut out and using the cardstock scraps. You will find this design here. Silly me didn’t think to take a photo of my last awesome scrap design.

The first problem is if the design that is remaining on the mat is in lots of little bits like in the above picture. How do you pick it up?
The solution?
The solution is the transfer tape that you use for vinyl projects. Make sure it isn’t too sticky as some transfer tape is waaay too sticky for cardstock. Test it first on a different piece of scrap cardstock.
Once you are sure the transfer sheet/tape is suitable press it down onto the pieces on the mat and give it a bit of a rub. Just enough that it catches the cardstock. At this point you may be tempted to simply lift up the transfer tape with the cardstock bits attached however, while this may work ok, it could also be a recipe for disaster with pieces falling off. Think of it as gravity kicking in.
Instead of lifting the transfer tape up, hold it against the mat and flip the mat over so the transfer tape is lying flat against the table. Then gently peel the mat up off the transfer tape, giving it a bit of a bend on its journey.
If the odd piece falls off it is usually not too much of a drama, simply pop it back on the transfer tape or directly on your project.
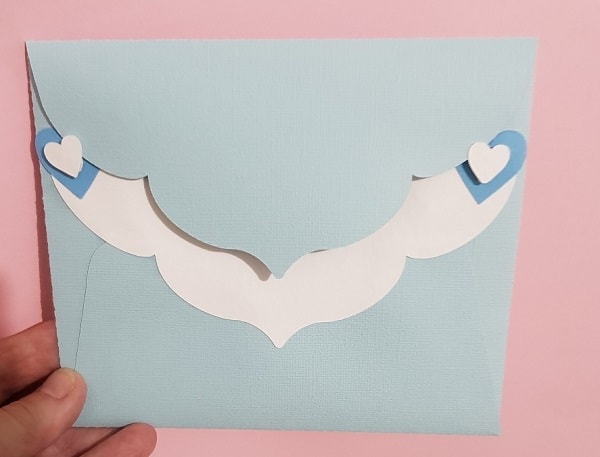
I will pop this picture into the mix. My original plan for this card was to write some wording underneath the heart however, the lettering cut so well that I chose to use them instead. It added more dimension to the card and I couldn’t bear to throw the letters away.

Stencils
After cutting items out of cardstock you may find you have the perfect piece of cardstock scrap to use for a stencil.
Stencils are great fun and can be used for a large variety of projects from creating cards to DIY decorating. You can use a stencil to create outline designs and they can be a fun item for kids to create with. The best bit, there is no cost. The sky is the limit to what you can do with a stencil.
Below is a piece of scrap cardstock that made a great stencil.

And here is the finished card. Super easy to do!

This card was created using a scrap stencil and different inks to create a unique effect. You can just see the tip of the other card where I have used the same design using the original design for a totally different type of card.
If you have a subscription to Creative Fabrica you will find my Stencil card tutorial on their website. Here is the link to the tutorial which is free as part of your subscription.
While you are there, search in the Classes section in the top menu for Scan N Cut and you will find a couple of other great tutorials that I think you will love.
If you don’t have a current subscription but are interested in the tutorials, Creative Fabrica has provided me with a special link. Access is still via their subscription however it allows you to basically “try before you buy” You will find more information on it here.
Other scraps from your Scan N Cut
Soooo, your Scan N Cut will create other scraps along the way too. Maybe scraps from other types of materials like Vinyl or fabric. Think about how these could be utilized as well.
Fabric
Small scraps of fabric are ideal for that special Applique project. Often you only need quite a small piece to add a bit of color to your design.
Here is an example of using small pieces of fabric to create an interesting combination of fabrics. You don’t need much of any particular color. For this card, I created an Applique design and it is sewn using a blanket stitch with my embroidery machine directly onto the cardstock. Using vinyl for the name adds another dimension. While you cannot see it clearly, the shoes are flock HTV.
I call this type of technique “Mixed Media”. The original design was created in Canvas Workspace.. yep.. good ol’ Canvas Workspace. I will create a tutorial on this card when I get a chance. (it is on my very long “to do” list.)

Vinyl scraps
Vinyl scraps can also be very handy to keep and use for other projects. Stencils once again spring to mind as vinyl makes a great stencil.
What about those small dinky bits that are a nice shape but small… these can be used as embellishments or as small labels. You could even keep your vinyl rolls closed with them LOL. Thinking outside of the square for some of these scrap pieces is actually a lot of fun. I often look at the leftovers and think hmmmm.
If you have some great ideas (I know you will have) leave a comment at the bottom of this post. I can’t wait to see what you have come up with.
Happy creating,


Dreaming Tree designs
Have you had the chance to visit the Dreaming Tree website? This website is wonderful for craft enthusiasts and has an extensive collection of beautifully crafted cards and awesome project designs. Just wandering around the website will provide an endless source of inspiration for you.
Here is my link to their website. Head over for a quick (or long) browse. Make sure you check out their FREEBIES. There are fantastic choices there too.
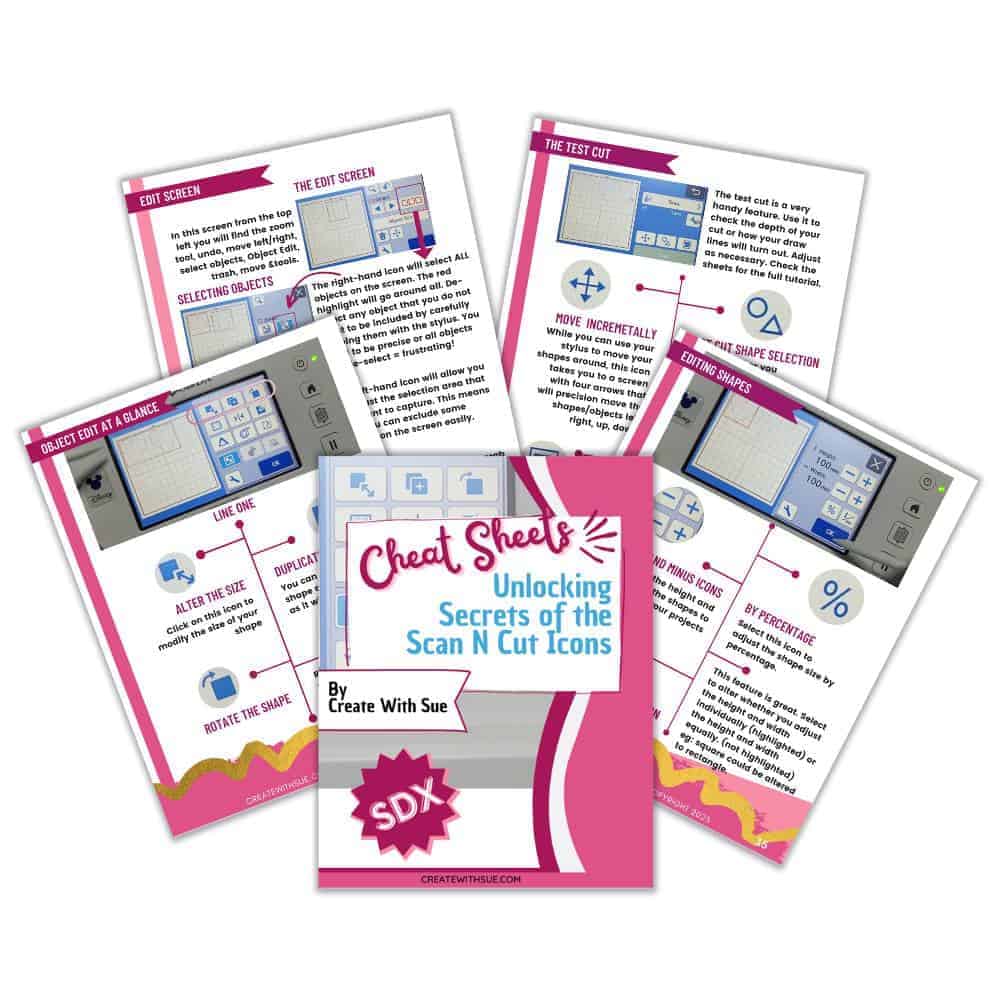
Scan N Cut Cheat Sheets for the SDX models
Are you at a bit of a loss with what all the icons in your cutting machine are for? I have a solution for you… Cheat Sheets. These cheat Sheets suit all models of the SDX Scan N Cut machines.
Cheat sheets for your Scan N Cut can be a great help. Find out more here!