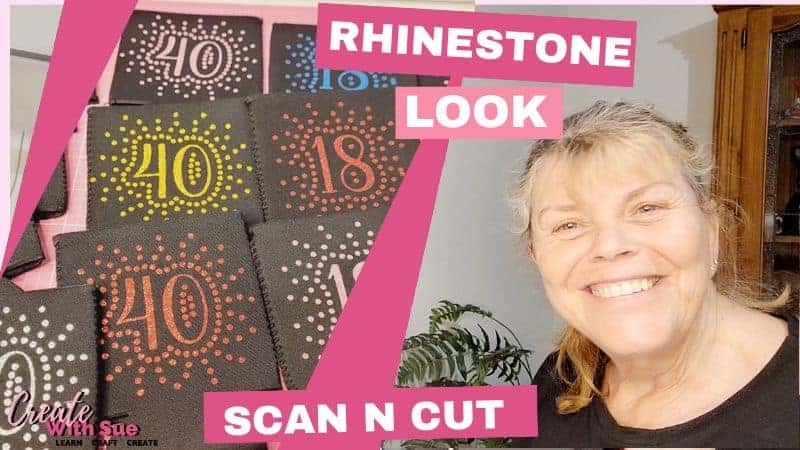
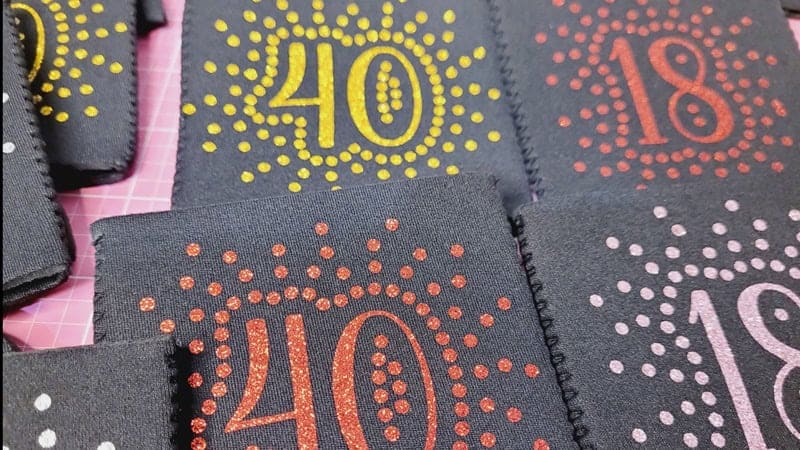
I’ve been busy making these HTV Can Koozies, and let me tell you, they are super pretty! I ended up making a mix of colors: pink, blue, red, and more because I got so excited about how pretty the HTV Glitter vinyl was. The combination of the design and the glitter HTV made them resemble a rhinestone project. In fact, the design was initially created to make these HTV Can Koozies with Rhinestones. I hope you can see them properly in the pictures because they are truly gorgeous. In this tutorial, I’ll guide you step-by-step on how to create these beauties. Plus, I have a free SVG pattern available for you to use for either a HTV or Rhinestone project!
Disclaimer: As an Amazon Associate, I earn from qualifying purchases. Links included in this tutorial may be affiliate links, Amazon or others, meaning I may earn a small commission at no additional cost. These commissions will help me continue creating content for you. Thank you for your support! Read my very boring full disclosure policy here.
What do you need?
- Glitter Heat Transfer Vinyl (HTV)
- Can Koozies
- Heat press
- Cutting machine – I used my Scan N Cut
- SVG design
- Baking paper or a Teflon sheet
Download Free SVG
Download the free HTV Can Koozie SVG file from my Resource Library. I have created a file suitable for both Scan N Cut and Cricut machines. I recommend not cutting too many of the numbers at once as they are relatively memory-intensive. Four at a time at most.
HTV Can Koozie YouTube Video
I have created a video tutorial for those who prefer watching how to make projects. Remember to like and subscribe, one so that I make more videos for you, and two, so you don’t miss out on any new ones that I make.
Preparing Your Design for Cutting
Alright, let’s get started with the tutorial. You will need to unzip the SVG file before using it. Import the design to Canvas Workspace or directly to your Scan N Cut. Once you have your project uploaded to your Scan N Cut, place the HTV with the shiny side (carrier side) down onto the mat. If it’s not sticking as well as you’d like, you can use a brayer to press it down a bit more securely. Sometimes, I even add a little bit of masking or painter’s tape to keep it in place. If using painter’s tape, ensure you use longer pieces so they are less likely to come adrift and end up in your machine.
Now, make sure your design is mirrored because we are cutting HTV. I’ve mirrored mine in Canvas Workspace however, if you get to your machine and you haven’t mirrored it, then you can go into the edit section and flip. This step is crucial for cutting HTV that comes on a carrier sheet.

Above is the Scan N Cut screen with the HTV Can Koozie design uploaded and showing as mirrored ready for cutting.
Note: You will find a few brands that are not manufactured on a carrier sheet and if you have this type, don’t mirror your project.
Cutting the HTV Can Koozie Design
Once your design is ready, go ahead and start the cut. I’ve set my machine to half-cut, which is perfect for HTV. If you’re unsure, start with the auto setting on the DX models. There are separate cut pressure settings for regular and half cuts, and starting on auto usually works well. Find instructions on how to set up the Half-Cut feature on a DX Scan N Cut here. If you are using a CM model Scan N Cut, set your cutting blade to only cut through the top layer of the HTV and not into the carrier sheet.
I recommend doing a test cut to make sure everything is set correctly. You can place the test cut in an area of your material that you won’t use again, like a corner. Once the test cut is done, check if it’s cut the HTV correctly. If it has, you’re good to go!
Weeding the Design
After cutting, carefully weed the design. Depending on the project, I often use my fingers to weed. Where necessary, use a weeding tool to remove the excess HTV. Note that I always check that the design has cut through properly before unloading the mat from the machine. If everything looks good, you can proceed to the next step.

This is the gold HTVRont Glitter vinyl being weeded. Check that the design has cut correctly before unloading the mat. This way you are able to send it through the machine again to cut any areas that may have been missed. For the video, I left it on the mat for easier viewing.
Pressing the design onto the Koozie
Now that we’ve weeded the design, it’s time to press it onto the Koozies. I pre-pressed my Koozies at 150°C for 15 seconds to remove any moisture. This step is good practice to ensure the HTV adheres well.

Next, align your design on the Koozie. I like to center the design by folding it up at the two ends and then placing the middle section of the design onto the Koozie first. Then smooth it out from the center to the edges making sure it’s properly aligned.

Cover the design with a piece of baking or butcher paper to protect it during pressing. A Teflon sheet will also work well if you have one. Follow the instructions for your specific HTV—some require a cold peel, while others can be peeled hot. I’m using HTVRont glitter vinyl, and I’m absolutely in love with how sparkly it is! Easy to weed and apply too.
Final Touches
Once the pressing is done, let the Koozie cool down slightly, then carefully peel off the carrier sheet. You’ll be left with a beautifully sparkly design on your Koozie!
Note: There are two types of HTV, hot peel and cold peel. Follow your manufacturer’s instructions.
I got a little carried away and made lots of these HTV Can Koozies—they’re just so fun to make! If you enjoyed this tutorial, be sure to check out my other tutorials, and I look forward to seeing what you create!
I hope you enjoyed this tutorial and found it helpful.


Join me on Facebook
Join me in the Scan N Cut – Let’s Create With Sue Facebook group. It is a group of awesome craft friends sharing and caring.
I would love to see you there.
You are always welcome to say Hi at [email protected] or [email protected]. It would be great to hear from you!

YouTube
Here is the direct link to my YouTube videos. Remember to like and subscribe when you are on my YouTube channel so you don’t miss any new video releases.

Follow me on Facebook as well as join the group. Here is the link to my Facebook page.


Hi Sue
Thank you for sharing that. They are so beautiful. Have you got a course on Rhinestones? On how to put it on clothing. I can’t find anywhere on You Tube on how to do it on the ScanNcut SDX machine.
Thank you
Regards
Caroline
Hi Caroline, I just checked my Rhinestone tutorials and decided that I need to add one about applying the Rhinestones to materials. I will place it on my “To Do” list 🙂 Thanks for asking. Sue
please tell me what is Koozie?
Hi Pat, a Koozie or “Can Koozie” is cooler made from Neoprene that fits over cans and bottles to retain their temperature while you drink them. I think the name is predominantly American. Also referred to as a Can Cooler, Stubby Holder (very Australian), Beer Hugger and Coldy Holdy. There are probably many other terms for the can coolers. I will update the post as other readers will aslo be interested in the various names.