Learn how to make a Mandala Christmas Tree Card with the ScanNCut
Creating a handmade Christmas card adds a special touch to the festive season. Today, we’ll walk through the steps to design and assemble a beautiful Mandala Christmas Tree card using Canvas Workspace and Brother ScanNCut. You can craft this elegant card effortlessly. Plus, I’ll share tips on how to personalize it and make it your own. Let’s get started!
Disclaimer: As an Amazon Associate, I earn from qualifying purchases. Links included in this tutorial may be affiliate links, Amazon or others, meaning I may earn a small commission at no additional cost. These commissions will help me continue creating content for you. Thank you for your support! Read my very boring full disclosure policy here.
Assembly Video for the Mandala Christmas card
Download the Free Mandala Christmas Tree SVG
To begin, head over to my Resource Library, where you can download the free Mandala Christmas Tree SVG. Included in the zipped folder is the SVG for both the ScanNCut and Cricut cutting machines. If you need help on how to unzip you will find a tutorial here.
This intricate design is perfect for creating a standout card that will impress your friends and family. Once you have the file, save it to your computer so you can import it into Canvas Workspace or upload it directly via USB to your ScanNCut.
Preparing Your Design in Canvas Workspace
Open Canvas Workspace and import the Mandala Christmas Tree SVG file. This software is great for organizing and customizing your design before cutting. You can resize it to match your card preference, make sure you select all the pieces and resize them all at once.
Group the base card to the scoreline
I have used the downloaded (offline) version of Canvas Workspace shown below. I recommend that you group the card base to the score line so that it stays in position once you transfer it to your ScanNCut.
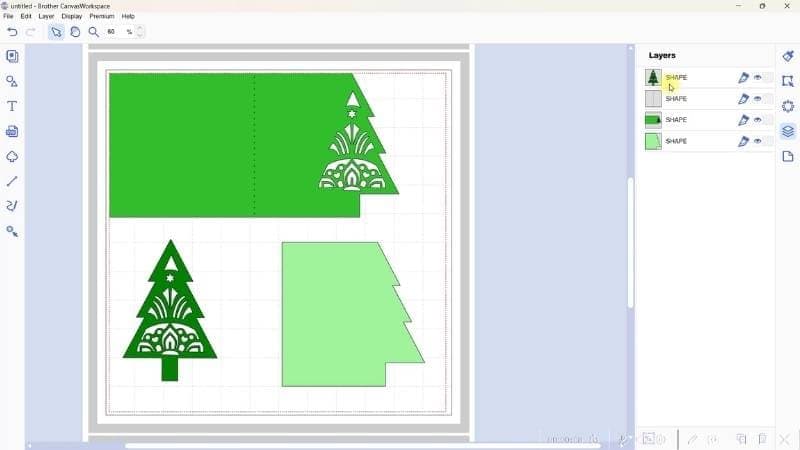
There are several ways to group objects in Canvas Workspace. My favorite is using the shortcut key Ctrl+G for PC or Cmd+G if you are on a Mac.
You also have the option to alter the dashed line in the design to a Draw line and use a scoring tool to create the fold. You will find some options to create score lines here.
Add a text sentiment
It’s also a great time to add any additional elements, such as text. For this project, you could include a festive greeting like “Merry Christmas” or “Season’s Greetings.” I used a single-lined font called Magnolia Sky which I love and use on many projects. You will find more information on how to use this font type in this tutorial on single-lined fonts here.
Note: I have just noticed the font comes with a gorgeous floral border file. I NEED to play with that…it looks awesome.
Position the text carefully to complement the Mandala tree design. Changing the text to Draw will allow you to draw out the sentiment.
Setting Up the ScanNCut for Cutting
Once your design is ready, save it and transfer it to your ScanNCut machine. If your machine supports wireless file transfer, use that option for convenience. Load your cutting mat with your chosen cardstock. A metallic or glittery cardstock can add a festive sparkle to your project.
Select the appropriate settings on your ScanNCut for cutting cardstock. I had my settings on the default settings for my machine. You can identify the default settings by the black box around them. If you’re unsure whether you have the correct settings, performing a test cut is a good idea to ensure you achieve a clean and precise result. Then, start the cutting process and watch as your Mandala tree design comes to life.

This is the mandala tree that sits on top of the base card. It is cut from glitter cardstock which adds a special sparkle. Choose a complimentary color to add as backing for the tree, or you could simply use the base card as the backing. For the Green Mandala Christmas Tree card, I used American Craft cardstock for the tree.
Drawing the text for the Christmas Card
For writing with the ScanNCut, I like using the Universal Pen holder or the 3D Funprintz holder. As you move through the settings on your machine, you will get to the section where you select Cut or Draw. For writing you need to select the Draw option
TIP: If you choose Draw and nothing appears on the following screen, this usually means that the design is NOT set to Draw. Go back into Canvas Workspace and check your settings. This is also true when you select the Cut option and no design appears.
For the sentiments in this card, I used an Ultrafine Sharpie which fit into the Universal Pen holder perfectly. For the glittered text, I used a Quickie Glue pen and added glitter while the glue was still wet. The glue pen needs to have some painter’s tape or something similar wrapped around the barrel to pad it out a bit. Some pens have a barrel that is too narrow for the Universal Pen holder to grip firmly and the painter’s tape will stop it slipping. Washi tape is another popular choice to do this with.
Tip: If using the Quickie Glue Pen with the ScanNCut, you will need to work relatively quickly so the glue does not dry before you sprinkle the glitter. Another option is to use foil and press the foil firmly onto the glue until it transfers.

Add glitter to the text after using the Quickie Glue pen in the Universal Pen holder in the ScanNCut
Assembling the Card
With your design cut out, it’s time to assemble the card. Begin by folding your card base to create a clean and crisp edge. Use double-sided tape or glue to attach the Mandala tree design to the front of the card. Ensure it’s centered and aligned properly. I often use Tombow glue however this project used the Art Glitter Glue.

If you’ve included text in your design, cut those elements out as well and adhere them to the card. Layering techniques can add depth and dimension, you could also consider using foam adhesive squares for a raised effect.
Adding Finishing Touches
To make your card truly stand out, add embellishments such as rhinestones, glitter, or ribbon. These small details can enhance the festive feel and make your card shine. You can also write a personal message inside the card to make it more meaningful.

Share Your Creation
Once your Mandala Christmas Tree card is complete, share it with loved ones or display it proudly as part of your holiday decorations. Handmade cards carry a personal touch that store-bought ones simply can’t replicate.
Don’t forget to visit the Resource Library for more free SVGs and crafting inspiration. Happy crafting, and enjoy spreading holiday cheer with your beautiful Mandala Christmas Tree card!
Happy creating,


Scan N Cut Courses
Would you like to create your own designs? It is easy to learn. Check out my courses and cheat sheets that are available to help you with your crafting journey. You will find more information about them here









I enjoy your tutorials very much. I am trying to make the Mandella Christmas Card and have gone into the Resource Library but cannot find the link to the svg/fcm file for my Scan and Cut. I just keep going in circles. My email is [email protected] if you can find the time to tell me where the link is. Thank you, Ann Hill
Hi Ann, once you are in the Resource Library, scroll down to the letter “C” and then look for Christmas. You will find this and other Christmas related projects in that section. I hope you enjoy making the card. 🙂 Sue
I made several of the Christmas tree tags and they are gracing my birch LED tree. Just lovely. I was wondering if you have a favorite glue?
Hi Rebecca, placing the tags on you birch tree with LED lighting sounds amazing. I am really pleased that you have liked the project. The glue I used in this project is the Art Glitter Glue which is one of my favorites. You should find a link to it in the tutorial.