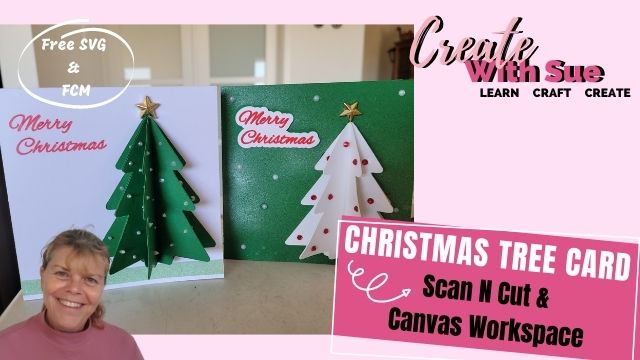
Making a Christmas tree pop-out card is a lot of fun….in fact pop-out and pop-up cards are all great fun cards to make and gift to friends and relatives.
Included in the tutorial is the free template for this Christmas tree pop-out card in both SVG format and FCM format so crafters with Scan N Cut and Cricut machines are welcome to use it.
- What do you need?
- Download Christmas Tree Pop-Out template
- Import the file to your cutting machine
- Differences of the SVG file
- Export your Christmas card to your Scan N Cut
- Putting your Christmas tree card together
- Create variations to the project
- Finished Christmas tree pop-out card
- OK, so I had an Oops
- Join me on Facebook
- Love to create your own projects?
- Intermediate course also available
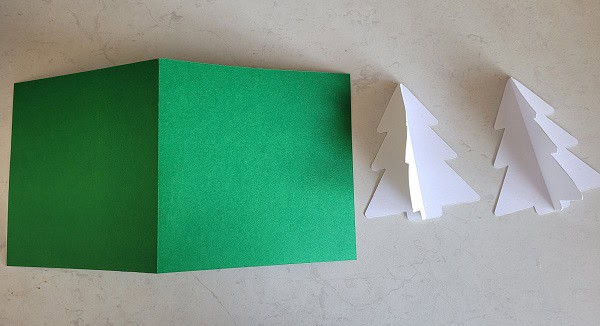
What do you need?
- Cardstock approx 220gsm or 85lb. This can be personal preference
- A different color cardstock for the tree
- Embellishments – star, pearls, rhinestones, or liquid pearls
- Scan N Cut or Cricut cutting machine
- Ability to draw sentiment with your cutting machine or can be hand written.
- Template from the Resource Library
Download Christmas Tree Pop-Out template
Download the Christmas Tree Pop-Out card template from the Resource Library and unzip it. If you need assistance to unzip the file you will find a tutorial here. Most often on a PC the file will automatically download to your Downloads folder.
You can locate the template in the Christmas Makes section of the Library. If you don’t have the password for the Resource Library you will find a signup form at the bottom of this tutorial. A forgotten password can be located in any of the emails that I have sent you.
Import the file to your cutting machine
Once you have downloaded the template and unzipped it upload the file to your software. We will look at Canvas Workspace and how it looks in that for the Scan N Cut.
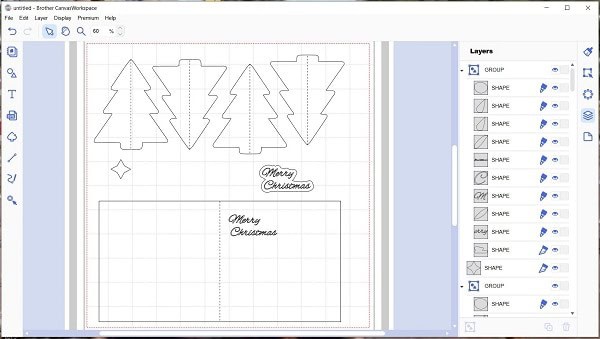
Choosing the FCM template
Below is the view of the template file imported into Canvas Workspace downloaded version using the FCM file. It looks quite different from the SVG version which is common when comparing the two file types.
Notice that looking at the Layers panel on the right-hand side of the picture, the file is broken up into Groups made of many smaller objects. This version is very easily edited in Canvas Workspace. You are also able to change whether you cut or draw the object AND importantly, you can hide any files that you do not wish to Export to your Scan N Cut.
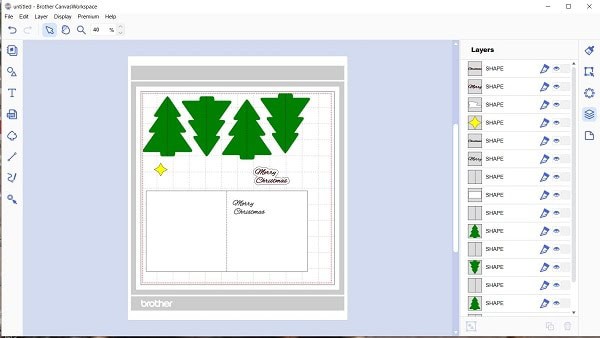
Choosing the SVG version of the template
Next view the SVG version of the file. You can see there is the original coloring retained and the right-hand Layers panel also has a different look.
Study the two pictures and take notice of the differences between the FCM file and the SVG file. Unfortunately, I zoomed in closer for the FCM and neglected to do this when capturing the same picture for the SVG version. This is only cosmetic so take no notice of that.
Differences of the SVG file
- SVG retains color of the original design
- The smaller break down of the various object that make up the file are not available in the SVG format
- In most instances, objects that you will want to Draw are imported as cut files and need to be manually altered to Draw by you. This is important!
- The grouping views are not there HOWEVER they are still grouped but the ability to manipulate the groups is no longer available
- Viewing the SVG layers is a much cleaner and easier to comprehend if you are new and unless you would like to make finite edits to the file, not really an issue.
- You are still able to alter Cut to Draw (blade and pen icons) and visa versa, Hide and Unhide (eye icon) each layer to elect what you would like to view on the mat and also Export to your Scan N Cut
- The Lock feature is still available (blank box on the right of the eye icon brings up a padlock to lock that object to the mat) The Lock feature is a great tool when designing.
- ALWAYS check the size of a SVG file. These files are created for use with different cutting machines and each has its own sizing format. The file will import according to the designer main cutter. You will note that some of my free templates state to use FCM for Scan N Cut crafters and SVG for Cricut crafters. This template has both the SVG and FCM sized for the Scan N Cut and should import the exact size as originally intended.
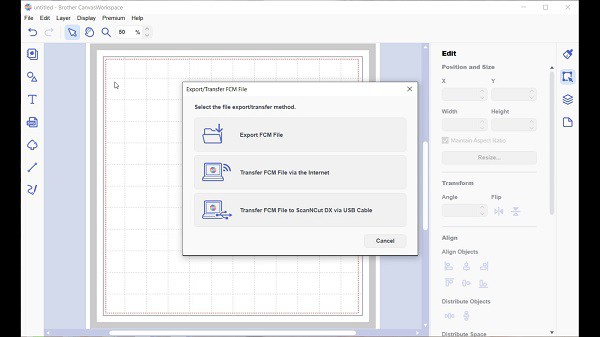
Export your Christmas card to your Scan N Cut
Export the components of your Christmas card file to your Scan N Cut when you are ready.
Remember: check that any object that you would like to have drawn has the Pen icon selected. Also, that you are only Exporting the sections of the Christmas card that you are ready to cut or draw.
Another way of managing this is to Export all the files to your machine and delete the ones that you aren’t ready to cut at your Scan N Cut. This too is personal preference and depending on the design (and maybe my mood) I mix and match either way.
You are able to choose WiFi, USB, Cable. To Export your design, go to File in the top menu and scroll down to Export/Transfer FCM file. It does not matter if you have used the FCM version of the template or the SVG, the Export function will be fine.
Choose one of the selections from the menu that pops up. The middle one is for WiFi and my favorite.
When cutting your designs out that have a Draw component, I recommend completing the Draw sections first and then cut.
Putting your Christmas tree card together
There are a few options and variations that can be made for this Christmas tree card.
The original design has the tree in 4 pieces which you can create a very full tree with. Fold the tree pieces at the score line and then glue an edge of each piece together. When they are dry enough to work with place glue on one edge of the two halves and join them. Make sure that you leave an edge of each tree unglued ready to attach to your card.

Tree with each edge glued together and liquid pearls added.
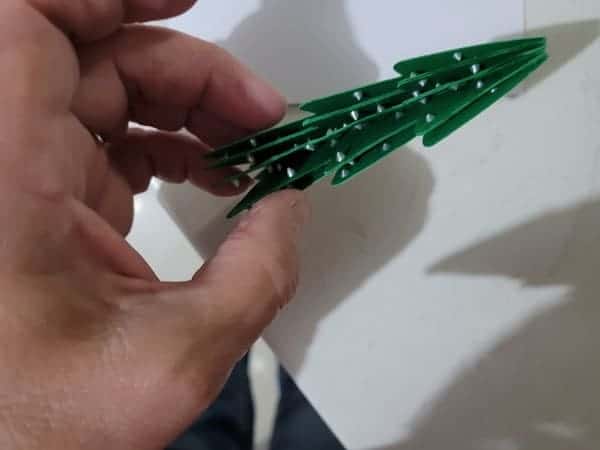
Notice how the tree still has an open edge. Ensure you leave that edge open so that you can attach the tree to your card.
I added the embellishments once I had glued the pieces together and prior to attaching to the card. You can also embellish before you start gluing. Either way will work.
TIP: aim to offset the embellishments so that when the tree is folded or flattened they don’t impact the next layer (crush together). For me, I found I had to make a conscious effort to do this as I had a tendency to want to place them in exactly the same place LOL. OCD?
Add some depth with foam tape

Foam tape will add some depth to the sentiment if you choose to use the separate offset sentiment included in the template. This is a photo of the foam tape that I used. It is quite narrow and I find this size really useful. The next thickness up is also very handy for many projects.
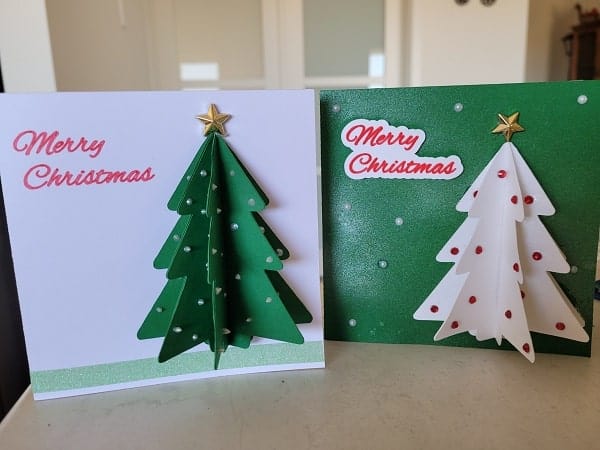
Color choices make all the difference

The Christmas tree pop-out card with tree and sentiment added plus a gold star on top. I glued Rhinestones on this card and really liked the effect. Plus, there are many color options with Rhinestones.
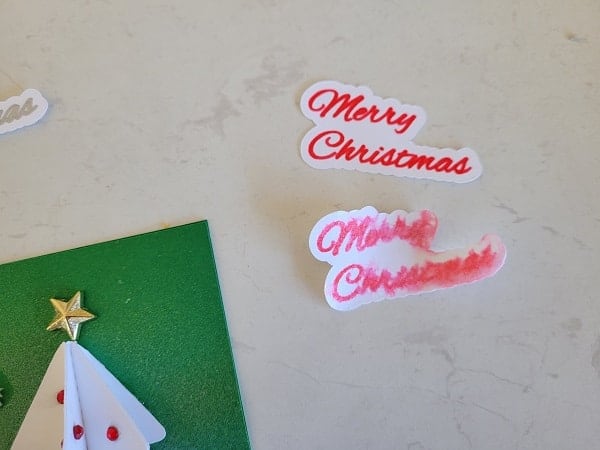
The sentiment is the included choice in my free template. I created the silver writing sentiment first up and it was MEH! It simply got lost on the card so the red one was created next which I felt was a better choice.
In the template file, there is a star you can cut out… it is there to use if you don’t have any alternatives. I loved the 3D star that I purchased a large pack of and they were very inexpensive. Purchased them in a small local craft shop and I was unable to locate exactly the same ones on Amazon. Here are some that are similar however if you have a local craft store that may be a better alternative.
Shimmer spray and pearls
Shimmer spray is another embellishment that can be added to the tree for a creative effect plus a few stick-on pearls. The pearls were a bit of a nuisance as they seemed to stick ok and then fell off. Resolved by gluing them on and now they are fine. Sometimes those sticky-backed embellishments don’t have enough stick!
I used the Imagine brand for this project however there are many to choose from. Take a look. The Imagine brand is OK… there may be better ones on the market. If you know of great alternatives add a comment below. We would love more opinions.

Create variations to the project
There are many, many alternatives on how to make this Christmas tree pop-out card your very own creation.
- As mentioned, color choices. There are so many.
- Sprays and spritzes to embellish the card.
- Adding Rhinestones for a bit of bling.
- Cut your own ornament shapes and sticking them on.
- Washi tape. One variation I did had green glitter washi tape at the bottom.
- Use only 2 pieces of the tree and still make a stunning card. This would make a flatter card to post more easily.
- Insert a 2 piece version of the Christmas tree INSIDE the card. I tried with the 4 pieces however this seemed too thick.
- The Christmas tree actually will stand up on its own and would make a cute ornament in its own right.
- Create a small hole in the top of the Christmas tree with a thin cotton piece of cotton or cord and hang them from your main Christmas tree or dotted around your home. Cute!
- Foil the sentiment – more information about this technique below
- Embellish with liquid pearls. The pack comes with many color choices and lasts for ages.
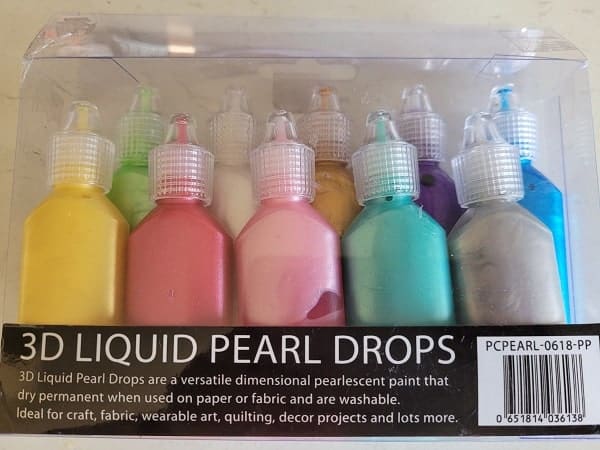
Liquid pearls are a great option for embellishing the Christmas tree card. These are the ones that I used. There are many different brands of liquid pearls on Amazon… mine, once again from the local craft store and relatively inexpensive.
Finished Christmas tree pop-out card
Here are two of my finished Christmas tree pop-out cards on display. I often have a tendency to over embellish. It is best to resist this temptation. Less is best.
The one on the left has the drawn sentiment directly onto the card. This would not have been a great choice for the green card as it would have gotten a bit lost on the green. Hence the offset white backing.
You can also vary your sentiment by foiling it. I love foiling and have both the Brother Foil kit and the WRMK foil kit. One is cold glue foil and the other hot foil.
The below picture was using the Brother Foil Kit. It produces a slightly thicker look than the WRMK Quill. I mainly use my WRMK on my older Scan N Cut as it gets quite hot and may void the warranty on your Brother Scan N Cut if you have issues.
You can read more about WRMK Quill foiling in one of my tutorials here.

And here is a tutorial on the Brother Foil Kit. I found that the Brother kit produces a better result if the design is not too big or thick. The ol’ less is best works again. Overall I have been happy with what I have produced.
OK, so I had an Oops
Well, realistically it would not be one of my projects if I didn’t have some kind of fail. I had a couple with this project. On the positive side, the errors I make and share with you are errors you can avoid making. This is why I include them.
My first error was in my original tree design. Much too clunky! The tree had a star included in the cut file, as part of the tree… definitely a no, no. This new version is much, much nicer.
The next oops was only a small, easily rectifiable one. It occurred when I was spritzing my card with the Shimmer spray. I sprayed the card once the Merry Christmas sentiment had been attached with the Shimmer spray.
The writing bled as you can see below. The drawing pen used was the small red Brother pen that is often included when you purchase your Scan N Cut. They are great little pens BUT… obviously not moisture-proof.
I simply cut created a replacement sentiment and carefully lifted the spoiled sentiment from the card and stuck the new one on. Voila… easily fixed.
TIP: don’t spritz your sentiment unless you are sure the pen used is water-resistant.
TIP: when creating the sentiment, check whether you have the fill option available on your Scan N Cut. This will often create a much nicer, brighter, and fuller result. I plan to do a tutorial on using this feature soon.
I hope that you have enjoyed this tutorial. In my tutorials, I always try to include additional tips and tricks to assist you with your designs. I always love to receive feedback and see YOUR creations.
Join me on Facebook
You are always welcome to join me in the Create With Sue Facebook where you can make friends, share your creations, and ask questions for additional assistance. I will provide any assistance that I can to help you use your Scan N Cut and Canvas Workspace.
Join me in the Scan N Cut – Let’s Create With Sue Facebook group.
I would love to see you there.
Happy creating,


3D Flower Tri-Fold Card – Create it!
Baby Card – Brother Scan N Cut
One Sheet Wonder Cards
Discover the endless possibilities of the One Sheet Wonder card technique! In this article, we…
Love to create your own projects?
If you would love to learn how to use Canvas Workspace and all the features that it offers I have a course available called Get Started With Canvas Workspace. This course will take you from the very beginning to being able to create your own projects from scratch.

Intermediate course also available
If you are finding your way around Canvas Workspace and would like to take your journey to the next level then Editing Nodes – Unlocked is a great stepping stone to being able to create your designs from scratch. Aimed at intermediate users of Canvas Workspace.


Hi, Just found your lovely website. I have a Cricut Maker and just tried cutting your free Christmas tree popup card. Sadly, the trees have a cut line right down the middle of each tree and there are nasty little “bobble” type shapes cut around the edges of the tree. I love the look of this card but wondered if you could help me please. It obviously wont work with these things happening.
Hi Audrey, The files are created with dashed lines as opposed to Cricut score lines. Normally Design space will cut them as dashed lines or you are able to convert them to score lines in DS before sending the files to cut. I am not certain why there was a funny “bobble” however I haven’t cut the design with the latest version of Design Space and will go and check to see what has changed and then make alterations if needed. Apologies that you have had issues.
Hi Audrey, I have gone back in to check the file in Design Space. I cannot seem to replicate the “bobble”. The steps in DS are Ungroup the file, then select all fold lines of both the card and Christmas trees and convert them to either dashed or score lines. You will also need to convert the Merry Christmas writing to pen lines. Then select the Christmas trees and their fold lines and choose “attach”. Select the card, the Merry Christmas writing, and fold line and choose “attach” for those sections. Do the same for the final Merry Christmas and the border around it and “attach”. When you go to “Make It” then the design will go onto the individual mats.
I hope that you can create the card ok this time. Email me at [email protected] for more assistance if you need it and I will see what else I can do to assist you. 🙂