Need a quick baby card and have the Brother Scan N Cut? This was my predicament this week and here is how I tackled it for an easy solution.
Disclaimer: As an Amazon Associate, I earn from qualifying purchases. Links included in this tutorial may be affiliate links, Amazon or others, meaning I may earn a small commission at no additional cost. These commissions will help me continue creating content for you. Thank you for your support! Read my very boring full disclosure policy here.
What do you need
- One sheet of cardstock
- Gold glitter card for insert – (use Non Shedding!)
- Vellum to make it extra special
- Double sided tape
- Curling ribbon, material ribbon, string, or similar to hang the ornaments
Showering a baby event
I received a late invite for a “showering baby” event this week and needed a nice card really quickly.
Note that I say “showering baby” event and not a baby shower which, little did I know is quite different. It was definitely an event to be proud of. My niece is having a baby in a few weeks and her younger sister, Kelly Hooper, is an event planner so you get the idea of how it turned into an event.

These pictures provides a glimpse of how gorgeous this event actually was.

Everything was set up to perfection.
Quick baby card required.
With little time to design my own card from scratch which would be my normal approach, I remembered that Brother have some wonderful FREE templates for so many projects tucked away inside Canvas Workspace (both versions)
Bingo! I did a quick search and found just the thing for a baby shower or new baby.
**** Brother has done a wonderful job in providing a large number of FREE projects for Scan N Cut users. These projects are usually really easy to do and GREAT for beginners (or those of us in a hurry 🙂 ). You are also not limited to using the pattern pieces in the project they are designed for. Add any pieces that you choose to other projects to make them your own.
Find a FREE project in Canvas Workspace
Downloaded version
When you first open up Canvas Workspace the FREE projects box comes up automatically. Once you click it closed and in Canvas you can bring it back up easily by clicking on the top icon on the left hand side in the downloaded version.
The search feature at the top of the Projects box enables you to locate free projects easily. Alternatively you can browse by scrolling through them.

Online version
To re-open the free projects in the online version is very easy too. You can click on the Canvas icon on the top left hand side of the screen OR the projects icon on the top right hand side of the screen and then tab to the free projects.
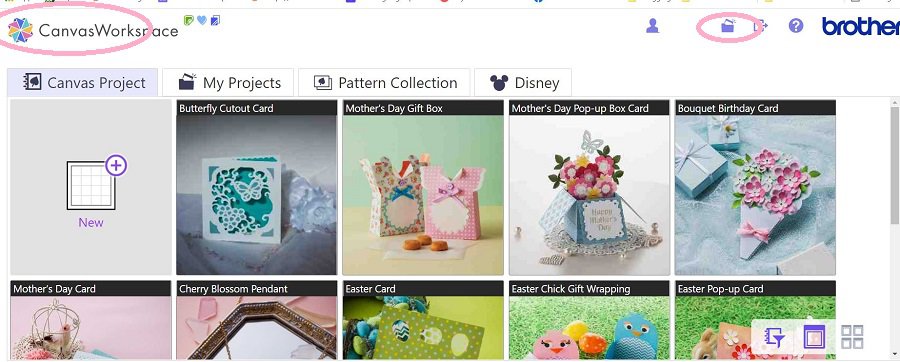
If you click on the circled icon on the right hand side it takes you to the “My Projects” tab where you can see all the projects that you have designed and stored in the cloud. This view is a lot easier to locate your designs than the view in Canvas Workspace.
Tab to the Canvas Project tab to see all the FREE Brother designs.
NOTE: the three icons on the bottom right hand side a pretty cool.
- The first with a small funnel is the Filter icon… this is where you can search for various categories and is the equivalent of the search feature in the downloaded version.
- Second icon along is the larger view of the projects which you can scroll through and…
- The third icon along is a smaller view where you can see many more projects at one time. You can flick between the second and third icon easily to view more or less on your screen.
Choosing a quick card to make
Well, I say quick… it was certainly quicker than designing it myself which is what I normally do. I still wanted to make the card unique however this card was a great start.
I ended up refining the search to include the word card… so “baby card” and chose the baby card on the right hand side. Play with your key search words. Sometimes a shorter search term will produce better results and other times a longer search term. ie baby vs baby card.
These are super cute hey!!

Easy pattern and tutorial
When you choose the design you want to make, Brother provides a helpful PDF tutorial and often a short video tutorial. This particular pattern came laid out on separate mats so you have the option to add the file you are ready to cut into Canvas Workspace, cut it out, and then add the next file, etc.

Don’t close the Project box, simply slide it down the page out of your way OR minimize it with the dash icon on the top right hand side of the box. You know… dash to minimize… square to enlarge and X to close. This option is only available in the downloaded version of Canvas Workspace.
Change the baby card to be your own
Remembering this is a baby shower… umm showering baby event, I didn’t want to make a pink or blue card. Plenty of time to do that when the baby arrives.
So, I added all the various pattern pieces at once to enable me to play with the card a little. I am loving the foiling technique which is a lot of fun and makes cards very special. Foil was on the “to-do” list.
For a tutorial on using the Brother Foiling Kit take a look here. If you don’t have the Brother Foil Kit (cold foil and glue) you can use other foiling methods like the W R Memory Keeper Foil Quill (hot foil). These days, I only use the Foil Quill in my older CM900 Scan N Cut as I am always a little concerned about the heat. The Foil Quill can get quite hot so I never place it into the Scan N Cut holder until it is at temperature and ready to start foiling.
Alternatively, there is even a method using your laser printer and a laminator.
NOTE: Don’t close the Project box, simply slide it down the page out of your way or minimize it with the dash icon on the top right hand side of the box. You know… dash to minimize… square to enlarge and X to close.
Making the baby card
With all the pieces uploaded into Canvas Workspace (downloaded version) I set about adding some extra touches.

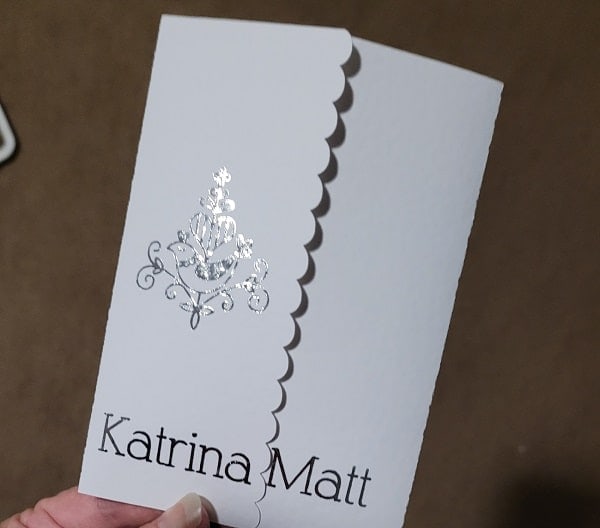
On the front of the card, I foiled the name of the new Mum and Dad to be and one of the free foil pictures that came with the Brother Foil Kit.
TIP:
When sending the various pieces of the pattern to your Scan N Cut use the eye icon on the right hand side in the Layers panel to send only the items you want to cut on the mat. The eye icon is a hide and unhide tool. Any object on the mat that is hidden will not be sent to your Scan N Cut. (downloaded version only)
A little bit outside the box
Jumping way outside of the “baby” norm I foiled in SILVER… Yes, silver on the outside and gold on the inside.

I used the Single Line font called Industrial on the card. I like the finished results of single line fonts and also designs that are more a line style. Single line fonts are a little hard to find for free however singlelinefonts.com has a nice range at a reasonable price.
Vellum was used as the insert with gold glitter card as the final insert sitting on top of the vellum.

Hang the ornaments
The wording “baby” is in gold foil and the hanging ornaments are swinging on what might commonly be referred to as curling ribbon. This is simply the ribbon that you can use for wrapping presents etc.
You can certainly substitute the curling ribbon for material ribbon, string or really anything that you have on hand that matches the colorings chosen. It really only needs to be sturdy enough to retain the glued ornaments and look nice.
Another alternative is to simply stick the ornaments to the card in strategic places however I rather liked the novelty of hanging them.
Double sided tape was used to glue the card together. I used a thinner double sided tape and then still trimmed it slightly to attach the ornaments. As long as the double sided tape does not extend past the ribbon or ornaments you are fine.
Re-capping the baby card layers
Just a quick re-cap of the layers of the card.
- Outside was the thicker, solid core, white card with silver foil writing and design.
- Next layer was translucent vellum. Double sided tape was used to attach the vellum to the main card.
- Glitter gold insert was placed on top of the vellum layer using double sided tape.
- Ornaments were attached to the curling ribbon. I cut the ribbon at random different lengths to create an interesting effect. Thinner double sided tape was used to attach the ornaments.
- The curling ribbon was attached to the back of the piece of card with the gold foil “baby” written on it.
- This card was then placed on the glitter gold layer holding the dangling ornaments in place.
Fortunately, even though this is curling ribbon, once it is in placed inside the card it sits nice and flat.
Need an envelope for the baby card?
Remembering that I was in a hurry…(I ended up with only an hour to make this card) I used an envelope pattern that was inbuilt into my Scan N Cut. This needed to be enlarged to fit the baby card however that part was easy enough.
To fit the card, the envelope needed to be resized to take up nearly the entire 12×12 mat. Measure your finished card and then count the squares of the screen mat. Each square represents an inch. Make the square section of the envelope where the card needs to fit slightly larger than the card itself. Give yourself enough room so that it is easy enough to get the card in and out of the envelope.
If you don’t have an envelope inbuilt into your Scan N Cut model never fear… here is a tutorial to help you create one. It also has tips on how to increase the size of the envelope past what the mat fits easily. An envelope pattern is always handy and can be saved directly into your Scan N Cut machine for easy access next time. Cards are often a standard size so it stands to reason the envelope that you design will suit most of your cards.
Wrap up
I hope that you have found the information interesting and helpful. Check out my other posts on my website while you are here. If you are new to your Scan N Cut then the Guide For Beginners is a great place to start.
Until next time……
Happy creating,
Join me
If you haven’t already, pop in and say hi in our facebook group Scan N Cut ~ Let’s Create With Sue
Before you go…..DON’T forget to subscribe! I would love you to follow my journey helping you create along the way.