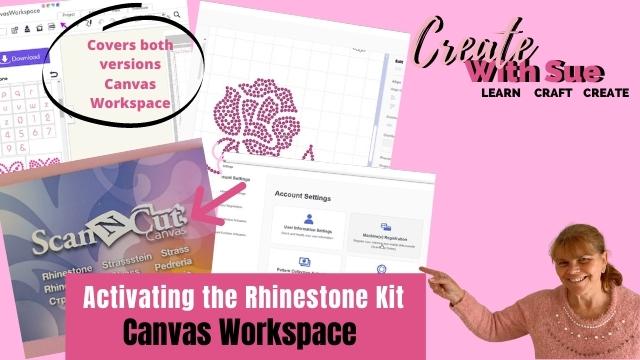
Activating the Rhinestone kit is the first step to creating awesome Rhinestone designs. This tutorial will step you through and demonstrate some of the newly added features. LOTS of fun.
Disclaimer: As an Amazon Associate, I earn from qualifying purchases. Links included in this tutorial may be affiliate links, Amazon or others, meaning I may earn a small commission at no additional cost. These commissions will help me continue creating content for you. Thank you for your support! Read my very boring full disclosure policy here.
I am going to cover activating and using the Rhinestone kit in BOTH versions of Canvas Workspace. Hopefully, this is not too confusing for you. I have tried to make it really clear with the use of headings to assist.
If you didn’t realize there were two versions have a read here – well, when you finish this tutorial 🙂
The activation card
In your Rhinestone kit and in fact, in most of the kits that you purchase from Brother, you will find an activation card. The card looks a little like a credit card, plastic with a number on the back of it. This is the code that is added to Canvas Workspace to activate your kit.
The Rhinestone kit’s card has the number covered by a silver film that you can scratch off. Use your fingernail or a coin to reveal the code.

Above is the Rhinestone Activation Card from Brother. You can see the title written in numerous languages for international distribution.
The front of this card is similar to other activation cards from Brother for the Scan N Cut.

The backside of the Brother Rhinestone Activation Card. You can see where the silver scratch area is highlighted. This will expose the activation code when removed.
Use a coin or your fingernail to remove the silver film. It is a bit like playing the Scratchies.
The Rhinestone Activation Kit will work with any model of Scan N Cut as the changes made to create and use the kit are in Canvas Workspace and not on the actual Scan N Cut machine. There are a few recent activation kits that are strictly for the DX models. This is because they have a component or tool that is only able to integrate with the newer models. Before purchasing a kit, it would pay to check that it is suitable for your model.
Where to add the activation code
Once you have located your code head into Canvas Workspace to activate the Rhinestone kit. You can usually do it in either version of Canvas Workspace however be aware that there are some patterns that require you to do it in the online version only. If you are adding a pattern or kit code and it will not let you activate it in one version, then try the other.
NOTE: The process of activating the Rhinestone kit is very similar to all the other kits from the Brother range. Patterns do have some variation and will go into the “Pattern Collection Activation”. Some patterns are only able to be activated in the online version.
Activating the Rhinestone kit in the online version of Canvas Workspace
You can activate your Brother Rhinestone activation kit in the Online version of Canvas Workspace. The arrow points to your username which is what you click to access the activation screens.

Activating the Rhinestone kit in the downloaded version Canvas Workspace
To activate cards in the downloaded version head to the Help on the top menu. Scroll down to Account Settings as shown below.

You will be presented with the below screen next. Note that this is the same area where you registered your machine. There is the choice of Pattern Collection Activation and Premium Function Activation. The activation for the Rhinestone kit goes into the Premium Function Activation.
This view is almost identical to the view in the online version of Canvas Workspace.

Entering your activation code
On this screen, you can enter the code that was revealed on your Brother Rhinestone Kit card. The code will probably be a mixture of letters and numbers. This may vary between countries. Mine was 3 upper case letters followed by a number in a 4 digit sequence.

You will need to confirm that the details are correct before activating the Rhinestone kit. You can only activate kits in ONE account. If you have multiple, make certain that the username that you want to connect the kit to is correct.
The activation code will also appear against the Rhinestone icon and once activated it will come “alive”. Well, pink instead of grey. The new designs and features of the kit will now be available for you to use. The below picture is just after I activated the code.

Rhinestone icons/tab added to Canvas Workspace after activation
New icons are added to Canvas Workspace downloaded version to access the Rhinestone designs and a new tab on the side menu to the online version of Canvas Workspace.
NOTE: If you are confused between the two versions you will find more information here.
I used the online version of Canvas Workspace for a number of years however the downloaded version is so feature-rich it is harder and harder to go back to the online version these days due to its limitations.
The best use for the online version of Canvas Workspace is on a tablet as it is browser-based. (not phone – the screen is way too small on most phones which makes it quite hard to use, especially if you are still learning)
What is added for the online version of Canvas Workspace
Additional tabs are added in the Left-hand menu of the online version of Canvas Workspace. When you click on the tab the new designs and lettering will be available for you to use.

Downloaded version icons added
The arrows are pointing to the new icons added to the downloaded version of Canvas Workspace. The icon on the left will add individual Rhinestone to the Canvas Workspace mat to create a unique design of your own.
The inbuilt designs are accessed through the Shapes tab and you will see a new jewel-shaped icon in the selection.
There is also a new icon on the right-hand menu that will give you lots of options to turn designs into Rhinestone designs, varying the size and style of the Rhinestone patterns.
This activation feature is a LOT of fun!
Let’s play with the Rhinestone included designs
NOTE: Before we go further through this next lot of information please be aware that the Rhinestone activation kit can utilize the features of the downloaded version of Canvas Workspace. There may be features in the right-hand menu that are not accessible in the online version.
Is the Rhinestone kit added design features fun?
Well, I loved exploring the newly added designs. They are so cute. While you cannot adjust the overall size of the inbuilt designs or Rhinestone size used, you can go into the layers panel and select individual Rhinestones and change feature areas of the design, stone by stone.
You might like to change the center of a flower or bring a section of the project to be more pronounced.
In the picture below, you can see that areas on the right-hand menu are greyed out. Only when you activate a stone can you select the drop-down box and select a different size stone.

Create your own Rhinestone wording
The Rhinestone kit adds a number of inbuilt designs BUT also adds the ability to turn many shapes, wording, and other files into your very own Rhinestone project.
Some fonts that you have installed on your computer make delightful Rhinestone projects…. not all though. As you can see in the picture further down, the second word “Love” is not quite right.
The good news is that you can adjust a number of the setting and also placement.
- Adjust individual stone placement by selecting a stone in the layers panel and moving it to a location that improves the look of your design.
- Alter the stone sizing which will adjust the look of your design.
- Change the fill pattern. There is a choice of None, Outline, Grid, Contour, Circular and Hybrid (Hybrid is a mixture of Outline & Grid)
- Options to change the Spacing between stones, Angles, Pattern and Cross Lines of Grid – depending on the above fill pattern selection.
- See how many Rhinestones will be required for your project. (Warning – Rhinestones are only marginally easier to manage than glitter. LOL Especially the smaller ones)

These options are in the online version too
These options are available in the online version of Canvas Workspace and can be found in the Premium tab of Canvas as seen below.

Adding a shape to create a Rhinestone project
Below you can see a heart and a star. These are shapes that you can select from the inbuilt shapes section of Canvas Workspace.

Change the color of your Rhinestone design
The Rhinestones will go onto your Canvas Workspace design mat with no color. This can sometimes make it difficult for you to imagine what your design will look like once it is finished.
By selecting the design, you can go into the Properties panel which is the top icon in the right-hand side menu, and alter the fill and/or stroke color. Changing the color will not change anything about the way your file will cut out.

There are lots of Rhinestone sizes to create your projects in. Below is a snapshot of sizes available and how they convert to actual sizes in inches and millimeters. As the Rhinestones come in many sizes it can be quite difficult to work out what size will suit your project best.

Hotfix Rhinestone kits
I purchased a kit to hotfix Rhinestones on all sorts of projects. This was in addition to the Brother Rhinestone kit. I loved the boxes of Rhinestones that came with this kit and the colors and sizes of Rhinestones included. The boxes are a great way to keep those Rhinestones in check.
You still create the design using Canvas Workspace for hotfix Rhinestones. It is really only a slightly different way to adhere the Rhinestones to your project. This was is good for smaller or irregular items.
The other way is a heat press which is great for T-shirts and larger designs that are fairly flat to create. This is the one I have however the Cricut is very popular – just a little more expensive.
What if you do not want the expense of the Brother Rhinestone Kit?
There are other ways of creating Rhinestone projects or you can find designs that someone else has created. They are quite inexpensive really.
Find for free or a small price
Creative Fabrica is one place that has Rhinestone designs available for purchase and also for free. This is a big cat design that I spotted which is really cute and was free. One of many files on the site. Do a search for FREE Rhinestone designs to find more designs that you may like to try, making sure that you select files that have SVG included in the download.
Use other software to create your own designs
Here is a tutorial that goes into more detail about alternative choices for Rhinestone creation. It goes over some of the basics of the kit, what is included etc, and also some information described in this tutorial as well. You can skip past those sections easily if you already have your kit. Near the bottom of the tutorial, it covers other software that can be used to create Rhinestone projects.
A few in the Resource Library
You can also check out my Resource Library as there are a few designs included in the library.
Easy to follow Rhinestone video tutorial
Do you like to watch tutorials on video? I have put together this tutorial on my YouTube channel so you may enjoy watching how the features work while I am using them. The video does cover most of what we have covered above but will also show you how I have created designs from scratch using the Rhinestone kit.
Don’t forget to show your support by liking and subscribing to my channel! By doing so, you’ll stay updated on all the latest video releases. Your likes and subscriptions also provide valuable feedback and help guide me in creating more content that you’ll enjoy. Thank you for your support!
Join me on Facebook
Join me in the Scan N Cut – Let’s Create With Sue Facebook group. It is a group of awesome craft friends sharing and caring.
I would love to see you there.
Please feel free to ask any questions that you need and while you are here, wander around the website. There are heaps of tutorials to help you on your crafting journey.
Happy creating


Can you make rhinestone template on circut
The Cricut will cut Rhinestone designs. You will have a good idea of how well a particular file will turn out once you upload the design into Design Space. You can use Inkscape or SCAL5 to create your own Rhinestone patterns, there will be other software that can do it too however these two are good and also economical.
Cricut’s Design Space has over 100 Rhinestone patterns that you can purchase for around $1.49 each as another option. You can purchase in DesignBundles, Creative Fabrica and Creative Market as well.
Hope that helps. Sue xx
Hi Sue, Thank you for that video. Was very helpful.
Love what you did with the shapes. I am not on face book. It would be great if you
could do more videos on the Rhinestone. I will be watching this video again just to understand the method of it.
Thank you again
Regard
Caroline
Hi Caroline, I am so pleased that you have found it helpful. Thanks for letting me know!
Hi Sue
Its Beth here ,
I have just purchased an Rinestone activation key and I think I put it under the pattern collection instead of premium function , so its not working for me , is there anyway that I can cancel it and re enter it in the correct place ?
Hi Beth, are you able to add it to the Premium section at all? I cannot see an obvious option to remove the entered codes from the pattern section.. I am a little surprised that it even let you enter that code. Try closing Canvas Workspace down, perhaps even reboot your machine to clear any memory. Have another attempt. If you still cannot add the code to the Premium, contact Brother support to assist you as they may have a trick to help. Hope you sort it out ok. Sue
Thank you Sue , I didn’t realise that I had to have the rhinestone kit with the main aviation key , which I believe has been discontinued, so is that why the design collection won’t work I have a SDX 1000 and just want to install the software on it so I can produce my own rhinestone designs . Living in Gawler I’m going to try Kornercraft to see if they have a kit but I think my chances are slim!
Hi Beth, Kornacraft closed down August last year. Kim retired after 66 years. HobbySew on Main North East road had 3 kits when I was in there about 12 months ago. If you cannot find the kit, Sure Cuts A Lot (SCAL6) can also create Rhinestone designs. I really like SCAL and started using an earlier version of it, then upgraded when they released version 6. Here is a quick look at SCAL5 (not the Rhinestone, I should do one for that too) https://www.createwithsue.com/create-shapes-in-scal5/