
Canvas Workspace Print to Cut activation card is a whether to buy or not to buy option. On the one hand, you would think that Brother might add this feature for free into the downloaded version of Canvas Workspace. On the other hand, it kinda makes sense as it is ONLY for the DX users of Canvas Workspace…. therefore… optional.
Let us find out how it works. I have included a video tutorial further down in the post to help you out even further.
Disclaimer: As an Amazon Associate, I earn from qualifying purchases. Links included in this tutorial may be affiliate links, Amazon or others, meaning I may earn a small commission at no additional cost. These commissions will help me continue creating content for you. Thank you for your support! Read my very boring full disclosure policy here.
What is the Print to Cut Activation Card?
Brother makes a number of Activations Cards. They have them for premium designs, Rhinestone Kits, Embossing Kits, Foiling Kits, and many more. Amongst them is the newer Print to Cut Activation Card which enables a registration feature to be installed in Canvas Workspace and be read by the DX models of the Scan N Cut.
The Activation Card is very easy to add to Canvas Workspace and utilizes the Trace feature of Canvas Workspace.
Is Print to Cut worth getting?
Whether Print to Cut is worth purchasing is a million dollar question.
Yes, you already have the scanning features of the Scan N Cut and between the Scan to Data and Direct Scan what more could you ask for!
The Print to Cut feature does add a bit of finesse and ease to creating stamped and printed images and adding a cut shape around them. A little bit like when you need to draw a dark line around your stamped image to ensure that your shape scans correctly, the Print to Cut feature traces the image and creates a darker line around it and the line is editable in Canvas Workspace.
You could also Scan to Data and transfer back to Canvas Workspace and edit the cut line giving a very similar outcome.
Do you need Print to Cut? I will leave that decision up to you. Read on to find out more…..
NOTE: The Print to Cut feature does not enhance the Trace function at all. There is another Activation Card to enhance Trace.
Where to add the Activation Code
To add the Activation code in Canvas Workspace you go to the top menu bar and look for the Help. Drop down the menu selection and scroll to your Account Settings. This is where you will be able to add your code. You can click on the Premium Function Activation button or the link in the side menu of the below screen. Both will open up the screen to for activation.

Enter your code in the space provided. If you have any issues with zero’s or the letter O try the zero first and if not correct go back and enter as an O. The software is clever enough to let you know that your code does not contain the incorrect alphanumeric value.
Once you click on Activate, scroll down and make sure that your Print to Cut is actually activated.
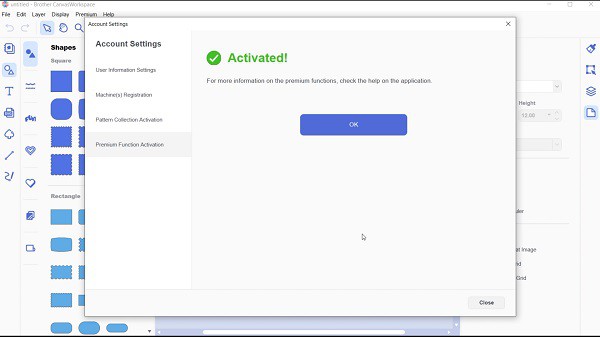
The above screen shows success! Yay!!
Added features in Canvas Workspace
A couple of noticeable additional features or items are added to Canvas Workspace once activation has been completed.
These include the registration marks which you can turn on and off and the ability to save the file to PDF ready to print out by your printer. The registration marks toggle is in the Artboard icon on the right-hand menu and the save to PDF is on the File menu just above where you send your files to your Scan N Cut.
OF INTEREST: “PDF stands for Portable Document Format. What is PDF? PDF is a cross-platform file format developed by Adobe. PDF is the native file format for files accessed and modified using Adobe Acrobat. Documents from any application can be converted to PDF.” lib_colostate_edu
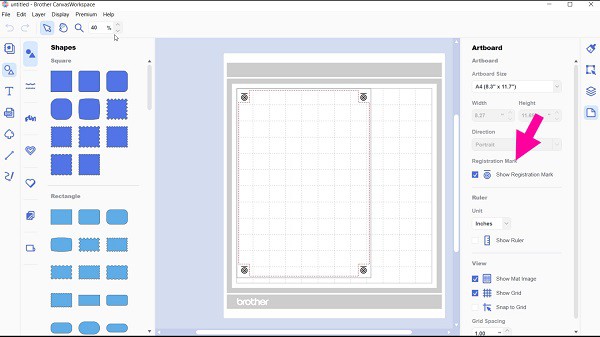
You can see the registration marks on the screen. I like how the red dotted cutting area indents around them. Make sure that you don’t place your image over the red dotted lines and over the registration marks.
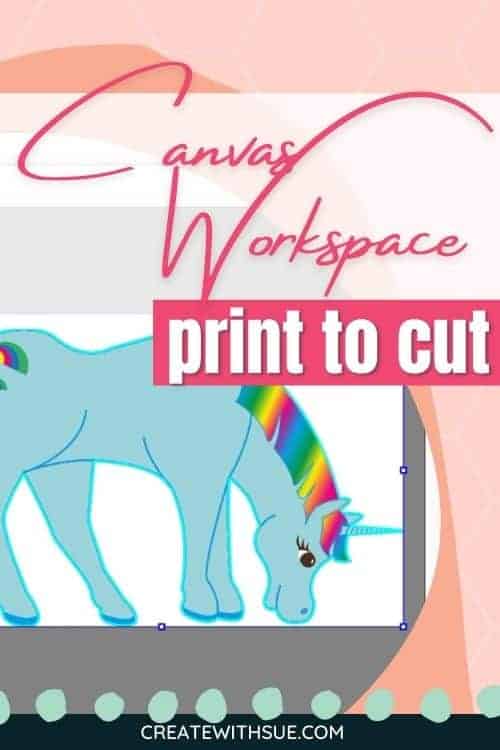
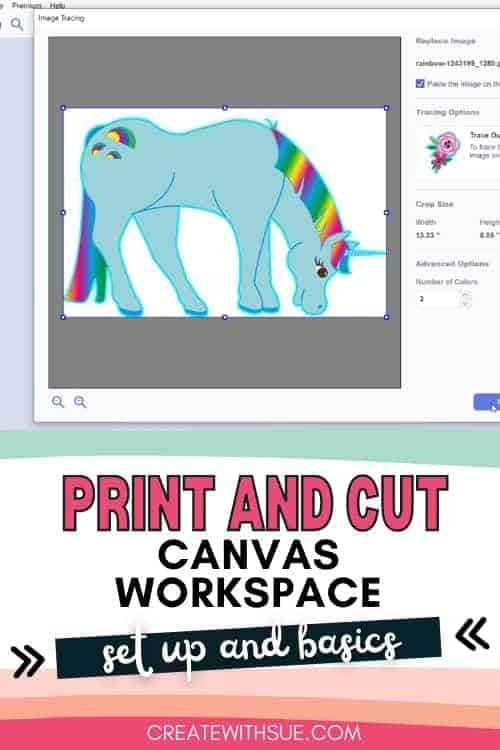
Trace an image
The next step is to trace an image with the Trace function. If you need help with the Trace feature you can find more information here.
You can also see additional instructions in the video tutorial further below in this post.
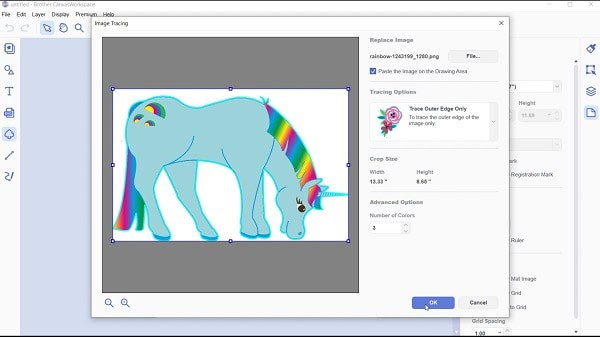
This Unicorn was from the Pixabay website where you can locate a number of free designs. I set the search to “Illustrations” as I knew that I wanted a drawing type image.
You can imagine the trouble I had once I got the designs up.. singling out one to use. I LOVE unicorns and there were so many options.
Print your design
Once you have traced your design and happy with the placement you can print it out. Now, Canvas Workspace still does not send the design directly to your printer. What it does is allows you to save the file as a PDF file and then open the file in your favorite PDF program that you can print from. Saving as a PDF is part of the new features of Print to Cut.
I use Adobe Reader however you can use whichever software program suits you best. Remember that you can set your printer output to “best quality” in the Advanced or Properties section of your print program to produce a higher quality printed image. This will vary depending on your printer and software that you are using.
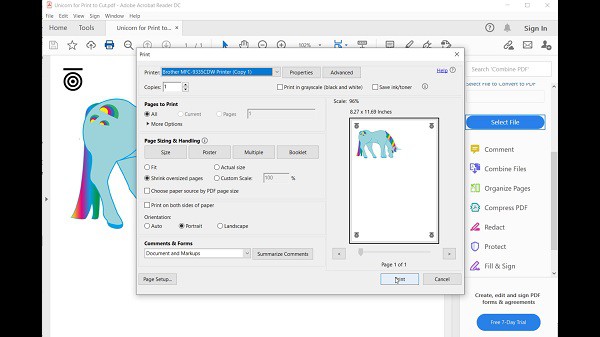
Note that you can see the registration marks on the printer preview screen. You need these marks to be showing for your Scan N Cut to locate the design on the print out.
Cutting your printed design out
OK.. so you have printed your design, we are getting there. Place your printed design onto your mat and secure firmly. I had a bit of trouble with mine as my mat is nearly ready to be retacked so I ended up using some painters tape to hold the paper down.
More information about re-tacking your mat can be found here
and
more information on how to stop your materials moving on your mat here
The registration marks need to be placed on the mat with the horizontal line aligned with your Scan N Cut. Your Scan N Cut will help you through this if you need it as a screen comes up explaining it.
Print to Cut Video Tutorial
Check out the video tutorial on YouTube
As always, feedback is welcome.
Join me on Facebook
Join me in the Scan N Cut – Let’s Create With Sue Facebook group. It is a group of awesome craft friends sharing and caring.
I would love to see you there.
Please feel free to ask any questions that you need.
Happy creating

More tutorials for the DX

Brother Scan N Cut SDX1000 – I bought another one!

Using the Built-in Scan N Cut designs
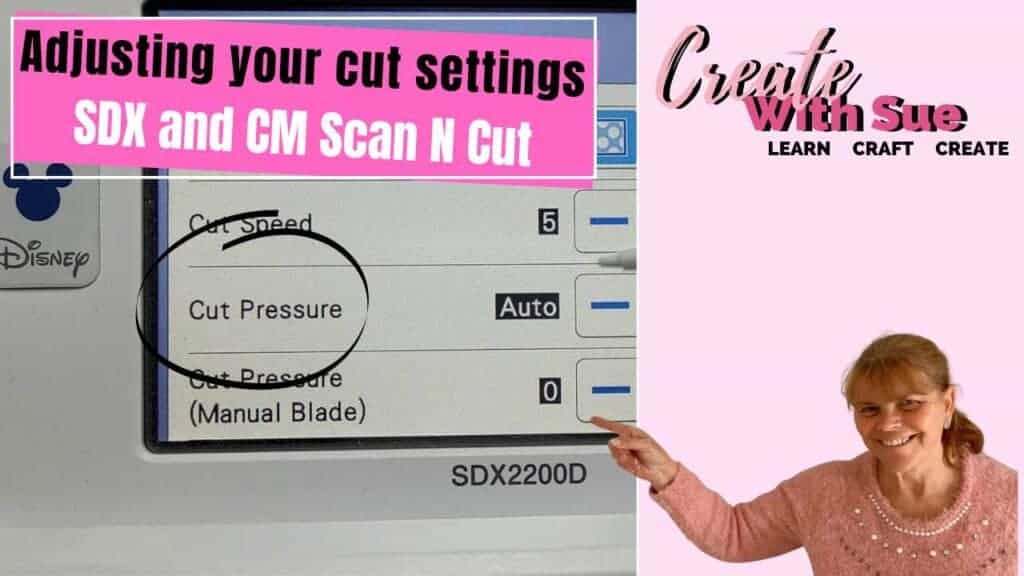
Adjusting the Cutting Depth on Your Scan N Cut

Like it? Pin it!


Very informative
Thank you, I am really pleased that you found it helpful 🙂
I’m having extreme trouble getting the activation card from any source. Can you help?
It can be very hard to find. Echidna Sewing usually stocks them. I am not sure if they will ship worldwide. Makers Superstore in the UK often has them too however when I checked today they did not seem to have any in stock. If you are in the US – try this store, if they don’t have them in stock then they may be able to get them in for you. https://www.bhphotovideo.com/c/buy/cutting-machines-accessories/ci/50710?fbclid=IwAR3csCWBZdtfoF8dY8fCd596ofdM0CUz7vBRLFzHAfChMQtkE93u8qragGA
Keep a watch on Amazon too as the activation cards are occasionally available on there too. All the best.. Sue
This business will send digitally: https://perthsewing.com/product/scan-n-cut-print-to-cut-activation-card/
Thanks Lisa.
Thank you! That’s a great help!
But where do you buy the activation codes from?
Hi Kel, thank you!
The activation cards can be purchased from any Brother Scan N Cut dealer and occasionally on Amazon or eBay. I know Makers Superstore in the UK sells them and also ships to the US and probably other countries. Echidna Sewing in Australia also stocks them however I am uncertain whether they ship internationally. If you have a local dealer they should be able to order them in for you if they don’t have them in stock.
Hi. I just received my activation code from Makers Superstore– although I was expecting the card I only got the email which I did not see for two months. That aside, when I print my hexies, or any other shape, they do not print to scale, but print about 80% smaller. I hope there is something in my settings I need to fix. Any suggestions would be much appreciated. I am in the US and use both mm and inches. Perhaps this is the issue? My cutting file was created in inches. I did have to set the printing using the “all layers” choice rather than the background image choice.
Thanks!
Carey V
Hi Carey, how have you gone with this? I will have a play with some settings to see if I can locate what is going on for you however my first thought is that it is to do with your print settings on your printer. Fit to page, letter as opposed to A4, a scaling setting etc. My best suggestion is to look through the advanced print settings on how the PDF is interpreted.
I believe you can get rid of the white paper border appearing around your cuts by making a change in the settings in Canvas Workspace. Here’s how I did it:
01) Select the image or text
02) Go to Edit, choose last option “Create Offset Line”
03) Adjust your spacing to suit your tastes (current range is 0.04 to 1.20 inches)
04) Change the Offset Direction to Inward
05) Change remaining options to your liking or experiment with them to see which suits you best.
This should allow you to cut just within the original cut lines for your shape or text. For comparison there is the option to set the original cut lines as draw mode data. Then you can see what sorts of adjustments you need to make until you’re happiest with the results.
Yes, this is correct. The offset feature in Canvas Workspace is an awesome feature and being able to switch it between inward and outward is a big bonus. You can also use the offset feature when scanning an item, directly on your Scan N Cut machine. This too is adjustable inwards and outwards on both SDX models and CM models. (not certain if it is available ALL models)
Hi Sue
When I export and print the PDF it’s not the best quality even though I’m using the best settings
Is there anything I can do differently
Hi Samantha, are you creating the design yourself inside Canvas or tracing the design? If Tracing, there are no settings inside Canvas Workspace to improve the quality of the PDF download however starting with a higher quality image should help.