This tutorial will show you step by step how to weld on your Scan N Cut. It will demonstrate how to add a shape in your Scan N Cut DX, then resize and align the shape or object. Finally, using the weld feature to join the shapes together to create your very own, unique design.
Scan N Cut machines are so versitile AND a great deal of fun
This tutorial is part of a series of brother scan n cut dx tutorials I have put together in the “How To” series. These tutorials have been created using the Brother Disney Scan N Cut DX 2200D model.
- What does it mean to weld on your Scan N Cut
- Adding shapes on your Scan N Cut
- Creating multiple shapes to weld
- Moving and adding more shapes
- How to align your shapes
- How to weld your shapes
- Rotate or flip shapes
- Your design welded
- Cutting your design out
- Video tutorial on how to weld on your Scan N Cut
- Join me on Facebook
What does it mean to weld on your Scan N Cut
What does it actally mean to weld on your Scan N Cut?
Welding is the joining together of shapes. You can make your very own unique design using any shapes you choose, right on your Scan N Cut by joining or “welding” these shapes together. The great news is that it is not only shapes that it works on, your Scan N Cut can also weld text in the same way.
Yes….these instructions on how to weld shapes are the same for welding text.
NOTE: Welding objects together is quite different from Grouping them together. When you group shapes or objects together each shape will cut out as a separate shape still. When you weld your shapes they will cut out as one shape.
Adding shapes on your Scan N Cut
There are a huge number of shapes that live on your Scan N Cut. This makes it so easy to choose a shape to use in your design without needing to go to your computer. It is one of the BEST advantages of having a Scan N Cut over other brands of cutting machines… there are lots of advantages however, not requiring another device to use your Scan N Cut is a biggy.
How to add a shape
There are LOTS of lovely designs to use for your project inbuilt into your machine.
The model shown is the Disney model and you can see that there is a selection of designs that are Disney related already installed. No activation key is required to use these files however Disney files are licensed for personal use only. This means that you cannot sell products with the Disney designs on.

The icon with the square and circle is the one we are using for this tutorial. Have a really good look through the pre-loaded designs so you are familiar with them.
Click on the the icon that I am pointing at and it will take you to the next screen.
Choosing shapes for your welding project
There are so many shapes to choose from and while I will choose one for this tutorial you can choose which ever one suits you best.

Above is a snapshot of some of the built in shapes available.
NOTE – you move through the screens by selecting the arrows that I am pointing at with the stylus. The double arrows will take you to the beginning or end of the selection. The single arrows will move you through the screens one at a time. If the arrow is greyed out as shown in the picture, you are on the final screen and can no longer move any further in that direction.
Adding shapes is a simple as clicking on the shapes you would like to use for your project.
Creating multiple shapes to weld
The screen you can see below is the one that you use to resize your shape and also create multiples of your shape.
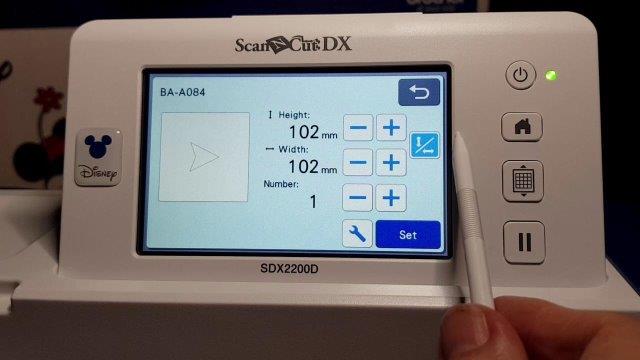
The plus sign will increase the selected shape and the minus sign will decrease the shape. By default, the shape will increase or decrease in proportion. This means if you increase the height from 102mm to 105mm the width will change automatically from 102mm to 105mm at the same time to keep the shape in exactly the same proportions.
On the right-hand side, I have highlighted the icon with two arrows and a line between them (near where my stylus is pointing). This icon, when selected, allows you to change the shape’s width and height individually. An example would be if you wanted the shape on the screen to end up being 102mm high by 105mm wide you would tap the icon with your stylus to activate this icon. Once activated, it would then allow you to increase the width only to the size that you require eg: to 105mm.
Duplicating shapes
Next, of course, is to duplicate the shape to create multiple shapes. As you can see in the picture there is a number 1 on the screen and 1 copy of the shape. The plus and minus next to the number allows you to add additional copies of the shape to your project.
Once you are happy with the size and number of shapes you can then choose the big blue “Set” button and your Scan N Cut will move you to the next screen.
NOTE: How many additional shapes you can add will be limited by the space available on your cutting mat. eg 12″x12″ mat. A message will pop up stating if there is not enough room and then you will need to either reduce the size of your shape or reduce the number of them.
Moving and adding more shapes
In the below picture you can see that there is now 3 shapes on the screen.

You can move the shapes around with your stylus on the screen. The Add button will allow you to add a different shape to your design.
Note: This screen will give you the option to save your design either directly to your Scan N Cut, onto a USB or back into Canvas Workspace.
How to align your shapes
In this veiw you can see that the shapes are not in a straight line on the screen.

Alignment options for your shapes
As you can see there are a lot of options for alignment available to you. You can align left, align right, to the top or the bottom align to the center or align to the middle. Have a play with all the icons so that you are familiar with what they can achieve.
The alignment function is very powerful and will place your shapes with precision on your screen and mat. This is not as easily achieved manually with your stylus.

How to weld your shapes
Next we will look at how to weld on your Scan N Cut.
Once you are happy with the alignment and placement of your design you can weld it together so that it is ONE object. You can see in the picture below that there are multiple red boxes on the screen. Each red box surrounds its own individual shape. To weld a series of shapes together you need to have them all selected as shown in the picture.
Each shape that you want to weld together must overlap slightly to achieve a weld. If you look closely at the picture below you will see that the points of the triangles cover the object next to it.
When you are ready you can click on the weld icon that I am pointing to with the stylus.
When you click the weld icon you will be prompted with a message that asks if you are sure that you want to continue and states that the weld cannot be undone.
Note: if you are still experimenting, I recommend you save your design prior to welding it so that you have a copy. You can save directly onto your Scan N Cut, to a USB or back to Canvas Workspace. (see the “Moving and adding shapes” section above)
Rotate or flip shapes
Rotate or flip any shapes that you need to as you are creating your design. You can do this before you weld the shape or after. Whatever you choose. This is the joy of creating on your Scan N Cut.
You can see the rotate icon that I am pointing to with my stylus. It will allow you to rotate to any angle that suits your design. The flip icon is the one in the middle of the second row. All you need to do is highlight your design (so it has the red box around it) and click.
Your design welded
Your welded design will now be one object. You can still add and weld more shapes to your design to create even more variations. I added a couple of shapes to make my design look a bit like a Christmas tree in a pot. I made it up as I went along which is often how I create things.
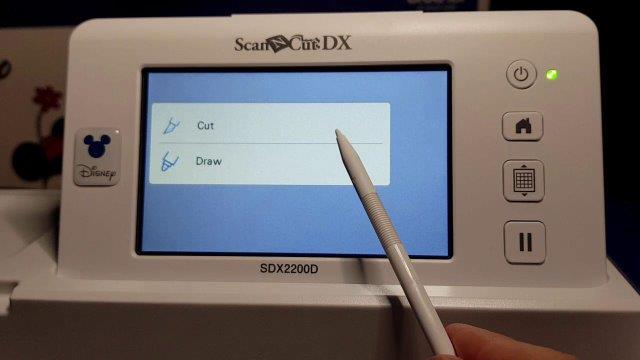
Cutting your design out
When you are happy with your design you are ready to cut it out. Go Ok and then select Cut or Draw to suit you project.
I recommend a test cut
Even though the DX has a fantastic auto sensor blade I still recommend that you do a test cut for materials that you haven’t cut previously.
I don’t do quite as many test cuts on the DX as I do on my CM900 as it really does do quite a good job. BUT my thoughts are that it is better to spend a few seconds doing a test cut than wreck expensive materials, feel utterly disappointed, and lose that crafting motivation for that particular project. (been there)
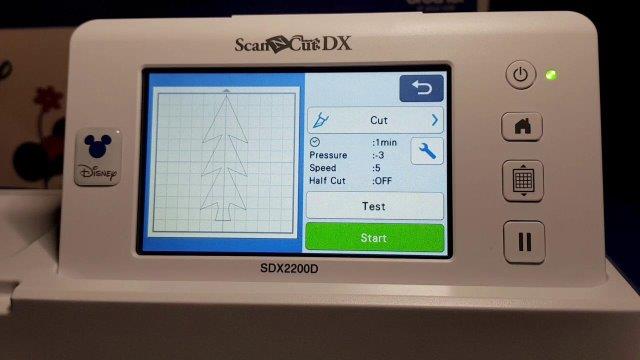
You can see in the picture above you can either select cut or you can add the test cut lower down on the screen. Clicking on the Test button will allow you to select a small shape, like a triangle and your Scan N Cut will automatically place it on your screen. Your Scan N Cut will select a spot it thinks is the best option however you are able to use your stylus to move the test shape into where YOU believe is the best location.
I aim for the least wastage of the materials on the mat AND an easy to access place as I often dont take the mat out the machine to check if it has cut throough ok.
Once you have cut the test shape you will be given the option to continue or to go back and change the settings. Obviously the choice that you make will be determined by the results. Make sure you remove the test shape and check the test cut.
Video tutorial on how to weld on your Scan N Cut
Here is the above tutorial on video called Scan N Cut DX “How To” weld on your SNC.
I know some crafters like written tutorials, some like video and some like BOTH.
I hope that you have found this tutorial useful.
Happy creating,


Join me on Facebook
Join me in the Scan N Cut – Let’s Create With Sue Facebook group. It is a group of awesome craft friends sharing and caring.
I would love to see you there.
You are always welcome to say Hi at [email protected] or [email protected]. It would be great to hear from you!

Need to learn how to use Canvas Workspace? More information can be found here!


That was great. Thank you.
Hi Diane, I am really pleased that you liked it. 🙂