
This tutorial will step you through how to add a design to your Scan N Cut DX. There are four ways you can do this and all of them are very easy. We will work through adding the design and getting it ready to cut.
This tutorial is part of a series of brother scan n cut dx tutorials I have put together in the “How To” series. These tutorials have been created using the Brother Disney Scan N Cut DX 2200D model.
Disclaimer: As an Amazon Associate, I earn from qualifying purchases. Links included in this tutorial may be affiliate links, Amazon or others, meaning I may earn a small commission at no additional cost. These commissions will help me continue creating content for you. Thank you for your support! Read my very boring full disclosure policy here.
Turn your Scan N Cut on
There will be a couple of screens that may appear on your Scan N Cut prior to getting to the screen where you need to add a design. One screen will be notifying you that your blade will move. When you are ready click OK. On the new DX models, the blade does not move a lot, it is really your Scan N Cut’s way to do a bit of a check and get ready for you to use it.
Some Scan N Cut machines have a lovely picture display, which is nice the first time you see it…not so much the 133rd time. Bypass the screen by pressing the Home button. This is the one with the picture of a house on it.
Features of the Scan N Cut main screen
On the screen pictured below the Home button is located just below the power button.
Take note of some of the features in this screenshot.
- Power button – top right-hand side, obviously On and Off.
- Home button – directly underneath and brings you to this screen from wherever you are.
- Load mat button – second from the bottom to load and unload your mat into your Scan N Cut
- Panic button – just kidding. It is the Pause button with the sideways equal sign LOL
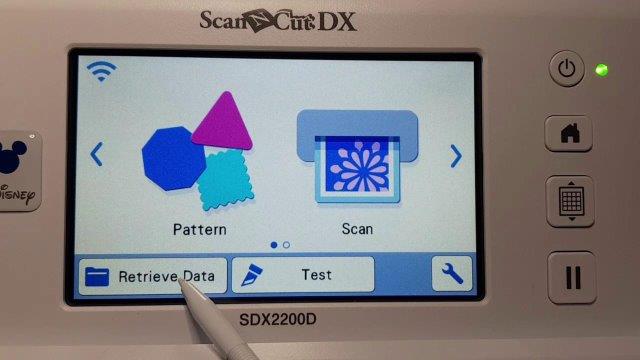
Along the bottom of the screen, you can see
- Retrieve Data
- Test (so you can test settings)
- Tool icon where you can change settings.
Then there is the WiFi icon on the top left. When it is blue as shown in the picture you are connected and ready to import from Canvas Workspace. If you need information on setting this up, I have a tutorial in the “How to” series Set up your WiFi to assist you.
Using inbuilt patterns is the one with all the colored shapes. You can do so much in here including creating your own designs from scratch. Check the tutorial for information on how to weld on your Scan N Cut. The tutorial covers a lot of features to help you create your design from scratch.
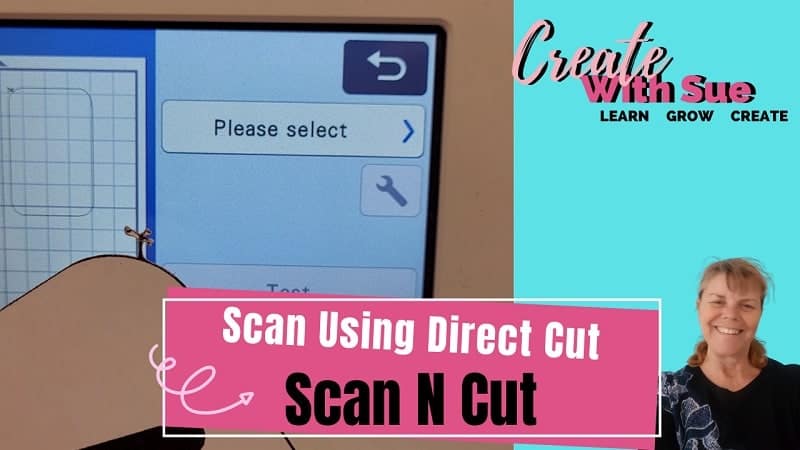
Retrieve Data – SVG or FCM files
Click on the Retrieve Data button that I am pointing to with my stylus in the picture above. You will be presented with a number of options on how to import your design or file shown in the screenshot below.
- Scan N Cut – The top left icon of a Scan N Cut will take you to your own saved files on the machine. These are designs that you have previously created and elected to save to the device.
- Canvas Workspace – The top right icon of a computer with WiFi next to it is the choice if you are importing the design from Canvas Workspace via WiFi. The screen will look like this after updating to version 1.70 on a SDX Scan N Cut. This update provides accessibility to the new Artspira app. Find out more here.
- USB – If you have a USB inserted into the USB slot on your Scan N Cut you can use a design transported to your machine via this method. We will go over this method in detail further along in the tutorial.
- Via cable – The bottom right icon is for accessing files via a cable from your computer to your Scan N Cut. This feature is only available for the DX models and the cable needs to be purchased separately.
If you haven’t updated your SDX Scan N Cut
If your screen looks different from the picture above then you may not have updated the firmware on your SDX Scan N Cut machine.
The icon has changed slightly however still use the same icon to bring files in from Canvas Workspace.
Retrieve your file using a USB drive
If you do not have a Wifi option then the next best method of transferring files to your Scan N Cut is using a USB device. To do this you place a copy on your USB and place your USB into the USB slot on the side of your Scan N Cut. This is usually located on the right-hand side of the machine.
Once your USB drive has been inserted into the slot you can select the USB icon on the screen and it will display the contents of your USB.
Using the arrows on your Scan N Cut
You may need to move through the USB and the Scan N Cut. This can be easily done using the arrows to the right-hand side of the screen. The single arrows move one screen at a time and the double arrows take you to either end of the list of files.
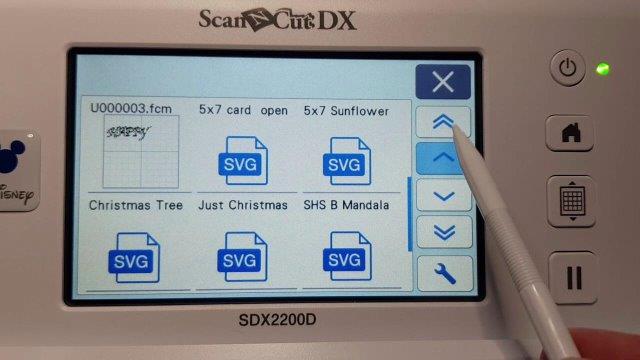
In the screenshot above you can see two different types of files. The file on the top left-hand side is an FCM file. Your Scan N Cut knows these files as it is a Brother proprietory file which is why you can see what the file actually is. SVG files are not native to your Scan N Cut however your machine will have no trouble reading them once they are imported from the USB. Just not in this view.
If you have saved your design in Canvas Workspace, downloaded version, you may have chosen to save in the CWPRJ file format. This stands for Canvas Workspace PRoJect. CWPRJ files will not import into your Scan N Cut and can only be used for design purposes in the downloaded version of Canvas Workspace.
Note: When you name your files, if you remember to give them a meaningful name it will make it much easier to select your designs to cut.
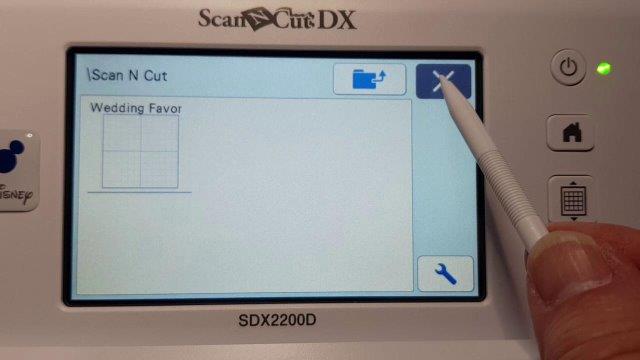
Locating your file on the USB
Clicking on a folder on your USB drive will open a screen that looks like this…depending on the content of the folder.
- To add the design push on the actual file on the screen.
- Click on the cross to take you back to the main screen of your files
- Tap on the folder with the upward pointing arrow to go up one folder or level.
Retrieve your design over Wifi
This is my favorite way to import files into my Scan N Cut. I like to make sure that they are exactly as I want them in Canvas Workspace, prior to importing them to the Scan N Cut to cut out.
Select the button with the picture of a computer and a WiFi icon at the side of it to import your design from Canvas Workspace.
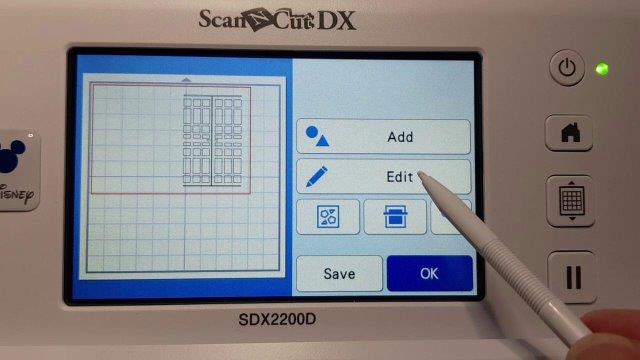
Now you have your design imported
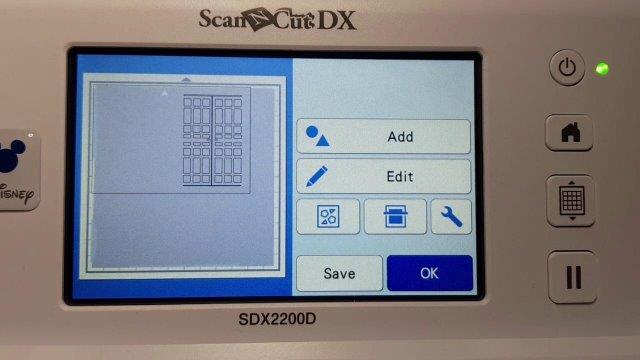
Now you have your design imported into your Scan N Cut you are ready to make any changes required. This can be to either the design or simply to the settings of your Scan N Cut so that it will cut out perfectly.
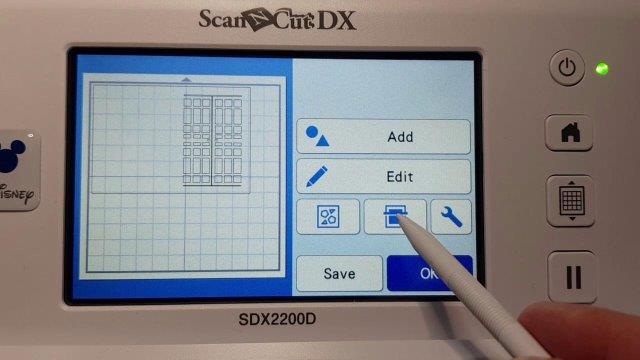
The screenshot below is the Add button, where you can add another design as well, add a shape or add text to complete your design. I am pointing to the Edit button if you want to edit your design and below are three icons.
- The left button with the little squares and triangle on it is a super cool feature that will organize the shapes on the mat for you automatically. You will have the choice of how you want them to fit on the mat so have a play the various choices and use the one that suits your project the best.
- Next is the button to scan your mat. I love this feature of the Scan N Cut as it makes it soooo easy to place your design precisely where you want it.
- Finally, the third button is the tools button. We will look at that shortly.
Scan your mat for precision placement
Select the center icon to scan the materials you have placed on your mat. Once you have it scanned you can move the design around the screen with your stylus and place it precisely where you want it.
This is a great feature to help you cut a number of shapes or designs out of different colors, maximizing the use of your expensive materials and making sure that you have your design exactly where you want it on your materials.
Click on the Scan your mat button that I am pointing to in the screenshot below and your machine will slowly pull your mat through and back again, scanning whatever has been placed on it.
More details on placing your design can be found here on my YouTube channel.
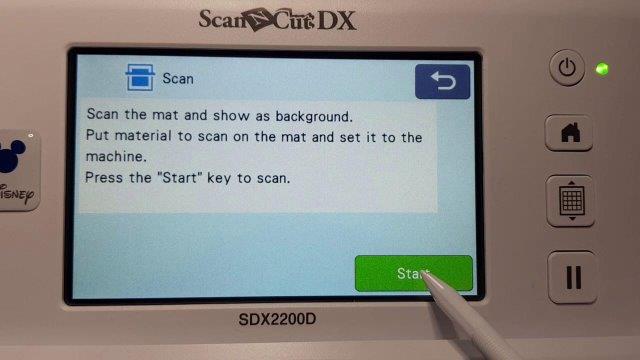
You will receive these instructions by your Scan N Cut after you have pressed the Scan Mat button to make sure that you have your materials on your mat.
Press start.
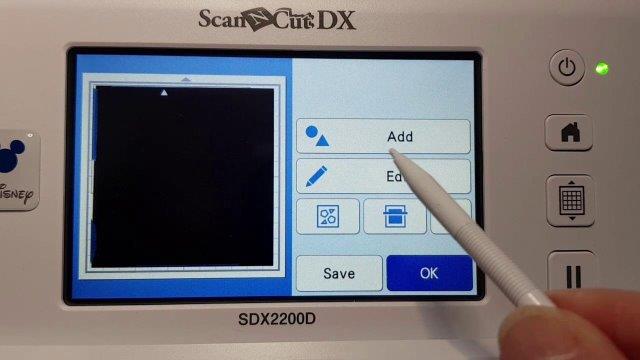
Scan N Cut image is too dark
Ok, so this happens! When scanning darker materials, it is way too hard to even see where the design you have added actually is. This makes it harder to move the design to the best location or do anything else useful with it.
As you can see…it is very black
There is an easy fix and it is in the tools section on this screen.
The tools button will move you to the below screen where you can make a few choices.
To fix the dark scanned image simply change the background. The center selection will provide a lighter background and make all the difference to see and manage your design.
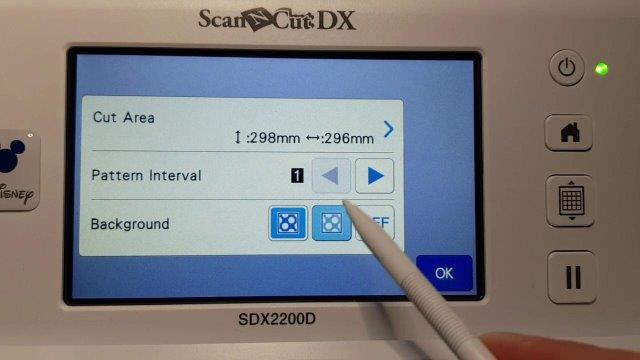
In this screen, you can also alter your mat size to the 12″x24″ at the top or if you are creating multiple shapes in your design the Pattern Interval will space the shapes according to these settings.
Note: The default setting always has the black square around which makes it easy for you to make a change and then remember where the setting was initially.
Lighter background selected
Once you have changed the background you should be able to see your design quite clearly and move it around as needed.
Add and modify the design in this screen. You can also save your design. Clicking on the Save button will give you options where to save your design. These will be exactly the same as the options to import your file.
Cutting your design
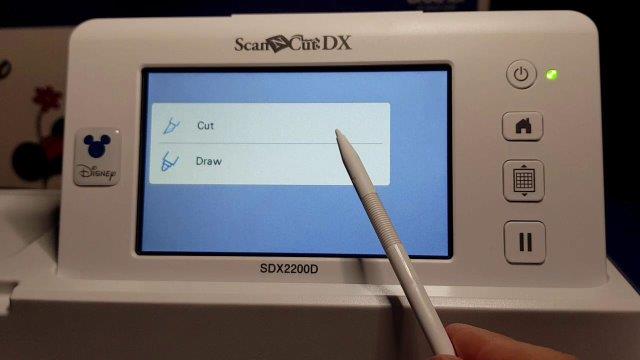
When you are happy with the design you have added to your Scan N Cut and it’s placement on your mat, select either Cut or Draw depending on your project. For this tutorial, we are choosing Cut.
This will take you to the screenshot below where you have more options to select from.
Options available on the Scan N Cut cutting screen
- Back button – blue reversing arrow located at the top right-hand side
- Cut button – will take you back to the previous screen to change to Draw
- Tool icon – will allow you to change the settings you can see on the screen
- Test – I always recommend a test cut. This will place a small shape on your mat to do a test cut with.
- Start – when you are happy with everything and ready to cut then select Start.
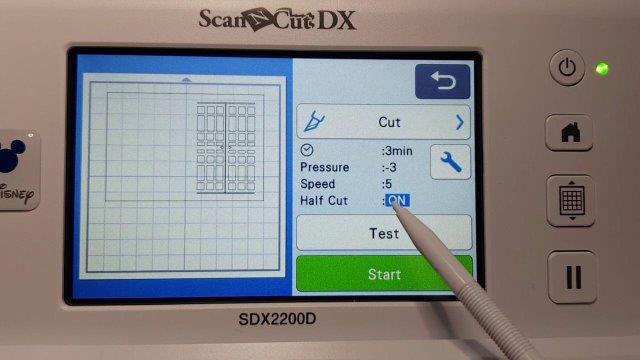
On the screenshot above you can see that the design I have selected will take
- 3 minutes to cut
- pressure set to -3
- speed at 5
- Half Cut is set to ON.
The settings shown are what I used for my last vinyl project. To cut cardstock, you would go into the tools and turn the Half Cut to OFF. If you try to cut with it on your blade will not cut all the way through your card. Depending on the results of your test cut you can change your Pressure settings or Speed.
Video Tutorial on “How to add a design”
I know some crafters prefer video, some like the information written and some like both. Here is the video version of the above information for you.
I hope that you have found this tutorial useful.
Happy creating,


Join me on Facebook
Join me in the Scan N Cut – Let’s Create With Sue Facebook group. It is a group of awesome craft friends sharing and caring.
I would love to see you there.
You are always welcome to say Hi at [email protected] or [email protected]. It would be
great to hear from you!

Need to learn how to use Canvas Workspace? More information can be found here!


hi sue im new to website. i have taken your free course on the scan n cut basics.my question is i want to take more courses but not sure what i need.i belong to paper glitter glue craft site that builds little houses.i have a good art background and make all my own designs and patterns on a drafting board.i want to learn how to scan my own drawings and export them to canvas workspace to ad score lines.and learn how to design my own houses on the scan n cut.i have a sdx125egy machine.
Hi Rick, I actually responded to another message from you and suggested joining Lucy’s group LOL. To create SVG files for all cutting machines this course here would be the way to go… https://jennifermaker.teachable.com/p/cut-above-course-how-to-create-svgs-cricut-silhouette-upload-sell/?affcode=152016_rgwuapgg. (this is my affiliate link to the course). There are other software platforms that you can use, Inkscape is free and a reasonable choice. The course also covers Adobe Illustrator which is quite expensive software. It is a great choice for designers though if that is your goal.
My scan cut is a CM650W. Can I apply everything you mentioned?
Hi Betty, the process is very similar with many of the icons exactly the same. As with any new advancements, the new DX models have some additional features that you will not see on your CM650W. I have a free course available which was created on the CM900 that you are welcome to enroll in. You will be able to work through all the features.
https://www.createwithsue.com/scan-n-cut-basics%202/