This tutorial is looking at how to stop materials moving around on the Scan N Cut mat during the cutting and drawing process. It is really frustrating when this happens and is mainly caused by the mat not being quite sticky enough.
When you first purchase your Scan N Cut the mat is super sticky. So much so that you may even have issues removing your cut project from the mat without damaging it. We will cover this also in this tutorial.
Unfortunately, your mat being too sticky will only be a short lived problem. The most common problem is that the mat is not sticky enough and the project you are trying to cut moves during the cut cycle.
This can be dire!
Many a project has been wrecked at this point which is why it is really important to ensure that your materials are firmly stuck to the mat.
Disclaimer: As an Amazon Associate, I earn from qualifying purchases. Links included in this tutorial may be affiliate links, Amazon or others, meaning I may earn a small commission at no additional cost. These commissions will help me continue creating content for you. Thank you for your support! Read my very boring full disclosure policy here.
Mat too sticky
We will look at this issue first because if you are new to your Scan N Cut this is the first issue you may come across. If you have re-tacked your mat…then you may need this information too.
As mentioned, when you first receive your mat it can often be a little too sticky. For adhesive vinyl and HTV (Heat Transfer Vinyl), this is normally not a big issue as they are fairly sturdy mediums and cope with very sticky mats, however, for cardstock, it can absolutely ruin a beautiful project.
Test
Ideally, you can test a small piece of the material you are going to use for your project on a section of your mat. Press it down firmly, then lift it off again. If it comes off easily and there are no issues with part of the cardstock being left behind on the mat then you are good to go.
TIP: When your mat is too sticky you don’t need to press your materials down quite as firmly as when it has lost most of its sticky. The material will stick easily without too much help.
Pat to reduce stickiness
One solution to reduce the level of stickiness is to pat the mat with a lint-free cloth which will reduce the stickiness. This will take some of the initial stickiness away without damaging your mat. This can also be a useful solution if you have re-tacked your mat and been a bit enthusiastic with the glue.
If by some chance you end up with excess paper left on the mat do not be alarmed. It will wash off. I have heard of new users throwing away their mat because they could not get the bits off or the mat had lost its stickiness. NOOOOO…. don’t do that. We will work through all the solutions….read on.
Easy way to get your project off your mat
If you find your project is sticking to your mat a bit tight OR simply a little harder to remove then bend your mat slightly to enable your cut design to ‘pop’ up which makes it easy to lift off. If you are still having trouble then turning your mat over so that your project is facing downwards then bend the mat slight upwards is another way.
I normally do not need to do the latter as I find that a gentle bend of the mat, even if the mat is still loaded in your Scan N Cut, will make all the difference.
Choose good cardstock
Another issue is that some cardstock is not as high quality as other cardstock which will also make a difference. There certainly can be a world of difference between paper and cardstock. I have had cardstock that tears away from itself making a mess which is really disappointing. This same cardstock when cut leaves an abundant amount of card fluff on the mat which is equally annoying.
Normally I aim to purchase solid core cardstock as I haven’t had any issues with this type of card AND no matter what project you use it on it produces a nicely finished project with no ‘white’ edges.
When purchasing, you can usually tell if it is solid core as the edges of the cardstock are exactly the same color as the rest of the card but not always, it can be tricky.
My problem cardstock was a black card with light grey in the core…. hmmm as I said…tricky.
Lucy Foxworth from PaperGlitterGlue has an article on which card to use for some of her projects. Her tutorial is called Best Cardboard For Your Papercraft. Lucy makes gorgeous little houses and knows her card.
Issues if you fail to stop materials moving
The biggest issue is that you have ruined your entire project and the materials associated with making it. This may be quite significant if you have spent a lot of time coloring in a design or even the expense of the actual material. Wrecking a project that you have already spent a lot of time on can be enough to make you cry.
Let’s see if we can avoid that!
Before you toss your project away in disgust take a look to see if there is any of it salvagable. Occasionally I have managed to salvage parts of the project and getting away with only having to cut one of the shapes or part of the design out again.

Ways to hold materials down
There are a few ways to help your project stick to your mat. Obviously the best way is to keep your mat maintained and have it the right level of stickiness.
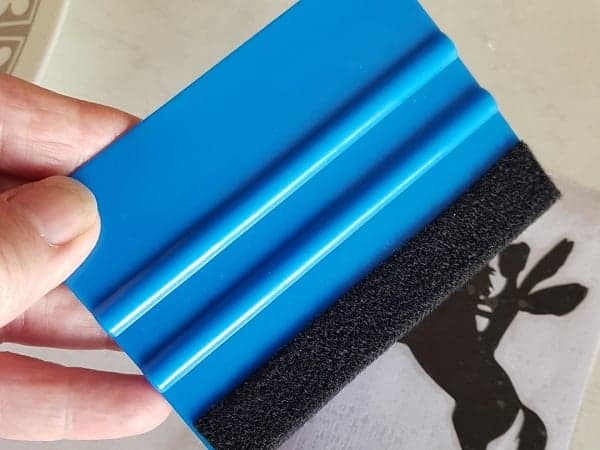
Using a Brayer
While in most cases simply pressing your cardstock or vinyl down firmly onto the mat will do the trick, the next best thing is to use a brayer. This is a roller type device that applies very even pressure over the areas that you roll it over.
You can also try a scraper or squeedgee and even a credit card may help to apply the extra pressure.
NOTE: I love my squeegee. I thought I didn’t need one until I bought it… HOW much easier it is to press the vinyl down firmly onto a project both before the transfer sheet is removed and once again after to make sure that your vinyl if firmly adhered to.
Painters tape
The next option is painters tape or can be known as masking tape. This is a great solution but still has a set of problems using it too. Washi tape is another alternative and works much like painters tape however it is a little more expensive and still has similar issues.
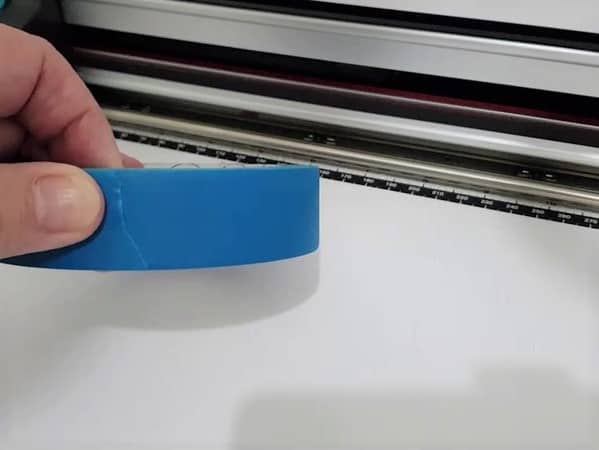
To hold your project firmly to the mat, cut a piece of tape to the size that suits your project best. When cutting 2×12 card then look at cutting the tape in half so that it doesn’t go over the registration marks of the mat at all or over the cardstock too far.
I sometimes have a smaller piece of cardstock or a piece that has had some areas cut out then tape the insides of the cut areas down too. Aim to tape as close to where you are planning to cut as possible without the blade cutting through the tape as well.
Issues with Painter tape
There are a number of issues using painters tape.
- Painters tape has been known to tear your cardstock while being removed from the card. I aim to only have it connected by a narrow amount of tape and if the cardstock is expensive then test first.
- The tape can lift off your project and get stuck inside your Scan N Cut. This is a nuisance but normally fairly easy to resolve by cleaning your scanner where it often lands.
- You are only able to tape the edges of the project’s materials. This works quite well if you are cutting a fairly solid shape however if you are planning to cut a more intricate shape with lots of smaller shapes then the inside shapes may lift from the mat and tear during the cutting cycle.
A Mandala project would be an example of this.
A better solution is to re-tack your mat
Cutting this type of project you are better off fixing the stickiness of the mat properly first as it can end in disaster. Even if this means waiting to cut your project until the next day. (just ask me……I ALWAYS push the boundaries with being too impatient so I am really familiar with cutting disasters)
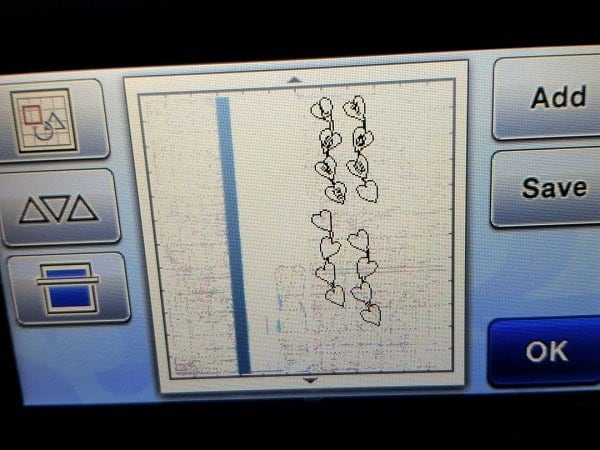
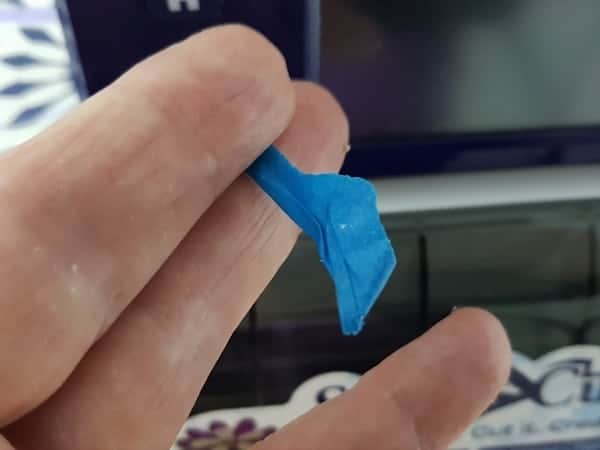
Tape caught in your Scan N Cut
If you lose a piece of tape into your Scan N Cut don’t panic. The cover from the scanner can easily be removed and most often this is where you will find the tape. Occasionally it will stick to your roller or just into the front of your Scan N Cut. Carefully remove tape with tweezers.
The pictures from the left. Scanned cardstock, the blue tape that is stuck on the scanner shows up as a big blue line. The middle picture is of the painters tape stuck on the scanner and the picture on the right is the tiny bit of tape causing all the drama.

For information on how to clean your scanner then the tutorial “Cleaning your Scanner” will help.
Sticky tape
I have also tried clear sticky tape. This can be used at a pinch however I have found that it causes more issues than the painter’s tape.
Clear sticky tape is hard to see when it is on the mat. It is also really hard to find if it inadvertently comes off in the machine. Really hard. (Ask me how I know this LOL) The sticky tape also seems to stick harder than painters tape. Painters tape tends to come away reasonably easily as it is designed to be removable.
Removable spray glue or basting spray
Some have used removable spray glue..this is tooo messy for my liking. When I tried this solution it was not very successful and I ended up with a funny story about it. The day I tried it I was in a bit of a rush and I left the house not realizing that I still had some of the basting spray on my fingers. My fingers were sticking together constantly. They stuck to my steering wheel… my gear stick, the door handle of the car…EVERYTHING! I stuck to everything I touched until I found a tap to wash my hands again.
When using basting spray you need to be very very careful not to get any spray on the outside area of the mat’s cutting area as it will cause issues with the rollers. If you do decide to use it I would recommend only spraying the material that you are about to cut…not your mat. I would also suggest using a spray box to contain the sticky spray.
Cleaning your mat
I aim to clean my mat every few projects to maintain a reasonable level of stickiness. Using alcohol-free wipes (baby wipes) is one of the easiest ways to keep your mat clean and rejuvenate it. Give it a quick wipe over and let dry and you will notice the difference. While I haven’t had any trouble with the wipes I have purchased leaving “fluff” behind on the mat, I have heard a few crafters say this can occur. Purchasing a reputable brand of baby wipes may avoid this.
When the amount of fluff and bits is beyond using a baby wipe (this can happen) then you are able to give your mat a quick rinse under the tap. Let it dry thoroughly and the stickiness will return.
I usually avoid using soap or detergent on the mat when cleaning UNLESS I am getting ready to re-tack the mat again. If the bits left over on your mat are really stubborn then increase the level of ferocity that you clean the mat. Next level soap, then some kind of brush to give it a bit of a scrub.
Sometimes you can inadvertently end up taking off the original glue and there is NO STICK LEFT….never fear there is Zig. It is quite easy to make your mat sticky again and certainly NO reason to throw your mat away!
They are way too expensive to do that.
Making the mat sticky again
Once your mat is beyond baby wipe rejuvenation then Zig Glue is wonderful and really easy to do. The hardest part is waiting until your mat is dry enough to use again. I usually wait 24 hours…basically the next day. Depending on the weather (temperature) you may get away with using your mat again after a few hours.
NOTE: purchase the wide tip Zig glue as it is much quicker to cover the mat area. It lasts for ages.
A number of crafters also recommend Aileen’s Tack it Over & Over Repositional glue however I haven’t tried this personally.
The full video tutorial on how to restick your mat is here:
I really hope that you have found some useful information in this tutorial. Check out some of my other tutorials while you are here, they have all been designed to help you as much as I can.
Happy creating,


P.S. Don’t forget to pop into our Facebook group and say hi. I love hearing from you! The group is full of awesome crafty friends like you and is where you can share your creations and any issues you might have.
BIG Changes for ScanNCut Owners – You Need to Know This!
Exploring the New Affinity Designer V3 — My First Impressions
Today we are exploring the new Affinity Designer V2 software which was released on October…
Cutting Cardstock: Tips for Better Results
Cutting cardstock with your ScanNCut can produce beautiful results, but sometimes you may notice issues…


I have a tip for you…in desperation one day when one corner of my card stock wouldn’t stick, I grabbed my stick of purple school glue. I figured it was an old matt so if it didn’t work…no loss. The purple glue worked perfectly in a pinch and I’ve been using it ever since.
Thank you for that tip Terri. There are a few types of glue that will work nicely. the only ones that I am not keen on are the spray glues however this may be just my experience. I will keep a lookout for Purple School Glue 🙂
Hi! thank you so much for all the tutorials. I am about to purchase this machine and was wondering if I print a custom box that I previously designed in illustrator that if I could add scoring lines to the design when cutting it.. want to create custom boxes for my business and would love to know if it is possible. Thank you!!!!
Jaqui
Hi Jaqui, you can certainly make custom boxes with your Scan N Cut. Using Illustrator you can create and save your box file in SVG format and your Scan N Cut machine will let you import it. Illustrator is great design software for the Scan N Cut.
Hi. Just to tell you I use Aileen ‘s Tack it Over & Over all the time on my 650 Scan and cut..
We sell that product in my store and I tell customer to mixes 1 teaspoon of water to 1 teaspoon of glue and is enough to do a 12 x 12 canvas, If you find it to tacky follow the method of pat to remove a bit of the stickiness. I use a foam brush or a low cost paint brush from the dollar store and put masking tape around the mat not to get it on the rollers. Works very well.
Jeannette
Hi Jeanette, thank you for the extra tip on how to mix Aileen’s Tack it Over & Over to be the correct consistency for the Scan N Cut mat. I use Zig Glue which does not need mixing and really easy to apply. Both of the glues need to be applied sparingly so your tip on how to mix Aileen’s Tack it Over and Over is really helpful. Thanks again, Sue.