Learn how to scan with the Direct Cut feature on your ScanNCut!
The Direct Cut feature is a great way to get an accurate scanned image for cutting. You can adjust the settings to get the best scan possible.
With the Direct Cut feature, you can easily add an offset, double line, dotted line, or fill to your scanned image. By adjusting the settings you can create a cleaner scanned image for cutting. This will help make sure your cuts are precise and look exactly how you want them to.
Watch this tutorial on the SDX2200D to learn how to use the Direct Cut feature on your ScanNCut!
Disclaimer: As an Amazon Associate, I earn from qualifying purchases. Links included in this tutorial may be affiliate links, Amazon or others, meaning I may earn a small commission at no additional cost. These commissions will help me continue creating content for you. Thank you for your support! Read my very boring full disclosure policy here.
- Scanning on the ScanNCut
- Video tutorial using Direct Cut scanning
- Select Direct Cut on your ScanNCut
- Recognition mode
- Framing your image to improve the scan
- Check whether the scan is correct
- Scan in Black and White mode
- Cutting your image out
- Finished cut-out image
- Tweaks, options, and features when scanning
- Join me on Facebook
- Love to create your own projects?
- An Intermediate course is also available
Scanning on the ScanNCut
The ScanNCut has a number of scanning abilities. These include scanning the materials on your mat for precision placement, Direct Cut, and Scan to Data.
What is the difference between Direct Cut and Scan to Data?
Direct Cut – This is when you scan an image that you have placed on your mat AND cut it out straight away. Crafters often refer to this as “fussy cutting”. Your ScanNCut makes fussy cutting so much easier.
Mats to use – The mat required for Direct Cut is either the Low Tack or the Standard mat. NOT the scanning mat!
Scan to Data – Scanning to data is when you plan to save the scanned image onto either your ScanNCut or maybe to USB. The image is not cut out straight away and, once saved, maybe cut out over and over again.
Mats to use – For the Scan to Data you are able to use either the Low Tack or Standard mat. Alternatively, you could use the dedicated scanning mat.
About the ScanNCut scanning mat
The scanning mat is a very white mat with a clear plastic cover. The clear cover stays on the mat during the scan and will assist in holding your document or image in place. The scanning mat does not have any tacky areas on it. This makes it ideal for scanning precious materials that may need protection. Perhaps photos or pictures that you do not want to be damaged in any way by attaching to a regular cutting mat.
The whiteness of the mat assists with the clarity of the scan. Personally, I don’t see a lot of value in purchasing the scanning mat for general scanning usage. However, it would be beneficial for someone who has particular requirements to protect their pictures, scan fragile items or materials etc. Or, if you plan to scan often and the marks or blemishes cause you problems with the scan.
HACK – For the odd occasion that you don’t want to damage a particular item, you could place a white sheet of paper on the standard mat. This would emulate the scanning mat’s features of a white background and nonsticky surface. You will need to hold the item in place, this could be done with masking tape however to reduce the risk of damage, tape clear plastic over the item to hold it in place.
Code for the CM Model Scanning Mat
The code for the CM model scanning mat is CAMATS12 (or the number will be 24 if it is a 24-inch mat). Note the letter S then 12. This denotes “scanning” and “12×12”. Also note there are no DX letters in the code. This is important for CM owners. Do not purchase a mat or accessory for the CM models with DX letters in the code.
SDX Model Scanning Mat Code
Code for the SDX model scanning mat is CADXMATS12 (or the number will be 24 if it is a 24-inch mat) Note the DX letter in the code, this reference means that the mat is for an SDX model ScanNCut. The letter S then 12 is for “scanning” and “12×12”. While most accessories can be used by the SDX model ScanNCut machines and may not necessarily have DX in the code, mats MUST have the DX in the code or they will not work.
Video tutorial using Direct Cut scanning
Often it is easier to watch how to do something than to read about it which is why I have included a video tutorial for you.
Select Direct Cut on your ScanNCut
Place the image that you are going to scan on the mat, choose Scan, and then, on the next screen select Direct Cut.

Recognition mode
On this screen, you are able to prep your machine ready to scan. The box on the left will scan your image in black and white mode and the one on the right in color. For this tutorial, I started with the color mode, and then we looked at the black and white mode.
YES, it makes a difference.
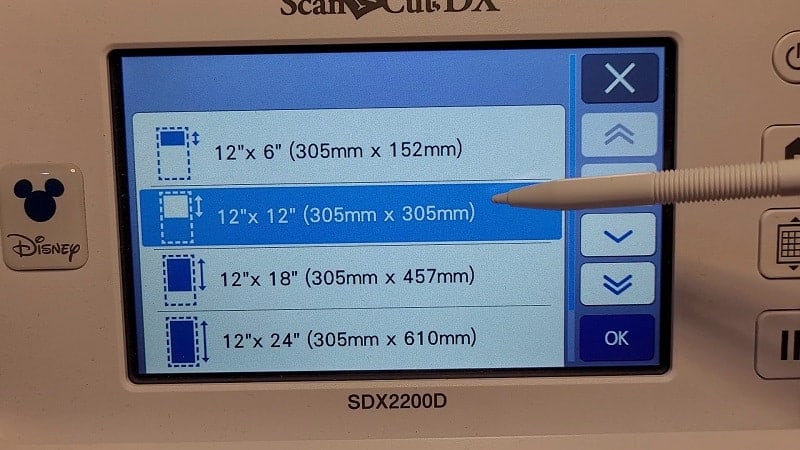
Choose the scan area to suit your mat size
The scan area you choose will depend on the mat that you have chosen to use to cut your image out. I selected the 12″x12″ however if your ScanNCut model scans a 24″ mat then you may select that option. Not all ScanNCut models will scan 24″ mats.

Scroll on the right to see the options available to you.
Scanner lever message
On the side of your DX ScanNCut, you will have noticed a lever. It moves between setting 1 and setting 2. Depending on what action you are undertaking you may receive a message to change the scanner lever. In general, the lever should be set to 1. For thicker materials, you can set the lever to 2.
These are the instructions that will appear on your machine.

Set the lever to the correct level for your project.
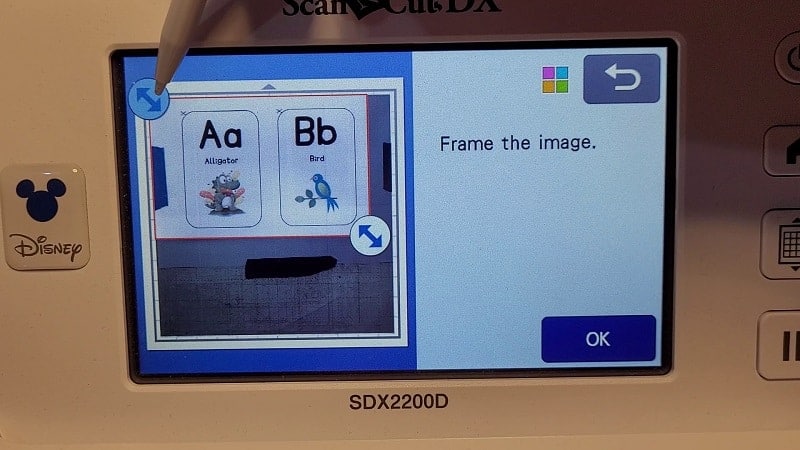
Framing your image to improve the scan
The image that you scanned will appear on the screen. Adjust the arrows inwards so that they outline the area you would like scanned. Place the red line as close as feasible to your image. This will ensure your ScanNCut will only focus on the exact area that you are wanting to cut out.
In theory, the ScanNCut will scan the entire mat area that you selected in the previous screen BUT this is not always the case. While it will scan the area, occasionally the output is not as we expect. We will look at ways to improve the quality of the scan as we move forward.
Once you have the red frame lines in the best location continue by selecting OK.
Check whether the scan is correct
Look at the next picture. There are areas of this scan that are not correct. The scanner has picked up the black outline around the flash cards quite well however also scanned some additional, unwanted shapes. Those extra components will cut out too!
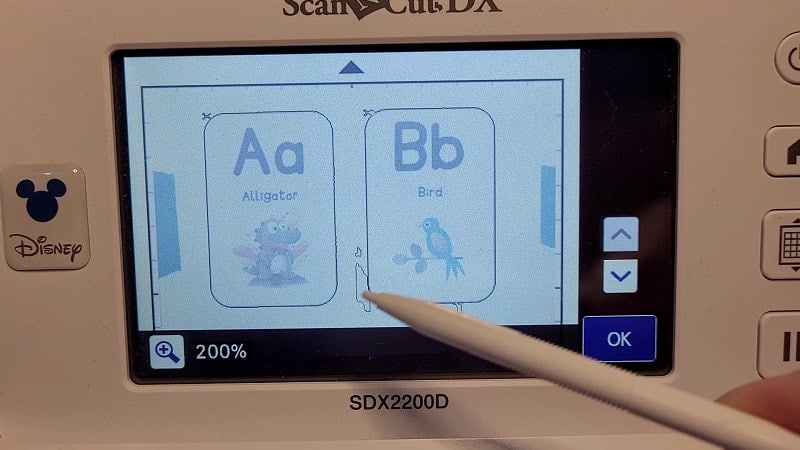
Recognizing what has been scanned correctly and whether there are unwanted shapes or anomalies in your scan is a key to your success. Always check your scan closely for errors. Zoom right in to check if necessary. If there is something that does not look right alter settings and scan again.
You can try tweaking the settings in the color mode and your ScanNCut will re-do the image recognition process each time.
Scan in Black and White mode
I find that even if your image is a color image, it will often produce a much better scan when using Black and White mode or greyscale.
Odd hey!
I backed right out of the colored scan mode and selected Black and White. Inspect the resulting scan and tweak the settings further if necessary. Black and White mode is probably my first preference for most scans.
Cutting your image out
When you are happy with the scan select OK and then choose cut.
From here on, everything is pretty much the same as anything else that you cut out with your ScanNCut.
Check that the half cut is off (unless you have scanned pattern vinyl) and do a test cut if required. I recommend doing a test cut when you are using materials that you haven’t cut before. If the material is something you use all the time then it is not really necessary.

Finished cut-out image
When the Flash cards cut out they included the small scissor icon in the top left-hand corner of the flash card. The fact that the scanner included such a tiny pair of scissors was impressive. I didn’t particularly want the scissor image on the flash cards so I simply snipped the tiny piece off with a pair of scissors. (real ones)

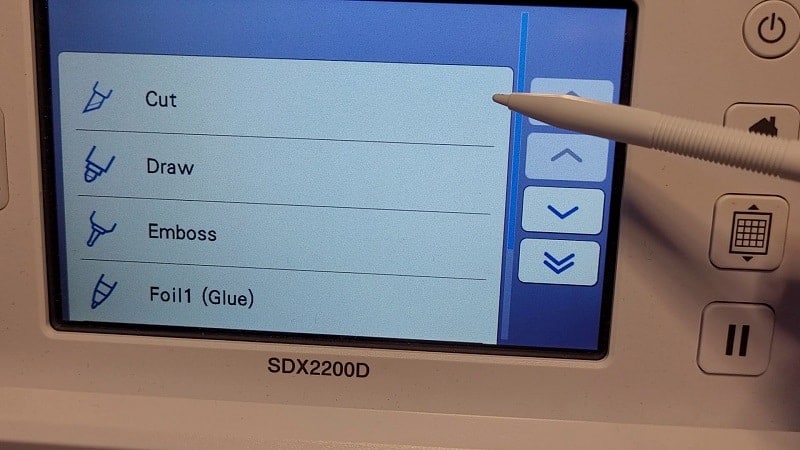
Tweaks, options, and features when scanning
When scanning there are so many options to choose from.
Adding an Offset or Inset to your scan
This is a really cool feature. You are able to move the scanned cut line further away from the image or bring the cut line in closer by adding and offset or inset. This means that you could cut inside the black scanning lines so they do not remain on the image.
Can you see the cut line below in the offset position? Look closely. The offset size is adjusted with the plus and minus icons.

Add a border to your scanned image
The icon next to the Offset icon is the Border icon. This is a fun feature and will add a border around your scanned image.
Border choices on my ScanNCut included.
- Irregular shaped icon – this will follow the shape of the scanned image
- Circle border
- Scalloped edge circle (these may not be the correct terms LOL)
- Pointed edge scalloped circle
- Square
- Rounded corners square
- Scalloped square
- Pointed scalloped square
- Hexagon
- Octagon
- and a pretty pattern border
Have a play with these shapes as they are quite fun. Obviously they are not always suited to what you are scanning.
Smoothing the scanned line
The icon in the picture below will provide the opportunity to smooth the scanned lines. This feature may help if your scan has a jagged edge or you would like a corner more rounded.
To tweak the scan, move the adjuster bar to the left or right. Moving the arrow to the right will provide a smoother line.

More options to delve into
This screen offers a number of options to enhance and alter your final scan.
Trash – To the left of my stylus is obviously the trash where you can remove parts of the scan. Depending on what has been captured in the scan, it may even remove those unwanted sections of the scanned picture above.
Fill – This icon offers settings to add fill to your scan or thicker lines. These options are handy with the draw function.

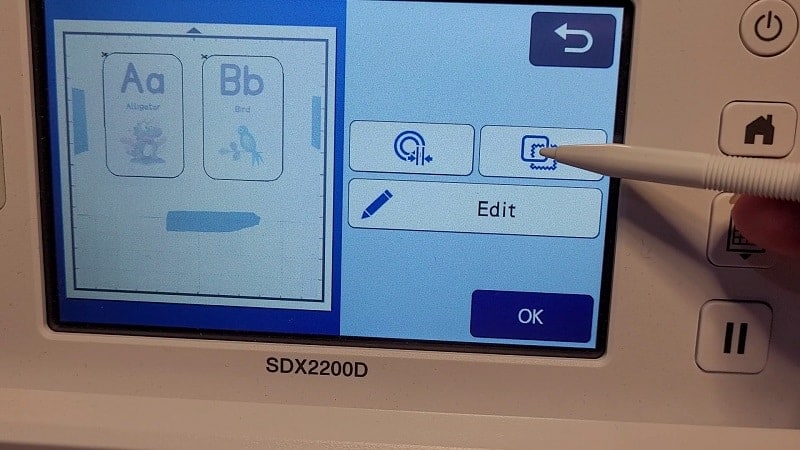
Adding an additional line to your scanned image
The far left icon will enable you to add an additional line to your scanned image. You need to use this wisely or you may end up will simply a second cut line.

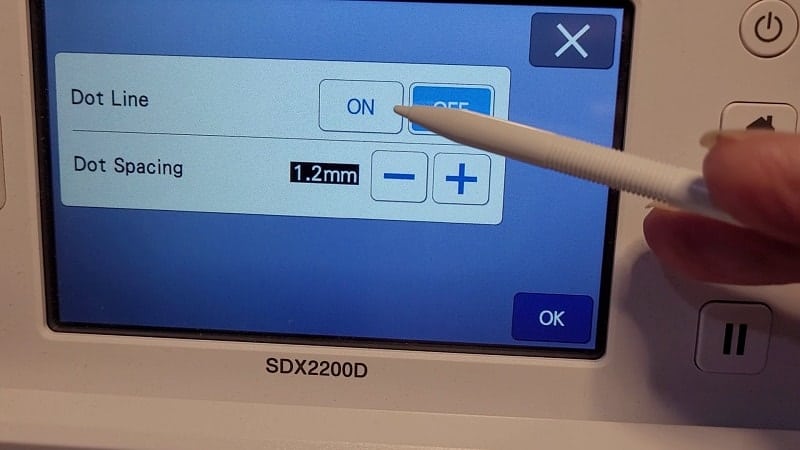
Dotted line

Select On or Off to alter the line from a single line cut or dotted line cut. Use the plus or minus icons to change the dot spaces.
Join me on Facebook
You are always welcome to join me in the Create With Sue Facebook where you can make friends, share your creations, and ask questions for additional assistance. I will provide any assistance that I can to help you use your ScanNCut and Canvas Workspace.
Join me in the ScanNCut – Let’s Create With Sue Facebook group.
I would love to see you there.
Happy creating,


Love to create your own projects?
If you would love to learn how to use Canvas Workspace and all the features that it offers I have a course available called Get Started With Canvas Workspace. This course will take you from the very beginning to being able to create your own projects from scratch.

An Intermediate course is also available
If you are finding your way around Canvas Workspace and would like to take your journey to the next level then Editing Nodes – Unlocked is a great stepping stone to being able to create your designs from scratch. Aimed at intermediate users of Canvas Workspace.