
I was asked to test the Zoom Precision Engraving Tool for the Scan N Cut by Jordan from Zoom Precision. As engraving has been a fascination of mine for many years, I jumped at the chance to give the Zoom Precision Tool a test run on my Scan N Cut. During the testing, I created a few designs so that I could use them to engrave on the blanks. This tutorial covers in depth how I created the one I engraved on the business card size blank pictured below.

Zoom Precision sent me the tool PLUS some amazing blanks to test the engraving tool on. I received a pack of business card-sized blanks in a range of colors, Zoom Precision engraving bracelet blanks, larger metal blanks, puff HTV (a new product)…. all sorts. Lots to play with so let us look at my first attempts at using the tool and share my tips and which settings worked for me and which did not.
NOTE: There was so much to explore and test with this engraving tool that I am not able to cover everything fully in this tutorial. This is part 1 and more will follow.
Disclaimers
While zoomprecision.com supplied the engraving tool for the Scan N Cut plus a number of blanks, this tutorial is based on my own personal views and opinions. I was very upfront with the company during the discussions that I would provide my unbiased comments and opinions.
Brother warranty – Keep in mind that this tool is not manufactured by Brother and should any issues occur while using the product your machine may not be covered by Brother warranty.
This post may contain some affiliate links for your convenience (which means if you make a purchase after clicking a link I may earn a small commission but it won’t cost you a penny more)! Read my very boring full disclosure policy here.
The engraving tool – Scan N Cut
Zoom Precision makes this engraving tool to suit the Scan N Cut and also specific versions for Cricut and Silhouette crafters.
Pictured below is the engraving tool as it arrived. I really liked the plastic storage case you receive to keep the tool and the tips in. This is a handy addition and a nice touch. The engraving tool for the Scan N Cut has a solid metal holder that the tips slot into easily. No plastic in this tool!
There are three different-sized engraving tips included in the kit. I found out a fair way into my testing that they are for various materials and not all are for engraving metal blanks. This makes the engraving tool very versatile indeed. Faux leather is definitely on my “to do” list.

Zoom Precision blanks for engraving
As I mentioned, Zoom Precision provided me with a number of blanks to test the tool with. These blanks are great to make items for work, home decor, jewelry, or unique gifts for friends and family. Projects range from keyrings, bracelets, rings, business cards, plaques, dog tags, name tags, and necklets to name a few… so many projects to choose from.
Some handy blanks are included with the engraving kit to get you started. The pack includes some heart-shaped, circular, and rectangular blanks. They come with a blue plastic protective covering on them so they don’t scratch.
Other blanks that are available include the 18 pack business or gift card sized metal blanks (3.3 x 2.1 inch x 0.8mm thick) in a range of cool colors. My very favorite bracelet pack with a bending tool included that is really easy to use.
Larger 5×7 inch metal blanks in a variety of colors are available to make unique gifts, plaques
How to insert the engraving tips into the tool
This was really easy. You can unscrew the entire silver casing and pop the tip directly into the end of the tool OR unscrew the silver section just enough to place the tool into the holder. This is similar to how the Scan N Cut blades and blade holder work. You will find this easy!

What designs to choose to engrave
There is a wide range of design choices that you can engrave. Some of the easiest to start with are single-lined designs. You can also play with thicker designs and use the fill feature to fill in between areas.
The one I have chosen to work with is a free design from the Brother collection. Now, I didn’t need all the components of the design so I edited the areas that I did not want to be engraved out of the file before I exported it to my Scan N Cut. This left me with that super awesome design that I engraved on the business card blank.
I also found suitable designs installed on my Scan N Cut and tested a couple of these too. A number of the Brother activation kits like the Embossing Tool Kit and the Foil Kit that I have purchased were also in the running. There were many designs to choose from without creating one from scratch or purchasing one.
After a bit of a look around, I selected the Foiled Handbag-Shaped Gift Box design from the free projects and edited it to suit my needs. These designs can be mixed and matched to create so many additional delightful projects.
Keep that in mind when you are looking for ideas.
I chose a design from the free section so that you too could create the design if you wish.
TIP: Use the search feature at the top of the Canvas Projects to find the type of design you need. eg. I searched “Foil”. Often the search feature works better with less wording.

How to edit the design to suit engraving
I have used the downloaded version of Canvas Workspace to edit the foiled design however I had a quick test in the online version of Canvas Workspace as well and it was just as easy to work with in that version too.
The first step is to click section B of the gift box to add it to Canvas Workspace. In the online version, use the blue icon on the left to add section B to Canvas.
When to Ungroup the design to remove unwanted areas
Once the B section of the design has been brought into Canvas Workspace, you will need to ungroup the design at some point so that you can remove unwanted areas. Depending on the version, or if you choose a different design, you may need to ungroup more than one section of the design.
Next, select the areas that you do not want. The downloaded version has the Layers Panel where you can simply use the eye icon to hide the areas you don’t want to be exported to your Scan N Cut. Hide or delete, it won’t matter which you choose.
In the pictured instance, you would leave ungrouping until after you have used the eye icon to hide the entire group shown below. When choosing the option to delete, you will need to ungroup first. This particular design is in a nested group. See the groupings in the Layers panel. You will notice below that the groups are indented underneath the top-level group.

Above – Project imported into the downloaded version of Canvas Workspace showing the eye icon for the show hide feature.
More editing to improve the engraving design
I didn’t want the key shape in the design for my project so I deleted this object. It could also be hidden. Find all the objects you do not want and remove them so they do not export to your machine.

Add additional shapes or wording
Add any additional components. I duplicated one of the tear-drop shapes, flipped it upside down, and then placed it in the area the key shape was. You will see “Flip” in the Edit panel on the right.
TIP: Crtl+C = copy and Crtl+V = paste on a PC and Cmd+C and Cmd+V on a Mac are handy shortcuts.

Once you have the design to your liking it will need to be sized to suit your project blank.
Resize the design
Ideally, you will measure your blank and resize your design to suit your project. Resize is found in the Edit panel. Leave the “Maintain Aspect Ratio” on to retain your proportions. You can also use the dots on the selection box when you have clicked on the design to adjust the size.
(for this project I haven’t done this as I also intend to demonstrate how to alter the size directly on your Scan N Cut)
Make certain your lines are set to Draw
At this stage, make certain that all areas you are planning to engrave are selected as “Draw”. You can alter this setting in the top menu OR in the Layers Panel in the downloaded version of Canvas Workspace. The foil design I chose was already set to Draw so that it would foil. See the Draw icon in the pictures.

Export to your cutting machine.
Once you are happy with your design, export it to your cutting machine. Go to the top menu item File, then scroll down to the Export options. I used the middle option of Wifi. If you are using a USB then select the top option to Export FCM File which will allow you to save to USB.

Import the engraving design into your Scan N Cut
Retrieve your engraving design on your Scan N Cut.
The metal blanks are quite sturdy and need to be attached to your mat quite firmly. I used some transfer sheet/tape and stuck the back side of the sheet to the mat and the sticky side to the mat. Next, I used masking (painter’s) tape to tape this down firmly. You could use masking tape directly on your blank if you have room where the design will not sit. Alternatively, you might try double-sided tape.
A few precautions taken
This is the point where it was a new experience for me and I did a few things as a precaution
- Didn’t use my best mat, hence you can see my daggy mat in the next round of pictures.
- Reglued my old mat as it definitely was not sticky enough for this type of project. Check here for info on regluing.
- Looked at options on how to stick the blank firmly to my mat without causing me grief getting the excess sticky off at the end of the project. This is where I determined that the transfer tape method I described above was best for me.
- Inserted the Zoom Precision Tool very carefully into the tool holder on my Scan N Cut. It is quite firm to push the lever down so take care and don’t use excessive pressure. Gently does it.
- Started with less pressure so the engraving tool did not apply too much pressure onto the blank. As I played with a few blanks I tested the outcome using increased pressure settings to see how the various pressure engraved.
- Once the blank was attached to the mat I scanned the mat so that the design could be precision placed onto the blank. This tutorial covers this if you need it. I definitely did not want the engraving tool to miss the metal blank.
- I was a little nervous about metal shavings from the engraving process. – I watched closely however I really couldn’t see any. I had planned to wipe the blank with a damp cloth to collect shavings if there were any. I didn’t need to worry on the projects that I did. The tip appears to indent the material differently than traditional engraving.
IMPORTANT – The blanks must be held down firmly on your mat as you do not want them to come loose.
Placing your design on your engraving blank
After you have your blank firmly affixed to your mat, load your mat into your machine. Insert the Zoom Precision Engraving tool with the appropriate tip/blade.
Scan the mat to show the blank and then move your design over the blank. Use the Edit feature to zoom right in to ensure the design is placed exactly as you want it.
The picture below has the zoom feature set at 200%, you can also zoom in to 400%. The arrows on the top right-hand side move the design up, down, left, and right. The other arrows are to move the mat around the screen so you can see your design.

If the design is too large or too small you can adjust the sizing further directly on your machine. Select OK to take you back to the earlier screen. This is in the Edit section of your machine. On the top left side of the blue icons, you will find the resize icon.
Check out what all the other icons do too while you are there. Some icons have pictures that are obvious as to what they do, others, not so much.
Message to attach the appropriate holder
Each time you press the green start icon you will see the below message even though the engraving tool is in the holder. The Scan N Cut doesn’t appear to recognize that fact.
Press OK and the machine will start engraving. The message doesn’t appear to cause any issues.

Changing the Scanner lever
You may also see a message asking to adjust the height of the scanner lever. This can be found on the left-hand side of the DX Scan N Cut machine. Make the adjustment if required. This message can pop up whenever your SDX Scan N Cut perceives the scanner needs to be higher or lower. Depends on what you are doing.

Settings for your Scan N Cut
You have two settings to choose from when you are using the Draw feature of your Scan N Cut. One is Speed and the other is Pressure.
I tried a number of combinations when testing.
For the very first black blank (pictured at the beginning of this tutorial) I used the default auto settings of the DX machine. I was extremely happy with the results of the first blank I engraved. You know, when you pick up a project that has just finished and go WOW!
As I tested the different tips and blanks I reduced the Speed and increased the Draw Pressure.
The slower Speed setting worked quite well too however I don’t feel it made a huge difference to the end result of my project. If you have any issues then this is a great option to try to improve results.
Draw Pressure – now this was a different story. I tested right up to the highest setting of 9 for Draw Pressure. This setting engraved quite deeply into the blank which was a nice deep effect however left quite a rough feel as well.
Engraving blank included in kit
Below is one of the blanks that was included in the Zoom Precision Engraving kit. The blanks come with a blue plastic covering that protects the metal. Remove the plastic prior to engraving.
The design is one that can be found in the SDX2200D Scan N Cut machine (possibly other models too) I scanned the blank and then resized the design to suit the blank.
Remember, placement is important. Use the Zoom feature to precision place your design.
This blank had the Draw setting at 9. The effect is really nice and deep, however, note that using the Draw setting at 9 does produce a slightly rougher feel once engraved.
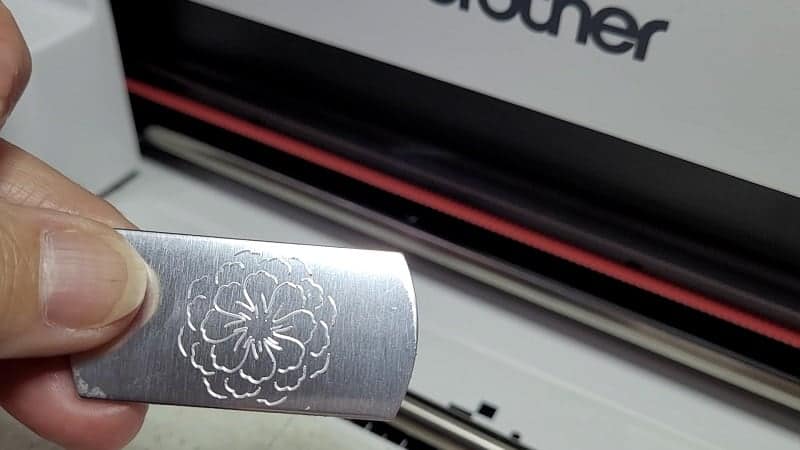
In the first card-sized blank where I used the default setting, the engraved design felt quite nice and smooth. Like professional engraving 🙂
*****My preferred result was to use the default SDX settings.
I have purchased very fine steel wool to give the rougher blank a slight rub over. Rub the steel wool in the same direction as the longest edge of your blank to give the blank a “brushed” effect. This may also remove some of that rough feel. Still testing this.

TIP: The machine’s default settings have a darker box around them to help you find them again. Use the + and – to alter the settings.
Finished results of the card size blanks
These are the four different blanks where I tested each of the different tips and various settings on the machine. The top left blank is barely engraved which is when I discovered that the tip was actually designed for faux leather or leather. Basically, not metal.

The first black blank on the right is actually the best result. I loved how it turned out!
I have started playing with the bracelet pack too. This pack is really exciting and will be another tutorial in itself.
Video – Using the Zoom Precision engraving tool
Prefer to watch a video on how to use your Scan N Cut and the Zoom engraving tool? I have put this one together for you. Remember to Like and Subscribe 🙂
My thoughts on the Zoom engraving tool for the Scan N Cut
I had a LOT of fun with this Zoom Precision engraving tool. My initial nervousness was definitely unfounded as everything worked perfectly in my SDX Scan N Cut. To be able to engrave a variety of items with the Scan N Cut is absolutely amazing.
This professional level of engraving is definitely something I could not achieve without the help of the Scan N Cut and the Zoom Precision engraving tool!
Join me on Facebook
Join me in the Scan N Cut – Let’s Create With Sue Facebook group. It is a group of awesome craft friends sharing and caring.
I would love to see you there.
Please feel free to ask any questions that you need in the group.
Happy creating


Great article, Sue! Love this tool and can’t wait to see more!
Thank you Leslie, I am really pleased that you enjoyed it. Testing was a lot of fun! 🙂
Good Morning
Your videos are so helpful and I’m hoping you can help me. I have the scan n cut 325 and got the engraving tool for Christmas. I’ve San my fabric , put in the design and when I go to draw the pattern disappears and it says please load a patter. The same thing happens when I press emboss.
Any suggestions
Thanks for all your help
Libby Duncan
Hi Libby,
Thank you! :-). I believe that your pattern is disappearing as it is set to Cut. You will need to alter the design so that the lines that you want to be embossed are set to Draw. The easiest way to do this is in Canvas Workspace downloaded version. Go into the Layers panel on the right-hand menu and select the design. Change the Cut icon to be a Draw icon which should change all the lines of the design.
I need your help! I can’t get the Zoom etching blade into my Silhouette 3 carriage. I do not want to break it, but did use some force to get it in. It is unlocked. What am I doing wrong??
Hi Danielle, I don’t have a silhoutte however please check that the Zoom tool that you purchased is the correct one for the Silhouette 3. There are different versions of the tool for each cutting machine brand. I can also tell you that my older CM900 ScanNCut is also very tight and I also get worried I might break it. My philosophy is if it appears too hard to close then dont. Go back to where you purchased your Zoom tool and check with them. Hope this advice helps you. Sue.