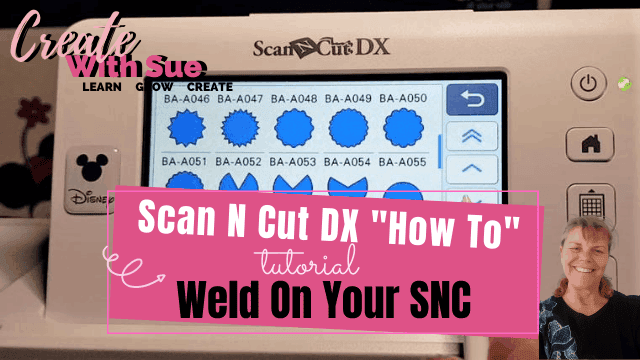
Struggling to get your cutting depth just right for vinyl, fabric, or cardstock? This tutorial will guide you through adjusting the cutting depth on both the SDX and CM models.
Let’s get started!
Disclaimer: As an Amazon Associate, I earn from qualifying purchases. Links included in this tutorial may be affiliate links, Amazon or others, meaning I may earn a small commission at no additional cost. These commissions will help me continue creating content for you. Thank you for your support! Read my very boring full disclosure policy here.
I have an auto blade: Is this even relevant?
While all the Brother SDX models of the Scan N Cut have an auto blade, did you know you can still adjust the cutting depth?
Yes, it is called adjusting the Pressure on the newer models. Sounds way more trendy and is still necessary to get the perfect cut on some materials.
Doesn’t the SDX auto blade set itself automatically?
Well, yes it is and it does a great job however it is not perfect. Occasionally your machine will get it wrong….. AND the result can be devastating.
The TEST cut
This is for BOTH the SDX range and the CM range of Scan N Cut machines. For CM models using the TEST cut is essential.
When you are planning to cut a material like cardstock, vinyl, or fabric that you have never cut before, I always recommend doing a test cut.
Cutting too deep
If your machine cuts too deep it may cut clean through your mat. This is very disappointing for new Scan N Cut owners and seasoned owners alike.
TIP: If this happens to you check this tutorial out Stop, Don’t thow your mat away! for a number of ways to repair your mat.
Your cut is not deep enough?
A cut that is too shallow may cause you problems weeding vinyl or perhaps ruin your cardstock design as areas that are not cut through correctly will tear at the cut line.
Below is showing three different test cuts. The first is not cut through at all. The second is not bad and the third is perfect. These tests were performed on an SDX2200D auto blade. As you can see the auto blade did NOT automatically select the correct cutting depth.
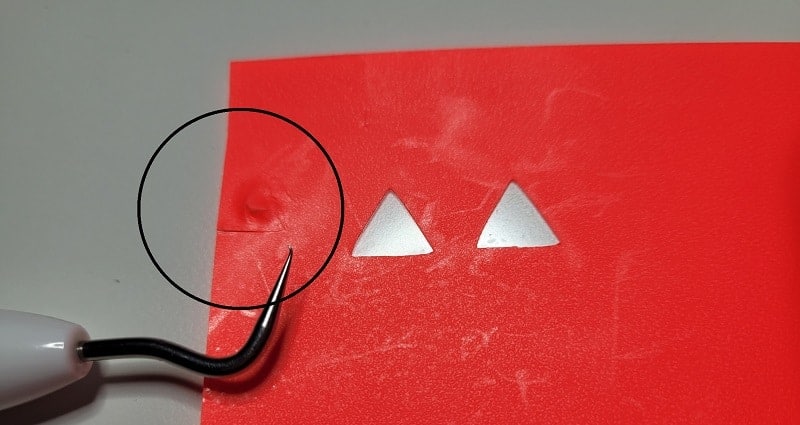
TIP: If you think that your machine has not cut deep enough, check your design BEFORE you unload your mat from the machine. If any sections of the design are not cut through correctly you can press the start button and have your Scan N Cut do a second pass.
This trick may NOT work if you have already removed your mat from the machine as it is quite difficult to reload the mat in EXACTLY the same spot. Having said that, if the project is no good due to the cut not cutting all the way through, you can always give it a try. You may be lucky!
SDX Scan N Cut models
Adjusting the cutting depth on the SDX models
So let us look at how to adjust the blade depth on your SDX Scan N Cut.
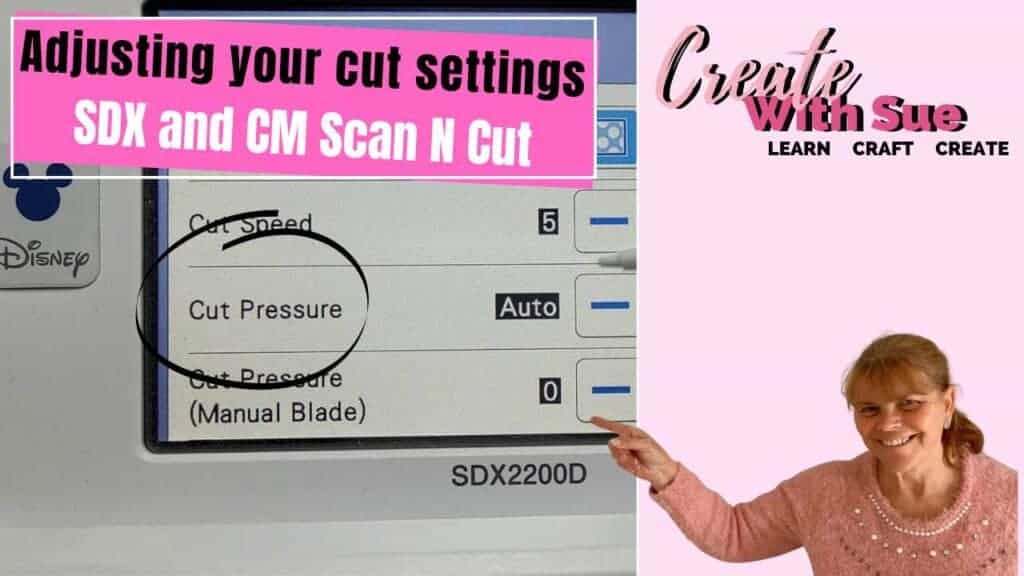
Step 1: Select the Cut setting on your machine
To begin with, ensure that your machine is turned on and you have a pattern or file uploaded and ready to cut. Go OK and locate the Cut setting on your machine and select it. This will be the starting point for adjusting your cutting depth.
Step 2: Access the tools icon for Pressure settings
Once you have selected the Cut setting, look for the tools icon, which resembles a wrench or gear. Click on this icon to access the machine’s Pressure settings, where you will be able to fine-tune the cutting depth based on your project needs.
Step 3: Adjust the Pressure setting
In the Pressure settings menu, you will see a numerical value representing the cutting depth. Adjust this value to a lower number if you wish to reduce the cutting depth or to a higher number if you need a deeper cut. Keep in mind that different materials may require different cutting depths for the best results.
You can adjust the Pressure when you are using the Half Cut feature. This is a different setting to your main Cut adjustment. Scroll down and locate where you can turn the Half Cut setting on. There you will find the adjustment setting for the cutting depth with the Pressure setting for your Half Cut projects.
For a full tutorial on setting up the Half Cut head here.‘
Settings that are available to select depth adjustment.
By default, your Scan N Cut will have an AUTO setting. As I mentioned before, in most cases this work fairly well. The AUTO settings or DEFAULT settings are indicated by a black box around the setting.
TIP: If you get a bit lost simply head back to the AUTO setting and start again.
Video tutorial – The Test Cut – Scan N Cut SDX
Prefer seeing how things are done? I have created this video to show you the steps.
What if I have a CM model Scan N Cut?
The Brother CM models are ALL manual blades. This means that you manually adjust the depth of the blade each time you use a different material on your mat.
TIP: Record your settings in a Notebook or on the packaging of cardstock etc. You can also write successful settings down on the carrier sheet of your vinyl. Really anywhere that you can locate. Periodically still do a test cut as the blades wear and the setting will alter slightly as time goes by.
Adjusting the depth of the blade on the Brother CM models of the Scan N cut is easy.
Many people feel a little anxious that the blade does not automatically set the depth of the cut.
For me, it was the exact opposite! When I purchased my SDX2200D Disney model, I was already very comfortable using my CM900 manual blade Scan N Cut and was phobic about the loss of control with auto blade on the DX. Fortunately, my phobia has dissipated LOL.
On the CM range machines, your blade holder will have a series of numbers. The lower the number the shallower the cut and the higher the number the deeper the cut. Surprise, this is exactly the same as the DX models so if you decide to upgrade, you are already familiar with the format.
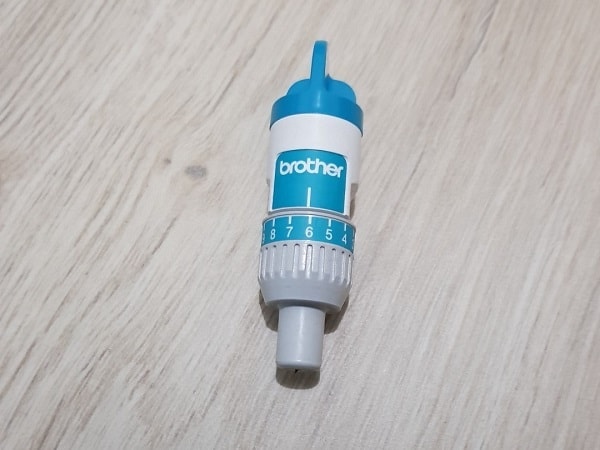
TIP: if the numbers are incorrect after cleaning the blade holder, try unscrewing the cap again and locating it at a slightly different spot to screw it back on.
It can be a difficult decision to choose what number setting you need to start off. If you are unsure, start at a lower number and do the test cut. Increase the cutting depth or decrease it as required.
For vinyl projects that you only want to cut through the first layer and not the carrier sheet, start very low eg. perhaps a 1 or 2 at the most. Even lower if needed.
The cutting adjustment will differ from machine to machine and will also be affected by the amount of use that your blade has had.
TIP: as a bit of a guide, you can measure the potential depth of your cut against the material you are planning to cut by holding the blade against the material. If the blade depth is a lot deeper than the thickness of your material, reduce the depth of your blade.
Conclusion:
By following this detailed tutorial, you can now effortlessly adjust the cutting depth on both the SDX and CM cutting machine models to suit your creative needs. Always remember to test various settings depending on the material you’re working with, and don’t be afraid to adjust and test as needed until you achieve your desired results.
If you aren’t already, you are welcome to join my Facebook group Scan N Cut ~ Let’s Create With Sue. There you can share your awesome creations with the group, ask for assistance or simply pick up some additional tips and tricks.
Happy creating,


Like to learn how to use Canvas Workspace? More information can be found here!