
In this tutorial, we will be creating a 3D flower Tri-Fold card using your Scan N Cut or Cricut cutting machine. I had a lot of fun designing this card. It has a number of layers for the flowers and the card would be suitable for any occasion.
Grab a copy of the file as I have included a free template (SVG and FCM format) in my Resource Library for you.
This post may contain some affiliate links for your convenience (which means if you make a purchase after clicking a link I may earn a small commission but it won’t cost you a penny more)! Read my very boring full disclosure policy here.
What do you need
- Cardstock for the base tri-fold section of the card
- Different color cardstock for the flowers
- Patterned paper for the inside of the card
- Glue – double-sided tape and/or craft glue (I used a combination of both)
- Foam tape to create the 3D effect
- Buttons as the flower centers however you could use cardstock
- Cutting machine. I have included instructions for both the Scan N Cut and Cricut
- Template – you can grab the SVG or FCM file from the Resource Library
Download the 3D card template
The first step is downloading the file from the Resource Library. If you already have a password great…if not it is easy to subscribe at the bottom of this page and one will be sent to you straight away. Included in the zipped file is the card in SVG and FCM format. If you need help unzipping, check my tutorial on how to unzip your files here.
Import the tri-fold card file into Canvas workspace
Once you have downloaded the file and unzipped it you will have a choice of using the SVG file or the FCM file.
Scan N Cut users only – FCM file in Canvas Workspace
The picture is of the download version of Canvas Workspace using the FCM file. The FCM format is Brother’s propriety file type and only suitable for Scan N Cut users.
Look closely at the picture and you will see that the file is in a LOT of smaller pieces. I have included the FCM format as it will be easier for you to make any alterations to the file that you choose. When you bring it into Canvas Workspace you can choose the individual pieces of the file.
NOTE: The file sections are overlapping each other and you will need to separate them out to cut them.
There are a few ways to send your card file to your Scan N Cut.
- Send the entire file and remove the pieces on your Scan N Cut and bring the design in each time and remove different pieces and swap them out as you want to change colors.
- Use the HIDE icon in the Layers panel. Looking at the picture…it is on the right-hand side and as you click on the “eye” it will hide the associated pattern piece and will NOT send that piece to your Scan N Cut to be cut out. This gives you the ability to send the pieces that you want to cut out as you choose.

To send the file to your Scan N Cut…. go to the top menu and select File, then export/transfer file which will pop the menu below up. Choose the option to your cutting machine.

Importing the SVG 3D flower tri-fold card file
The alternative option is to import the SVG version of the card. It will look similar to the picture below.
If you have a Cricut the sizing will be imported correctly to Design Space.
In Canvas Workspace for Scan N Cut users, it will need to be resized. Make sure you select ALL pieces of the file and enlarge all the pieces until you have the size that you want. My version of the 3D flower tri-fold card has the main card section as 5.00 inches high by 10.00 inches wide. In the Edit panel you will be able to see the size when you click on the base of the card.

Cut your 3D flower card out
The next step is to cut all the peices out.
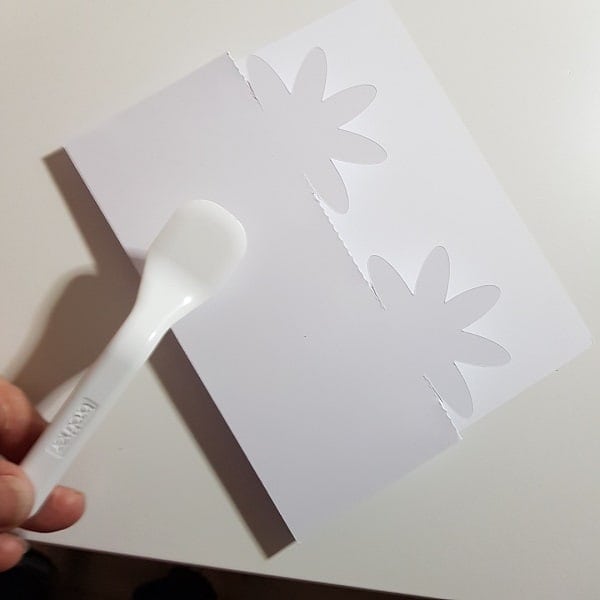
TIP: Occasionally when you cut your files out, the cut line looks raised like you can see in the picture below. Use your scraper tool or a bone tool to flatten the edges. Simply slide the scraper tool along the raised edges for a more flattened appearance.
Pieces of the 3D card – putting it together
Shown are the pieces of the flower card. I started adding the patterned inserts first and then added the flowers with the buttons as the final step.

Lift the inside cut section of the floweres up. Bend them slightly so they POP but not too much that they show a bend line.

Foam strips cut to size to create the 3D flowers. My strips are quite thin as I had run out of the next thickness. You are fine with any size as long as the foam tape is not visible.

Add each of the layers of the flower onto the card. Align the base layer to the first colored flower layer. Then, turn the top layer of the flowers slightly so that they offset.

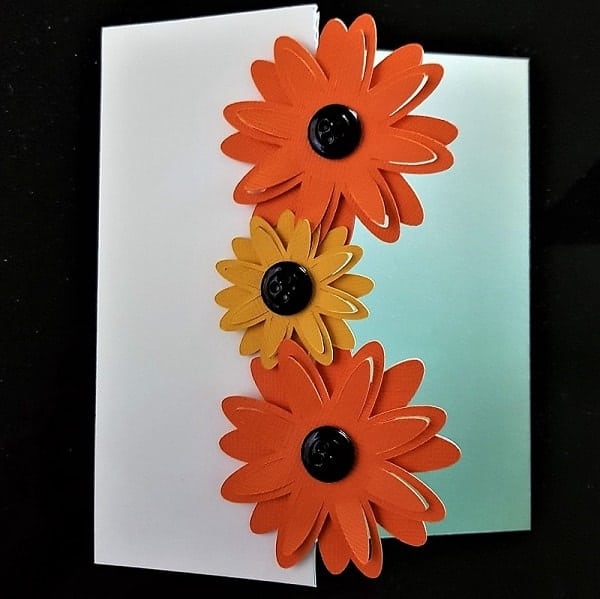
This is what the card looks like from the inside.

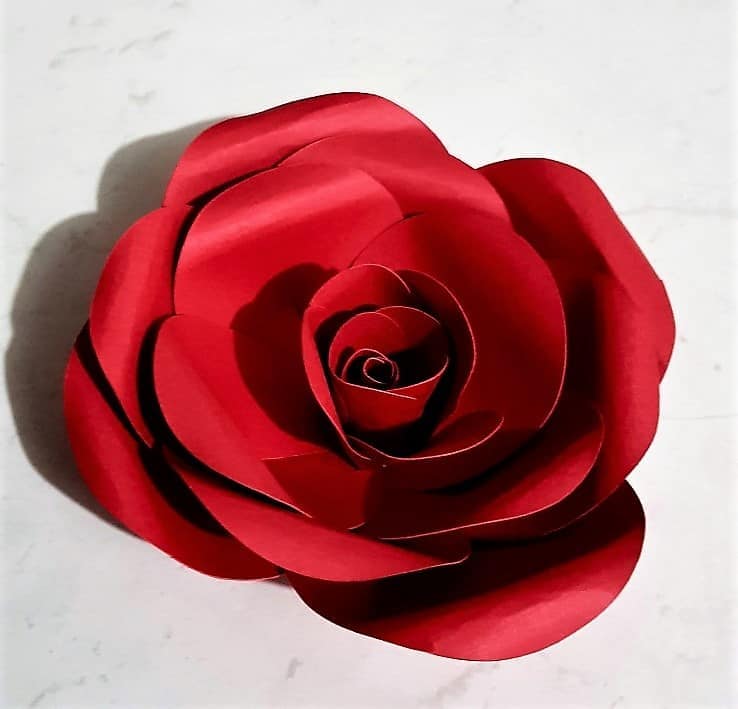
Finished 3D flower tri-fold card
Buttons were my choice as the centre of my 3D flowers. Included in the pattern pieces are circles for the centres if you would prefer.
Another alternative is to use small round pompom type embellishments. I was certain that I had some in my stash but after hunting for ages I had no luck locating them. My button collection is about 30 years old so that was my next choice. Thinking about it…. my mum’s button stash is about 60 years old as they were originally her mum’s (my nanna’s) buttons which mum has added to over the years. #Must raid that button tin at some point LOL

I hope that you enjoy making this 3D flower card as much as I did. I would love to see what you make and you can post any projects that you make in my facebook group Scan N Cut – Let’s Create With Sue. If you are not a member already you are more than welcome to join. It is full of awesome crafters just like you.
Happy creating.


Like to learn how to use Canvas Workspace? More information can be found here!


This is just adorable! I am going to make a few of these cards today, in Fall colors, for my September family birthdays. Thanks for sharing your talents and for the easy-to-follow tutorials.
I am really pleased that you are enjoying the tutorials. Have fun making the card!
I love this, will definitely be having a go at this x
Hi Wendy, I am so pleased that you love it. I would love to see what you create. 🙂
Thank you for sharing your free file. I Love this card. I make cards for nursing homes so would be making a few of these.🙏
Regards
Elizabeth
Hi Elizabeth, making cards for nursing homes sounds so lovely. Thank you for letting me know… very pleased 🙂