
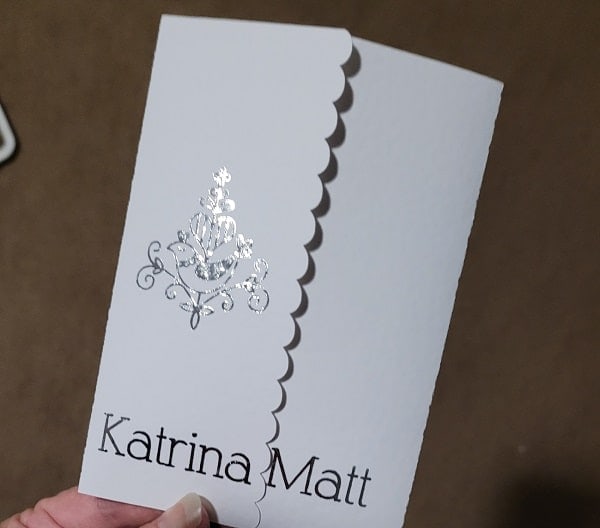
Have you thought of making a threaded Christmas Tree card? This card can be cut out with your Scan N Cut or Cricut cutting machine and would even be fun for the kids to help with. Included is a free template to help you get started.
Members of my Facebook group requested that I put this cutting machine design together for them….so here it is!
What is a threaded Christmas Tree card?
A threaded Christmas Tree card is one where you thread string, wool, faux leather, or similar through a series of holes in the shape of a Christmas Tree adding baubles or other threadable embellishments as you are threading, making a really easy, GREAT looking, Christmas card. It is very easy to cut out and make.
Disclaimer: As an Amazon Associate, I earn from qualifying purchases. Links included in this tutorial may be affiliate links, Amazon or others, meaning I may earn a small commission at no additional cost. These commissions will help me continue creating content for you. Thank you for your support! Read my very boring full disclosure policy here.
What do you need
- 1 sheet of Cardstock (at least 65lb or 180gsm). I like 220gsm, solid core if I can get it.
- A sheet of complementary color cardstock for insert (optional)
- A scrap of yellow and brown cardstock
- Multi-colored threading beads – check out the cheap shops for these
- Jute string, wool, faux leather thread, or Christmas gift tie
- Glue – I used Aqua Tombow
- Cutting machine – either a Scan N Cut or Cricut
- Free template available in SVG or FCM format

Choosing colors for your threaded Christmas Tree
For my threaded Christmas Tree card, I went for a white background and highlighted it with a green colored faux leather jewelry line which I raided from my jewelry making stash. I went shopping for the baubles but this is where I became a little unstuck as I was unable to locate the exact baubles that I had pictured in my head.
Checking out multiple stores, and not having quite enough time to purchase the baubles online, I ended up choosing some square multi-colored threading beads with tiny letters embossed into them. They are quite cute and gave me a great idea of finding the letters for Merry Christmas to thread into my Christmas Tree.
This was NOT the best idea I have had as it took me forever to locate the letters in the colors that produced the effect I was trying to acheive. Not to mention….you need to look VERY closely to even see that it says Merry Christmas in there somewhere LOL.
Colors for this Christmas Tree could include white string with green cardstock. This would be a striking effect! It would look quite rustic with natural jute string too, making it very cost effective. Colors for the baubles are unlimited. Pearl pink and pearl white would be a lovely soft combination.
Download the FREE template
Downloading the free template from my Resource Library is the first step to get this project underway. It is available in both SVG format specifically for our Cricut friends and in FCM format for Scan N Cut creators.
Tips for Scan N Cut
If you have a Scan N Cut then I would recommend that you use the FCM file as your first option. It is sized exactly for your Scan N Cut machine and will upload into Canvas Workspace nicely.
There are a few things to check once you upload any file in Canvas Workspace.
The first is that the sizing is exactly what you want. If you upload the SVG format this definitely needs checking as the SVG will often upload a little smaller than the intended design.
To resize, you drag your mouse and create an imaginary box over the entire design. Once all the pieces of the project have been selected, either drag a corner blue handle or go to the Edit menu and adjust the size. Make sure all the objects are resized at the same time to keep their ratio correct.
The next area to check is that the dashed lines have imported in as dashed lines. Some designer’s files include a scoreline, sometimes highlighted in a blue color, which on the Scan N Cut will cut as a cut line…NOT a score or dashed line. To alter this, select the line that you need to change, and then you can go up to the top menu in the downloaded version of Canvas Workspace and simply dropdown the line selections and choose a dashed line.
See the arrow in the picture below pointing to the drop down box.

Lastly, if there is writing or drawing in the design that you are using, check that it is set to ‘Draw’. In the picture above you can see all the individual components of the Merry Christmas and note that the pink arrow is pointing to the draw icon. If you use a design that uploads with any writing set as a cut line, it is effortless to change it by dropping down the selector box and checking ‘Draw’.
NOTE: I have used a Single Line font for the Merry Christmas writing from singlelinefont.com. The fonts upload into Canvas Workspace in individual pieces but still draws or even foils quite nicely.
Tips for Cricut
Tips for the Cricut are very similar to the ones I described above and are good practice to check whenever you upload a file into DesignSpace.
Checking that the file has uploaded the size that you would like is very important. Once again, the best way to resize is to make sure that all the objects of your design are selected and resize them all in one go. Resizing can be achieved by grabbing one of the corner handles or altering the size in the top menu bar.
Next, check that the fold line is set to either dashed or score up in the top menu bar. For the Cricut the choice is yours. To alter, select the line in the layers panel on the right-hand side of Design Space. You may need to ungroup the project first, depending on how it has uploaded.
Make sure any writing is set as ‘Draw’. You can see in the Layers panel on the right the letters are set as ‘Cut’. Select the letter, go to the dropdown box on the lefthand side of the top menu, and make the selection that you are after.
Remember to select the objects that you want to cut out on the same mat and go down the bottom right hand side and ‘Attach’.

Cutting out the threaded Christmas Tree card
When you are ready, cut out the various pieces of the card. I cut out the star and the tree base on bits of scrap.
If you have a Scan N Cut you are able to scan the scrap and then precision place the small objects exactly where you need them. Wicked hey!
Check out my tutorial on how to cut multiple colors on one mat with your Scan N Cut

Above is the cardstock scraps that I used to cut out the star and base. Note that I used a small piece of painters tape to give a little extra hold.

The scanned image of the cardstock scraps. Remember that you can change the background to lighter or darker depending on what you are scanning. Note the highlighted object that can be precision placed.
Let’s make the Christmas Tree card
Now you are ready to put it all together.

I found it easier to glue the small star and base in place first letting the glue dry before I started threading the tree.
TIP:
If your card has raised edges after it has been cut, (see the picture below) use the spatula that comes with your Scan N Cut or something similar to run along all the cut edges and flatten them. For this project, I had a small pair of scissors handy and used the handle end of the scissors. It worked a treat.

You can just see a small blob of wet glue peeking out the top of the tree base. The Tombow glue was great…easy to apply with the choice of the fine tip or wide tip and dried clear. I used the fine tip for these items.
Thread your Christmas Tree
Work out how much of the string or thread that you are using that you will need to thread all the way up the tree. You could start either at the top of the tree or the bottom however I decided it would be easier starting at the bottom.
I only tied a half knot in the thread to ensure that it did not bulk out too much. My jewelry thread was quite thick, this may not be a problem with thinner thread like wool or string.

Place the beads as you thread each row, working your way up the tree. They will slip backward and forward along the thread which adds to the finished project. Ease the thread so that it is firm as you thread up the tree. (A bit like lacing a shoe)
Tie off the other end. Again, I only tied a half knot and then glued the knots down so they stayed put. This was to reduce the thickness at the backside of the card.
The Jute string would be another great option to thread your card.
Threaded Christmas Tree Card Finished!
To finish this card off I ended up adding a diamonte to the star to add that extra bit of sparkle…. because let’s face it, you can never get enough bling IMO.
The beads move along the threading to create a fun and interesting effect.

I hope that you enjoyed this tutorial and have fun making the threaded Christmas Tree card.
Happy creating,


P.S. Don’t forget to pop into our Facebook group and say hi. I love hearing from you! The group is full of awesome crafty friends like you and it is a place where you can share your creations and find out the answers to any issues you might have.
You are always welcome to say Hi at
[email protected] or [email protected]. It is always
great to hear from you!
You will find lots of tutorials throughout my website. While you are here, check them out.!


Hi Sue I have purchased this machine 3 times and sold them twice,I have the disney one now sdx2200d,I can cut any images that are large but if im cutting lacy borders or an intricate cross,when i make them the size I want them they just tear never a clean cut unless I enlarge them,and recently as it was cutting the blade holder hopped up,at my wits end lol
Hi Eithne, the Disney is a GREAT model. I recommend that you keep practicing easy projects using cardstock. Lacy patterns, mandalas, or anything that has small detail may not always cut nicely when scaled smaller. Why don’t you try to make projects that you do not have to resize for starters? When you resize a project down, it is not how the creator made it which increases the risk of not cutting correctly.
Once you have your confidence you will be able to resize with more success. Feeling like you fail with projects will dampen your enthusiasm to use your machine which would be very sad.