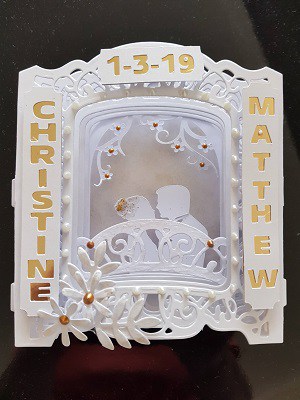
This is a special wedding card. Is it a card? Not at all like your normal everyday cards that you see in the shop. Nope! Not at all!
What? How?
Let me tell you how it came about…
I was asked by a lovely 92-year-old lady for a ‘special’ wedding card for a special relative of hers who was getting married. It was a very a wedding she was very excited about attending and had to travel about 1200 kms to get to. She had seen some of my other cards and thought they were great. Just the fact that she loved my previous cards was exciting and I was so pleased.
BUT!
Have you any idea HOW much pressure that suddenly puts on you? I was suddenly very anxious about the card I was required to produce. What design do I choose….there are so many lovely ones. Did she want it fussy or flowery. Did she want it modern or old-fashioned. Sheesh! So many decisions.
I had a 3D card making die for a manual die cutting machine that I hadn’t had a chance to use as yet. I mainly make my cards with the Scan N Cut but fell in love with this particular die.
I had bought a Sizzix Big Shot a few months ago…here is the story of how THAT came about and figured now may be the time to have a play with this die.
What was I going to use?
While the cutting die was very lovely on its own I decided I would use a combination of the die and the Scan N Cut. I just needed to figure out how I wanted it to look … and of course there was still the dilemma of whether she would like it once I finished.
Here is where I started.
I searched through my stash of card-stock and chose a white shimmery card about 220 gsm which is about 80lb. Can’t go wrong with white for a wedding.
For the 3D effect the card requires a number of layers. This particular card normally has a front, a back and 4 layers in between. Wait and see how many it ends up with!
Tip: The magnetic sheet I am using is a Real Estate marketing calendar, you know…. the ones that they drop in your letter box. Well I have heaps of them and boy have they come in handy to store the dies. AND THEY ARE FREE!
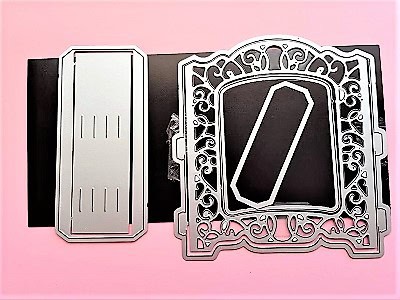
This is how the die looks. I keep my dies on a magnetic sheet so they stay together while being stored. The die comes apart into a number of pieces so I place a tiny piece of sticky tape on the edges when I need to use them as one.
How does this go together?
As I mentioned earlier, this die comes apart into a number of pieces.
To start with I cut –
- 1 Back –
- 1 Front –
- 4 Internal pieces
- 2 Side pieces

You can see in the picture the pieces of the Die. If you remove the smaller frame in the center of the main die it produces a layer that has a solid center if you use it will the frame in it will cut it out with that center missing. It is a very versatile Die, cleverly thought out.
Sizzix Big Shot
These die’s can be used with any manual die cutter, not just restricted to the Big Shot. After I cut the main pieces out, I laid them out on the bench to review what I was going to add next. I needed to add something of interest in the middle section so I decided that I would make a scene with a bridge at the front and a bridal couple at the back.
To make the bridge I cut another piece of the die I have in my hand and used the arched top part of it. I placed it part way down the card and glued the “bridge” to the first internal Piece.


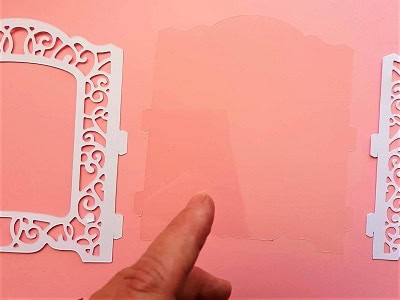
Two of the pieces cut out. Note that there will be a right side and wrong side of the card. For the front cut off the tabs so that you have a neat finish.
Brother Scan N Cut Section
For the next steps I used the Scan N Cut however there are manual cutting dies that go with this set that you can purchase to build a choice of views with. I don’t have them so creativity stepped in. I went on a search for a SVG file of a bride and groom to cut out with the SNC and tree like file set in an arch which seemed appropriate. I glued the bride and groom to the 3rd internal layer and the tree I glued to the inside edge of the fourth layer.
Now, before I move on too far some jazzing up was definitely required. At this stage we are white…..too much white!
The bridge area I covered in very fine crystal color glitter and using Gel Liquid Pearl drops, I add a little detail. Adding Gel Pearl Drops on the hair of the bride and on the leaves of the tree and we have more color! A start anyway…..
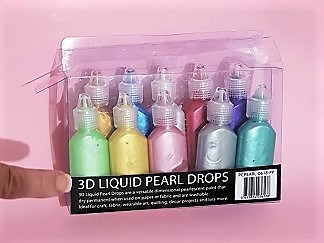
I use these 3D Liquid Pearl Drops for numerous projects. When using them, you need to add a little more than you think so that they raise into a pearl shape (if that is the effect you are after). AND make sure that they are completely dry before you try to touch them. (just ask me how I know?) I practiced a fair bit when I first got them. LOL, probably still need more practice.
Looking at the view I elected to rub a smidge of gold ink with a tissue (you can get special sponges etc) lightly over the white area, just enough to give it a bit of color. We are getting there!
Front Page
What do you think the most spectacular part of a card would be?
If you said the front then you are right! The front is special on any card and I needed this one to be extra special on this wedding card. Out with the Gel Pearls again, placing them around the inside edge. I picked a pearl color this time. Making some flowers and leaves seemed the next logical step to me…. tick.
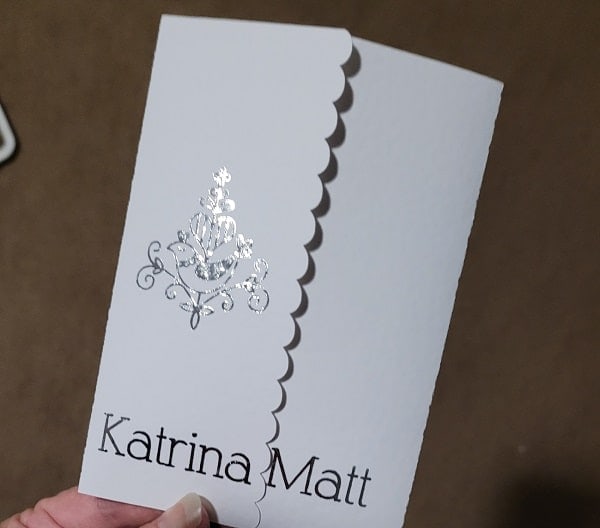
Did I mention a name?
One of the main requests my 92-year-old lady made was putting the bride and groom’s name on the card.
Problem…… card isn’t very big! It is certainly deep but overall not a particularly large card. This is one area that the Scan N Cut strides ahead of the manual die cutters. You are limited the size of the die whereas with the SNC you are only limited by your mat. (there are some cool workarounds to cut really large cut files that are much larger than the mat.)
After a couple of attempts to get the names so they looked nice on the card I finally come up with a shaped cutout with the gold backing.
What I discovered on this part of the project was that how I normally would put a name on did NOT work on this card due to all the filigree. The names just got lost amongst the detail.
You can still se the tabs at the side in this photo… watch the change.
Names and date done…. tick.
Now I was worrying!
The worry that she wouldn’t like the card, that it was too fussy or wasn’t what she had in mind at all kicked in big time about now.
There was no way I wouldn’t finish this card now though so I decided I would make sure that I left enough time to make another card for her if she hated this one. An alternative was starting to mull away in my mind so I was ready. (nothing like a bit of confidence hey?)
Let’s put this together.
We are ready to get this together. Putting the tab of the 1st internal layer on the left side, then the 2nd one on the left side, then the 3rd one left side only, continuing until they were all attached.
Once all the left side pieces are attached you can start from the front again attaching the tabs to the right side working methodically with each piece.
This bit is a little fiddly but overall putting the card together is pretty easy.
Glue the front and the back on next. Note: both front and back do NOT have tabs on them.


The next decision.
So I get this far and my mum (who hasn’t seen the card yet) says “is it going to be like a normal card where she can write a message?” Aahhh a message hmmm……
Let’s make this special wedding card a little more complex and add another layer and add sides to hide the join.
Thinking of a message to go inside the card, I printed the wording on the card with my printer. Placing the die, aligned correctly so the message would be placed correctly, I cut out another solid back piece using the die. This made a card flap that I glued to the back of the 3D card. Where to write the message was solved.
Did you say you can see a box?
Yes, you can! That was another part of request. That the card came in a matching box.
This too was done with a combination of the Scan N Cut and the Big Shot. I cut the box out with the Scan N Cut and cut a hole in the top so that piece of clear acetate could make a window to see the 3D card. Cut another layer with the die in white with the filigree design and 1 panel without the filigree in gold to go under it.
You can see the the acetate cut out quite well with the die. This piece was cut with the thin outline part of the Die.
Note: I have been talking about a variety of quite different pieces being cut with this die. It is very versatile.
Some pretty pink tissue paper laid on the bottom of the box to finish it off. ..
Wait!
Needs something more!
Went hunting for some ribbon and made 3 bows with the really long tails. Two for the card and a matching one for the box.
Now we are done!


And she loved it !!!!!
This was the BEST news. The lady loved the card. All that worry I did…..for nothing. And then I found out that not only the bride and groom loved it but it was a huge hit with everyone at the wedding. It was passed around and around and was being taken the next week to a card making group as they hadn’t ever seen a card like this one.
I was thrilled.
Hopefully you have enjoyed following this special wedding card making journey.
Happy creating
Sue