T-Shaped thank you cards are a variation of a normal plain card and can be an interesting alternative AND a lot of fun. This tutorial will show you how to make one AND has a free template in the Resource Library in SVG and FCM format.
How will you make your T-Shaped card?

Disclaimer: As an Amazon Associate, I earn from qualifying purchases. Links included in this tutorial may be affiliate links, Amazon or others, meaning I may earn a small commission at no additional cost. These commissions will help me continue creating content for you. Thank you for your support! Read my very boring full disclosure policy here.
- What do you need to make the T-Shaped card
- Download the FREE template pattern
- Import the file into Canvas Workspace
- Check the sizing of the T-Shaped card
- Making alterations to the design
- Let's cut your T-Shaped card
- Putting you thank you card together
- Join me on Facebook
- Would you like to learn to make the most of Canvas Workspace
- Other tutorials to check out.
What do you need to make the T-Shaped card
- 3 pieces of different colored cardstock – I used 2 sheets of American Craft and 1 non-shed glitter cardstock
- Glue or double-sided tape
- Cutting machine – I used my Scan N Cut
- Universal pen holder (fits all Scan N Cut models) or brother pen holder
- Pens to suit – I used Ultra Fine Sharpies in the Universal Pen Holder
- Template from the Resource Library or design your own
Download the FREE template pattern
Head over to the Resource Library and grab the free T-Shaped card template. If you don’t have a password, you can request one on the library page or register at the bottom of this page. The password will be sent to you straight away. The file can be downloaded in a zipped format and you have a choice of using the SVG version or the FCM version.
If you need help with unzipping the file there are instructions here to help.
Import the file into Canvas Workspace

Once you have downloaded and unzipped the file you can import it into Canvas Workspace. Go to “File” then “Import From Your Computer” and then search for the file you have downloaded.

Check the sizing of the T-Shaped card
The T-Shaped thank you card is designed as a 5×5 inch card. This means that the actual base of the card that you are cutting will be 5″ high and 10″ wide. One of the first things to do when you import a file is to check that it is the size that you want to cut it.
If you choose to make the design bigger or smaller then remember to select ALL the pieces of the design and resize them all at once. This ensures all your pieces retain the correct ratio and fit together once you cut them out.
Making alterations to the design
I love this part of creating. It is a way of making a design YOUR design.
One important part of this though is to check that the file has been imported with the draw files still being set as draw. FCM version of the template should import with the draw files set as draw however the SVG will not.
In Canvas Workspace, go to the right-hand panel, and in the Layers Panel (the one that looks like a stack of papers) check that the icon next to the components that are designed as draw files has the Pen icon selected.
If they have the Knife icon then click on the icon and it will drop down and you can select Draw. This feature is also available in the top menu however it only shows when you click on the shape and activate the option.

Remove the drawing from the template
While we are looking at the features of the Layers panel it is worth covering the fact that you can hide shapes in this panel too.
This gives you so much flexibility with your design. On the picture of the Layers panel above you can see I have circled an Eye icon. This is SUCH A COOL FEATURE! Any shape that you do not want to cut/draw can be hidden. YEP! COOL!
Being able to hide the various shapes provides you the ability to remove the draw sections of the designs if you do not want to add them to your T-Shaped card. If you wish to remove them permanently you can also delete. The FCM version of the file for Scan N Cut users gives you the ability to play with the design.
The Eye icon also allows you to send only the shapes of the design that you want to work with to your Scan N Cut when you are ready for them. Simply hide the shapes you are not ready to cut, transfer via wifi to your machine, then hide the shapes you have just cut and unhide the next round. Easy!
Adding writing to your design
We all love to add a sentiment to our cards and how professional does it look when you create the sentiment with the Draw feature of Canvas Workspace.
Now, I have added a very simple sentiment which for obvious reasons I have not included in the free T-Shaped thank you card template.
The first thing that you need to consider is the fact that the design is a T-Shape card. This means that you will want your sentiment to sit under the T part of the card so that it does not show when the card is closed.
Once you have created your sentiment, check that it is located where you want it when the card is closed by moving the base card template over your writing to double check. BEFORE you move the template…. make sure that the dashed fold line is grouped with the base so you don’t have to re-align it.
Using the Text tool in Canvas Workspace
If you are new to Canvas Workspace, you add text by using the Text tool. Click on the “T” on the left-hand menu in the downloaded version of Canvas Workspace and click on the design mat. (see picture below)
This will give you a flashing cursor – type the wording.
There is a drop-down menu that appears when you are using the Text tool where you can select what font you would like to use. With the downloaded version of Canvas Workspace, the choices are only limited by what you have installed on your computer.
Err… I am a bit of a font junkie so I have many fonts to choose from .
Note:- If you are using the online version of Canvas Workspace Brother have provided software called Type Converter to enable you to add any font that you would like to your designs. See a tutorial here. Not quite a user friendly as the downloaded version however it is an option.

Which fonts to use the Draw feature with
The next step is to think about the font. I used a Single Lined font called Tuxedo however there are many to choose from. You are able to choose any from the selection but keep in mind most fonts that you can see are designed to be used as a cut file and have an outer stroke line and then a gap between the stroke.
For more information about using Single Lined fonts and where to find them check this full tutorial out here.
TIP:- If you are using a single-lined font and have an issue seeing what you are typing then use a different font to start with. Type everything how you would like it and then change the text to your single-line font. Canvas Workspace occasionally does not “see” the font in Text Edit mode.

Which pens to choose
Pens can be the next biggy.
The Universal Pen Holder solves this problem to a certain extent. The Universal Pen Holder is available in standard and small barrel. I have found the standard very useful.
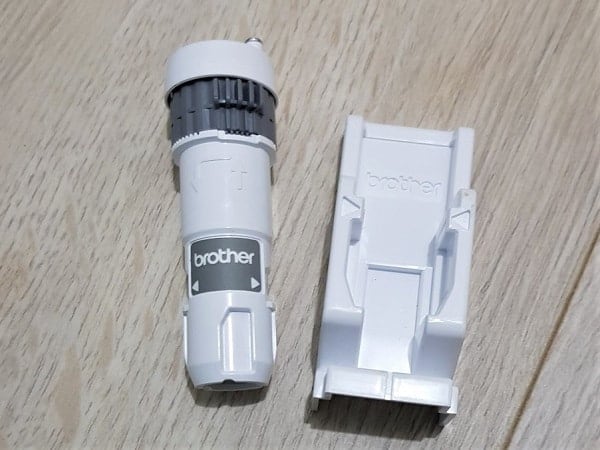
That and Ultra Fine Sharpies. (NOTE: Ultra Fine NOT Fine)
There are other pens that fit really well in the Universal Pen Holder too. Another tip is that you can add some tape to any pens that are a little thinner than the Pen Holder tightens and holds.

In the above picture, you will see that Sharpies come in many sizes. The Ultra Fine Sharpies are the ones with the arrow pointing to them in the middle. You do not need to purchase the pack as pictured. Sharpies are available in various ways.
Change your T-Shaped thank you card to suit another occasion
You can alter the design by changing the front panel to suit any occasion that you need a card for. If you are a beginner then this is a great thing to practice.
Steps to do this are:-
1. Create a rectangle the same shape as the ‘thank you” rectangle in the free design.
2. Add text using the text tool and the instructions above.
3. Resize the text so that it fits the rectangle shape nicely
4. Use the align tools to center horizontally and vertically (tip: lives in the right-hand Edit menu)
5. Now, the funny thing is that your machine will see that text and cut it out of the rectangle without you doing much more. You also have the option to Subtract the text from the rectangle to make it permanent.
Let’s cut your T-Shaped card
Now that you have finished making the T-Shaped thank you card your very own you are ready to cut it out.
Use the Export feature if you have wifi or a direct connection to your Scan N Cut. Alternatively, Export the file to your USB device and take it to your Scan N Cut.
Hint:- the Export choices live in the File menu with the Import from Computer we used earlier
Putting you thank you card together
Really, this is the easy part of creating your card. Below are the cut-outs that you should have to make your T-Shaped thank you card.

I used double-sided tape for some of this project. This is such a quick way to construct cards however you do need to be careful when you place the pieces together and there is no “play” like there is with glue. Once you have touched the other layer with the double-sided tape it is stuck.
To give my thank you card a bit more depth I added double-sided foam tape (similar to this one) to one layer on the front and one layer on the insert.

You can see the tape on the backs of the card pieces. The card piece on the left has the foam tape for added dimension and the card piece on the right has the thinner double-sided tape.
Glue – you can certainly use glue for this project if you prefer. I like Tombow glue however another favorite is Art Glitter glue. (Art Glitter glue does not have glitter in it). There are many other great types of glue too.
Join the T-Shaped card pieces
Now that you have all the pieces ready to build your card… go for it!
The first layer is the base T-Shaped layer however I am inclined to build from the top layer down. This means I would choose the smallest top layer, add it to the next layer and then finally place it on the base T-Shaped layer. There are NO rules with crafting so if you prefer to layer differently go with whatever is easiest for you. This is your project.

You can see the “thank you” cut layer has been added to the second glitter layer in the picture above.
And here is the finished T-Shaped thank you card.
You could also make this card with the embellishments all added upon completion.
I would love to see your finished card. Please share!
Join me on Facebook
Join me in the Scan N Cut – Let’s Create With Sue Facebook group. It is a group of awesome craft friends sharing and caring.
I would love to see you there.
Please feel free to ask any questions that you need and have fun with your creation.
Happy creating

Would you like to learn to make the most of Canvas Workspace
Canvas Workspace has so many features and it has been designed to work perfectly with your Scan N Cut. This makes it ideal to design your own creations in.
I have a Step by Step course that will take you from beginner to pro and creating your own designs from scratch.