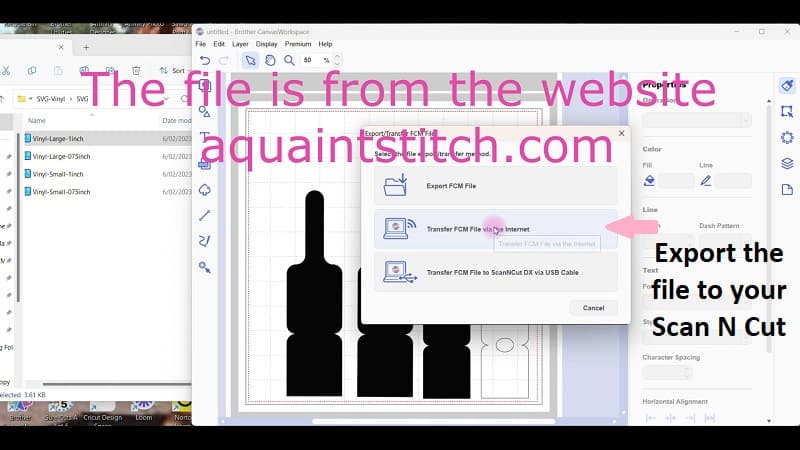
This tutorial is showing how to use free SVG’s in Canvas Workspace. In particular, how to use the free SVG for a fabric sanitizer holder downloaded from the website https://www.aquaintstitch.com/. One of our wonderful Facebook group members had some problems importing the free file so I put this video and tutorial together to assist.
This tutorial will also cover adding multiple files and Grouping in the downloaded version of Canvas Workspace. Do you want to find a slightly different way to import multiple SVG files? Read on to find out how.
The video component of this tutorial was created very quickly, so there are not too many bells and whistles along with it. I will include it below for you. I know it is sometimes easier to read AND watch how to do something which I why I often create both.
Disclaimer: As an Amazon Associate, I earn from qualifying purchases. Links included in this tutorial may be affiliate links, Amazon or others, meaning I may earn a small commission at no additional cost. These commissions will help me continue creating content for you. Thank you for your support! Read my very boring full disclosure policy here.
About the free SVG file
Before we move on to show you how to use free SVG’s in Canvas Workspace I will let you know a little about this file.
Titled Ava Hand Sanitizer Pouch, this is a sewing pattern available for you to create in two sizes. It can be made using fabric or lightweight vinyl. At this stage, the creator has it for free on their website. Note that I do not have any control over whether this will change as time goes by.
You will find the full instructions about the project and how to create it on the website when you go to download the file in the next step.
Issues with SVG files can be common
I would also like to be clear that how this file imports into Canvas Workspace is quite common and there is nothing wrong with how the creator has created the file. It is more to do with the software used and how Canvas Workspace interprets the code behind the file.
Think of it like someone creating a piece of writing in French and then your English conversion program misses a word or two while converting it to English.
All software may use different code (writing) within their own proprietary software programs. Some software programs will not need any conversion and others need to convert some parts.
I have come across this in various files that I have played with and have created other tutorials showing similar issues with the file that I used. One you can find is here. It is on importing a cute Gnome design and resolving some of the issues in Canvas Workspace, however, the tutorial’s main focus is on actually creating the project.
Download your free file
While this particular free file I used as an example is a sewing pattern, the instructions provided in this tutorial will work with other SVG files, free or paid.
If you would like to create this sewing pattern head over to this link to the product and download the file. https://www.aquaintstitch.com/product/ava-hand-sanitizer-holder/
PLEASE NOTE: I am not affiliated with this website at all. I have only used this SVG file due to a request from one of my Facebook group members.
Unzip your file
Most SVG files come in a zipped format. If you need help with unzipping please see my tutorial here for PC.
How to import your SVG
There are a couple of ways to import your SVG file and if you have a number of separate files one of the easiest ways is to simply drag and drop. At some point, the downloaded version added this super cool feature.

I found the easiest way to drag and drop the files was by lining up the File Explorer box next to Canvas Workspace. Then grab one file and drag it into Canvas Workspace.
Group the design together
To add multiple files, you need to move each file after it has been imported so that the files do not import on top of each other. This can cause complications when separating the different files. It certainly would in this instance too.
After you import the first file, ensure you select ALL the objects of the design before you try to move it. If you miss this step you may leave objects behind. In the downloaded version of Canvas Workspace, go to the Layers Panel. You will find the icon to Group at the bottom left of the panel.
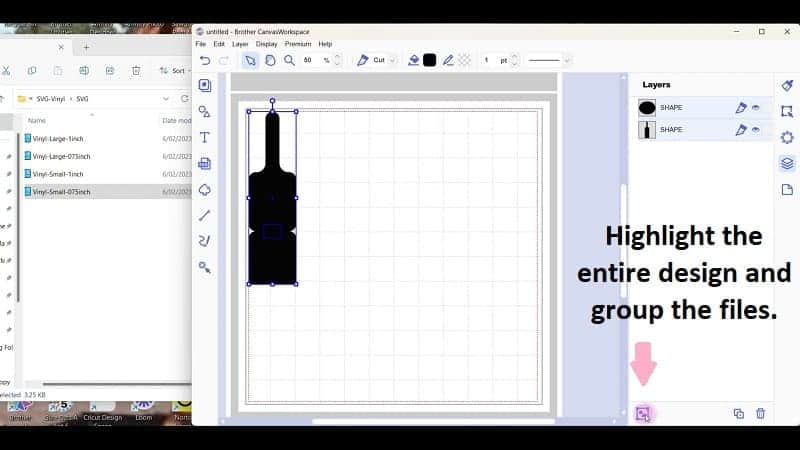
NOTE: This can be achieved in many different ways in the Canvas Workspace software.
Easier to move the SVG file
Once your file is grouped you will find it so much easier to move the file around the workspace.
Below shows the separate objects in the Canvas Workspace Layers Panel after being grouped. You will note that the objects have jutted in under a section called GROUP. If you click on the GROUP wording you can actually change the wording to something relevant to the design.

Add the remaining SVG files
Move the file from the top left of the workspace screen so that the next file imported is not directly on top of the original file. You can then drag and drop the next file of the design into Canvas Workspace. Once again, Group the objects of the file together, and move the SVG next to the previously imported design file.
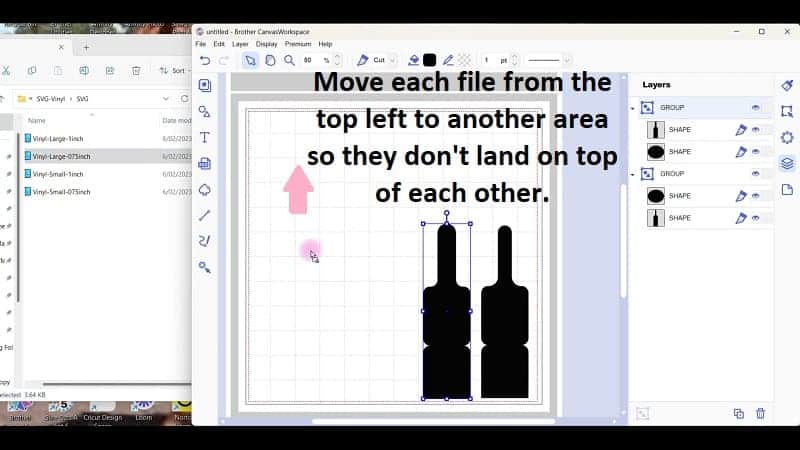
Now repeat the above steps to add each of the multiple SVG design files to Canvas Workspace.
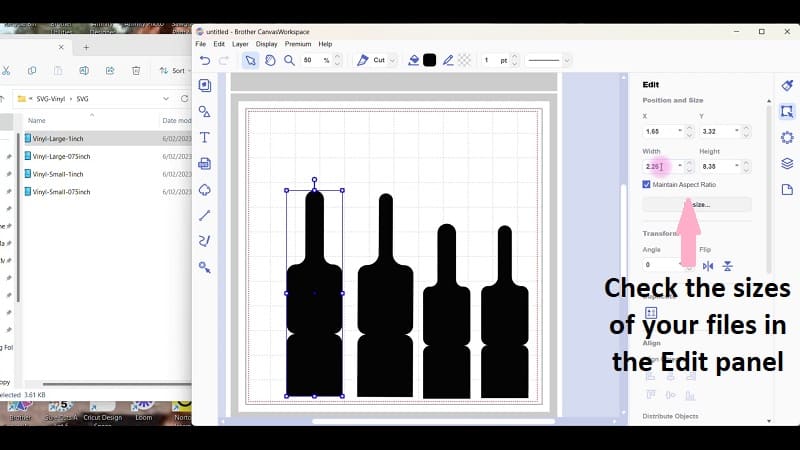
Check the sizes of the imported file
Check the sizes of the various files imported in the Edit panel. The view below is the downloaded version of Canvas Workspace. You will see the different sizes of each file as you select each one. Technically there are two sizes of the design for different-sized sanitizer bottles.
Changing the ALL-black view
This particular SVG file has imported each file into Canvas Workspace all black. All that has happened is that Canvas Workspace did not convert the information received exactly as intended. (you know, French to English) This, of course, makes it difficult for you to see the objects in the design.
Head into the Properties panel on the right-hand side of the downloaded version of Canvas Workspace and click on Fill. In the color selection panel that pops up choose transparent (or light color). Then, select the Line (Stroke) and alter that to black so that you can still see the design on your workspace.
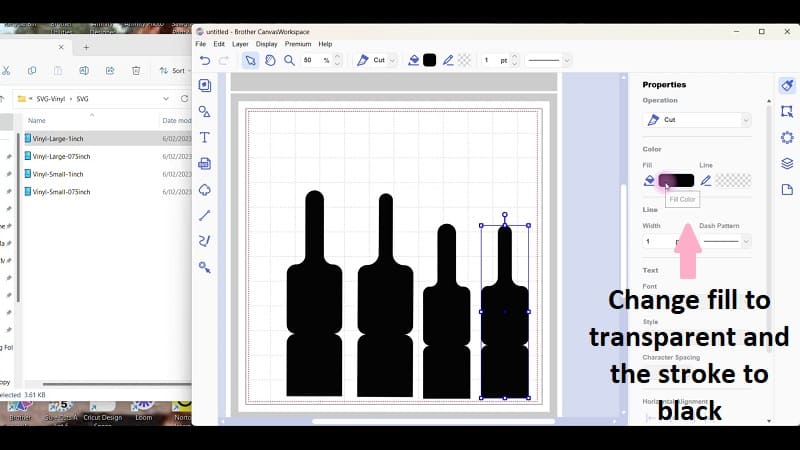
Changing the view of your file makes it much easier to see what you are doing. It makes the various objects of the design easier to see, edit, move, and, align.
Export the file to your ScanNCut
Go to File and then scroll down to Export/Transfer FCM in the drop-down menu. This will give you the pictured options to export the file to where you want it.
A video version of the Tutorial
Why don’t you watch the video version of “How to use free SVG’s in Canvas Workspace” on YouTube? You can find my other tutorials designed to assist you with using Canvas Workspace and your ScanNCut there as well.
Links to related tutorials
Would you like to learn how to use all the features of Canvas Workspace? Step-by-Step?

Head over to this page to find out more.
Join me on Facebook
Join me in the Scan N Cut – Let’s Create With Sue Facebook group. It is a group of awesome craft friends sharing and caring.
I would love to see you there.
Please feel free to ask any questions that you need.
Happy creating