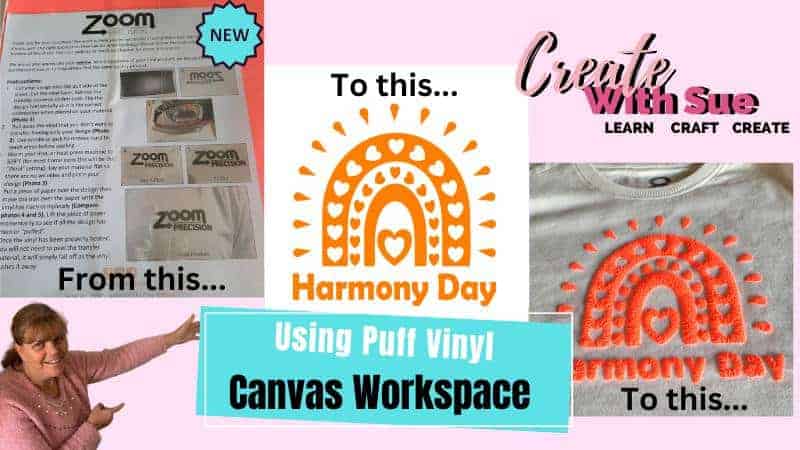
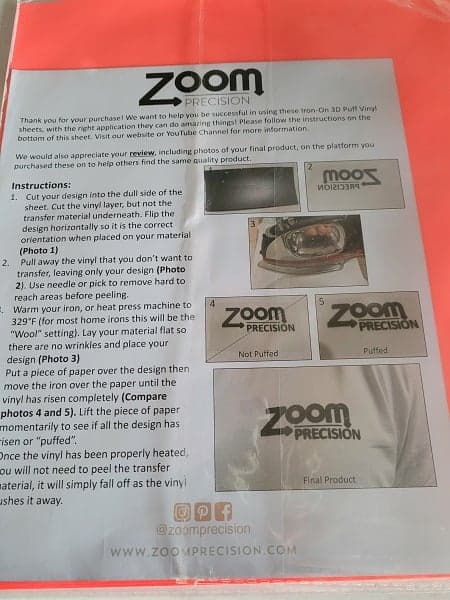
Zoom Precision’s 3D Puff HTV sparked my curiosity and took me back to the days when I used puff paint with my little ones. After some trial-and-error experimentation, I was able to create an awesome Harmony Day T-shirt for my granddaughter!
If you’re curious about crafting with 3D Puff HTV too, make sure that you read through this guide so you can avoid making the same mistakes I did. Things that didn’t work out as planned and how to get the best results with your ScanNCut.
I had a GREAT time creating a Harmony Day T-Shirt with 3D Puff HTV from Zoom Precision, the maker of Zoom Precision tools for cutting machines.
The free Harmony Day design is included in my Resource Library.
Disclaimer: As an Amazon Associate, I earn from qualifying purchases. Links included in this tutorial may be affiliate links, Amazon or others, meaning I may earn a small commission at no additional cost. These commissions will help me continue creating content for you. Thank you for your support! Read my very boring full disclosure policy here.
What do you need
- 3D Puff HTV (Heat Transfer Vinyl) from Zoom Precision
- A cutting machine like a Scan N Cut or a Cricut
- T-Shirt or project of your choice
- Heat Press or iron
- Teflon Sheet or baking paper
- Weeding tools
Creating a Design
The first step is to create a design that will look great in 3D Puff HTV. Now, this is where I had my first learning curve. From my previous practice with puff paint, I already knew that you needed to leave a bit of a gap between each area of the design. The spacing or gap is so that when the “puff” occurs, it does not turn into a puffy blob.
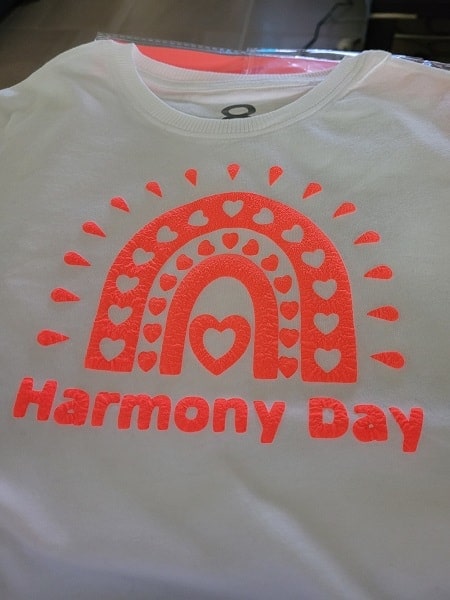
My granddaughter is celebrating Harmony Day shortly and the 3D Puff HTV was a great choice to make her a unique T-Shirt for the event. I went about creating the design for her T-Shirt ensuring that the lines were not too close etc.
Confession
Ok, confession time. My first attempt was a learning curve and did not turn out as expected. I discovered that the 3D Puff HTV is not like ordinary Heat Transfer Vinyl – it is special. When you feel the HTV it has a rubbery feel and when you cut the 3D Puff HTV it is prone to acting rubbery too.
My first design had problems. I had too much detail that would not weed properly and I ended up adjusting the design to remove it. Along with that, the font that I originally chose was a really bad choice. It is a font that I use a lot and really love however it had way too much detail and did not cut or weed nicely at all.
I have included my final design for you in my Resource Library editing out everything that caused me grief.
Tips for using 3D Puff Heat Transfer Vinyl
Through my project, I uncovered a treasure trove of tips and tricks to help you create an amazing 3D Puff HTV design with Zoom. I’ll break them down into easy-to-follow questions and answers, so you can make the most out of your own endeavor!
Is 3D Puff HTV easy to weed?
My initial response was no. Working with 3D Puff HTV can be difficult. What I discovered is that it simply needs the correct settings and design and voila, so much easier. With some slight adjustments to my initial design, the weeding process became simpler and more successful – giving me an end result that was well worth any additional effort!
The 3D Puff HTV I tackled in my tutorial was the second design, and while it wasn’t without its challenges, overall the weeding went quite smoothly. To ensure everyone’s success with this project, I’ve tweaked my original design to accommodate any potential hiccups!
Is the puff HTV like normal HTV?
Zoom 3D Puff HTV provides an experience like no other when it comes to applying heat transfer vinyl. The flexible, rubbery feel stands in stark contrast to traditional Heat Transfer Vinyl. It does not cut, weed, or heat like regular HTV. However, the finished product is sure to impress with its awesome texture!
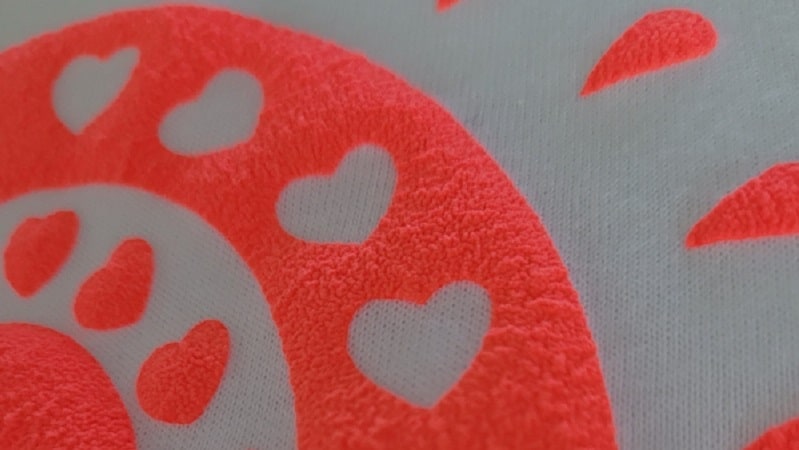
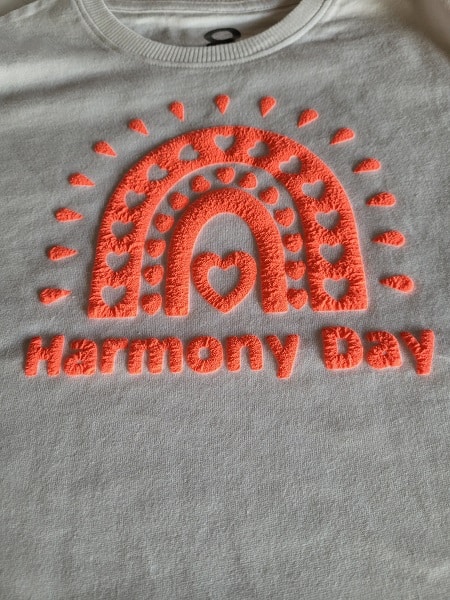
In fact, I would go as far as saying that I was pleasantly surprised with the result once transferred to a T-Shirt, with the puff turning out an unexpectedly fascinating texture. I have zoomed in on the picture below to try and show you the texture, although I don’t think I have really captured it. Loved it!
Do you need to reverse the design?
YES! Like any Heat Transfer Vinyl, you need to reverse or mirror the design. While you may not notice a major problem if there is no text in your design, any text you have added will read back to front if you forget to mirror it. (this is so easy to forget to do!)
How to improve the ease of weeding?
Sharp blade and clean blade holder
First up, ensure that your blade is relatively sharp and there is no debris in the ScanNCut blade holder that may cause you issues.
(I wonder if I was using a brand new blade whether my first attempt would have been successful.)
Adjust your Half Cut settings to suit
On your ScanNCut, set your Cut setting to the Half Cut setting. (If you have a CM model adjust the blade depth accordingly). This is where the test cut comes in handy. Do an initial test cut just to check whether it will cut through ok. My first triangle did not cut through well at all and it was impossible to lift the triangle out. If this is your result too, go into the settings for the Half Cut and alter the pressure from auto to potentially 7 or 8. Do another test cut. When checking whether your test cut is ok or not, watch for any areas that don’t quite cut through properly. You may notice some rubbery areas that are caught. Adjust your test cut so that this is not happening.
I still had a couple of spots that were connected. The HTV stretches where it has not cut properly and needs a bit of a pull when weeding. I noticed it is very forgiving once puffed and is not noticeable.
My first test cut is shown below.
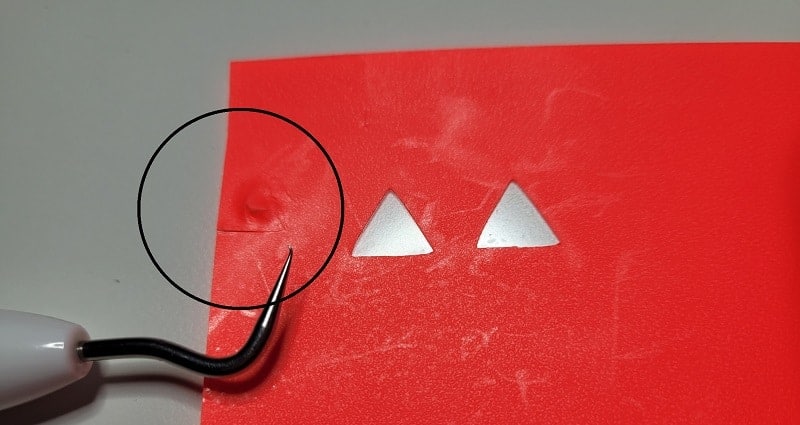
I ended up cutting mine on the setting of 9. My recommendation would be to aim for 7 or 8 as my setting of 9 (which is a lot of added pressure) completely cut through the backing in some areas. (I have a fix for this further down too) Remember that each machine may cut a little differently and the settings my machine uses may not be the same as yours. In fact, your auto setting might set the depth perfectly!
Take care when choosing a design to create your 3D Puff HTV projects
When designing your first attempt for 3D Puff HTV aim for a less complex design. Things like shapes being too small and being careful which font you choose. Pick a font that is open and blocky for the best results. Even to the point of considering whether the font has smaller characters like the “a” or an “a”. I was a little bemused by the difference and then decided it was due to a sharper turn by the blade and the fact that the letter center presented slightly smaller in the first a than the second a
Wikipedia – The lowercase version can be written in two forms: the double-storey a and single-storey ɑ.

Choosing the perfect font for your project is essential, but it isn’t just an artistic decision. Setting text too small can greatly increase difficulties when cutting vinyl materials such as puff – you’ll want to ensure that both letter size and font selection work together to get a flawless result!
Even when creating a design using regular vinyl, this needs to be taken into consideration. Something to think about…
Heat settings for the Zoom 3D Puff Vinyl
The Zoom 3D Puff Vinyl came with a set of instructions that suggest 329F and no time frame. (329F is about 165C). It mentions moving the iron around until the vinyl puffs.
I used a Heat Press….. and didn’t want to muck it up. The setting that I chose to use with my HTVRont auto press was 300F (150C) and I pressed for 15 seconds. It worked!
My philosophy is that you can always add a bit more time to your project, however, if you overheat your project in the first pass then you may wreck it.
NOTE: Heat press machines can vary in performance. Test for the settings that suit your machine.
Video tutorial on how to create the T-Shirt
The video will cover adding the design to Canvas Workspace, mirroring it, altering the text, grouping, transferring it over to the ScanNCut, adjusting the Half Cut settings, weeding the 3D Puff HTV, and pressing it. LOTS!!
Finished Harmony Day T-Shirt
This is the Harmony Day T-Shirt completed. Overall it turned out great and Matilda will love it and wear it proudly on Harmony Day. My second design was so much easier to weed and very quick and easy to press plus I loved the texture it created on the shirt.
The picture on the right-hand side is more angled and taken closer in an effort to show you the texture of the puff HTV.
Pros and Cons of Zoom 3D Puff Vinyl
Pros
- Is available in some great colors
- Easy to press to get a perfect puff
- If you use a suitable design and cut to the correct depth it is easy to weed
- Has an awesome texture once puffed.
- Definitely adds some POP and Pizazz to your project
- Can be used on any material that can be heated – for hats, T-Shirts, shoes, and hair ties (my granddaughter wants a matching one for Harmony Day). Lots of projects to choose from.
Cons
- Can be hard to weed due to its rubbery nature
- The auto setting of the SDX model ScanNCut did not take into consideration the rubbery, flexible nature of the 3D Puff HTV
- Your design needs to be specific for 3D puff projects
Fixing HTV projects that cut all the way through
Now, I mentioned that my Half Cut setting of 9 cut right through some areas of the design during the cutting process. This can happen even on auto occasionally. The design is not wasted and can be easily managed.
To fix this you need some heatproof tape. All I needed to do for this project is to flip the design over and tape across the few areas that were cut all the way through with the heat tape. This held the design together nicely.
For more tips with vinyl check out this post.
I use a tape dispenser that I LOVE! I have it loaded with heat tape for both HTV and sublimation projects. You will be able to read more information about the dispenser here.
Join me on Facebook
Join me in the Scan N Cut – Let’s Create With Sue Facebook group. It is a group of awesome craft friends sharing and caring.
I would love to see you there.
Please feel free to ask any questions that you need.
Happy creating