This tutorial will cover some tips to fix vinyl mistakes that a so easy to make however can be easy enough to fix too.
Do you ever have a bad day crafting? or, maybe been a little absentminded when creating your project or for some reason, you have an HTV or vinyl project that is thwarted with problems. You are not alone but never fear, there are ways to resolve problems that frustrate you.
Now, most of these tips to fix HTV vinyl mistakes however a number of the tricks will work with either HTV or normal adhesive vinyl. Worth a shot!
Disclaimer: As an Amazon Associate, I earn from qualifying purchases. Links included in this tutorial may be affiliate links, Amazon or others, meaning I may earn a small commission at no additional cost. These commissions will help me continue creating content for you. Thank you for your support! Read my very boring full disclosure policy here.
Mistakes we will cover include:
- Forgetting to weed part of your design
- Cutting your vinyl completely through instead of using half-cut
- Missing part of your design (or losing it)
- The need to mirror HTV
- Design won’t stick to your project
Forgetting to weed part of your design
Weeding is an important part of the vinyl cutting process, but it’s also easy to forget to weed part of your design. If you find yourself in this situation, don’t worry – there are a few things you can do to fix it.
This is a really easy mistake and there are lots of causes. These can range from absent-mindedness, the vinyl cut lines hard to see, or the design having tiny pieces that may go unnoticed. You probably have the odd additional reason to add to this. I am certain there are many.
One thing to keep in mind is that this problem may have a different solution depending on the project that you are doing. AND the level of risk needs to be assessed.
Usually, you locate this error AFTER you have already ironed it onto your project. {sigh}
Tip to fix this mistake
There is a chance that you can heat the vinyl again and remove the unwanted piece of vinyl. While this can work there is some risk involved in removing the unwanted piece.
Things to consider
- The additional heat may cause damage to the main part of your project. In this instance, you need to assess if it is worth the risk.
- The unwanted piece leaves a sticky, noticeable mark on your material. If this occurs, you can move on and see if option #2 is possible.
Alternative tip to fix this mistake
An alternative tip to fix this mistake is to add an extra piece to your design. This option can potentially fix most mistakes. For example, I left the center of the letter e and hid the error by placing a flower in a strategic spot. The solution will be different for each project of course. This is a great tip to fix this HTV mistake. It may even be useful for normal vinyl although most often you can simply weed adhesive vinyl after it has been applied

Adding a flower or suitable object can effectively disguise areas that were missed while weeding.

Cutting through your vinyl completely
One of my first tips to reduce the risk of making this mistake is to do a test cut. This is particularly important if you are using material that you haven’t used before.
The half-cut
The DX models have the Half-Cut feature which is a wonderful feature. Unfortunately, another issue is that it is easy to forget to turn it on when you need it OR off when you don’t. It is a problem if it is set incorrectly whichever way it is. I have had cardstock not cut through completely.
A great habit to get into is to check whether it is off or on my DX every time that I cut. This is a great habit to get into.
The test cut
When I use my CM900 model with the manual blade I ALWAYS do a test cut. For the CM models, it is a necessity really .. but now, with my DX it is not quite as important however, there are times it will “save your bacon”.
For this problem, the HTV had a slightly thinner carrier sheet and a test cut wasn’t performed with the DX2200D. Even though the half-cut was set to ON for some reason the thickness of the carrier sheet wasn’t determined properly and the blade cut through the carrier sheet.
This can happen with both normal adhesive vinyl or HTV and the fix is similar.
Fixing an HTV file that has cut through
This is a great tip to fix any vinyl project which has cut right through or even if only some areas that have cut through.
Leave the design on your mat as you can resurrect it. By leaving it attached to your mat you can weed the unwanted areas away and correct the issue with heat resistant transfer sheet or tape.
Follow these steps.
First, use a normal (non-heat-resistant) transfer sheet to keep everything together while you pick the cut design up from the mat. It is a little stickier and the HTV will be mirrored and needs to flip. Then flip the design over and apply the heat-resistant tape over the carrier sheet that will still be on your design. Once the design has been stabilized on the heat-resistant transfer sheet you can then remove the normal transfer sheet.
For normal adhesive vinyl, you only need normal transfer sheet.
NOTE: Don’t be tempted to use the normal transfer sheet/tape for HTV though.
While this doesn’t look the best but it certainly does the job. Let’s face it, it is not how you achieve your finished project, it is how it finishes up.
This is a close-up of the tape. It was a roll that I purchased ages ago and was perfectly fine for this project. If you are planning to use the tape for sublimation I do not recommend the yellow tape and prefer this one.
The other brand I like but find a little more expensive for me to purchase (may not be where you are) is the Cricut brand.
The yellow tape pictured left yellow residual marks on my sublimated coffee mugs. Not good!

Part of the design does not cut at all
When the Scan N Cut has missed cutting out some sections of the lettering or design. Often, this is simply because the blade depth wasn’t set quite right on either DX or CM models or occasionally when the materials have lifted in a few spots from the mat.
The picture below is of an O. You can see that my Scan N Cut has not cut all the way around.
Don’t take any notice of the lifted area at the edge of the cut, that was just me picking the center up with the weeding tool to see if I could remove it.
This problem is able to be resolved too.

Tip to fix this vinyl issue
This tip to fix the vinyl mistake involves an Exacto knife. Cutting the missed areas with the Exacto knife can be a great solution and is a relatively easy issue to resolve.
This solution works in all sorts of projects, both cardstock, and vinyl. The Exacto set is definitely a handy tool to have.

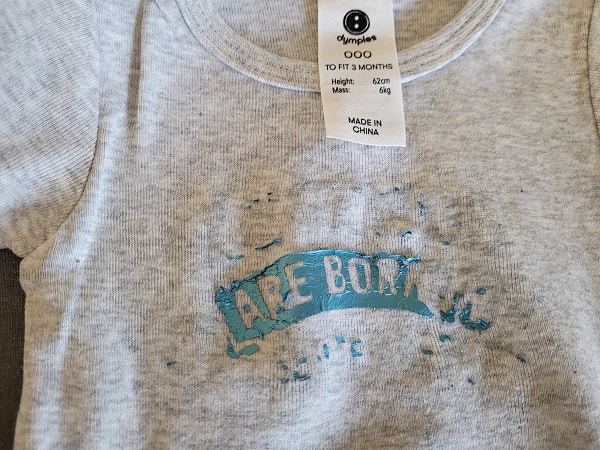
Missing part of your design
As you will see, there was still another issue with this project. I could hardly believe it. Talk about a day of learning. This is exactly what making mistakes are – days of learning.
It has also provided me with the opportunity to share my “learning” with you. A silver lining in a sea of errors.
If you look below, you will notice that the three dots are missing at the bottom of the exclamation marks. {sigh} This was such a silly error. The vinyl was not cut squarely on one edge and during the cut, the design just missed cutting the complete circles out. The bottom edge of the circles were missing.
TIP: tutorial on how to use the scan feature to precision place your design on your materials. This tutorial demonstrates how to make the most of this scan feature. (I absolutely love this feature)
NOTE: I didn’t try to fix this prior to ironing the design onto the T-Shirt. It was fixed it afterward.

Tips to fix vinyl mistakes where a bit is missing
There are lots of causes why a part of your design is missing. While it might be due to a mistake during the cutting process, often it is that something else has happened to that part of the design.
Maybe that section is damaged while you are weeding the vinyl or you have misplaced it. I have heard of tiny bits of the design being found in the most unusual places, floating in the bathtub, stuck on the back of elbows, attached to shoes, or hiding for days and then suddenly reappearing. Now that can be a bit annoying, LOL. Quite hilarious some of the stories. (if you have a weeding story you are welcome to share it in the comments)
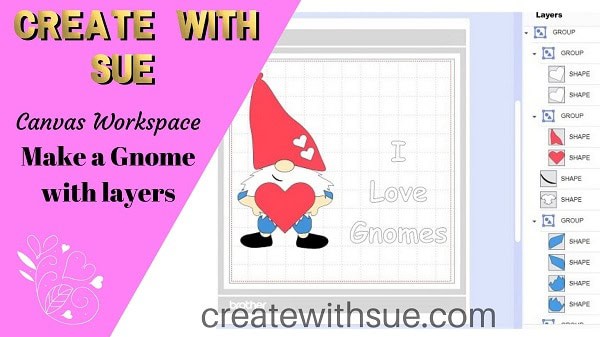
The downloaded version of Canvas Workspace is great for this fix
To fix vinyl mistakes like this, head back into Canvas Workspace and used the eye icon to hide the entire design EXCEPT for the section of the design that needs to be re-cut. If the design was put together directly on your Scan N Cut you would head back there and see if you can follow these same steps.
If you used a built-in design or uploaded an SVG file, you may not have the flexibility to hide all the objects that you need to do this. QUICK TIP: Try Exporting your SVG as an FCM file and then Importing the file back into Canvas Workspace. The FCM version of files usually imports with all the small details separated out for each object.
The intricate design of the files read by FCM means you may occasionally receive messages about small objects not being sent to your machine. This is because Canvas Workspace spots tiny objects or nodes that may not cut well and removes them. While you might think this will cause a problem for your design, it rarely makes any difference when removed from the project file. (Make sure that you check the file by zooming in once it has been imported into your Scan N Cut.)
Converting to FCM is a great feature to use to your advantage to fix issues and mistakes.
Using the eye icon to fix this issue
In the picture below, you will see that all that is visible in the T-Shirt design are the dots. That is all that will be sent to the machine to be cut and you could cut it on a bit of scrap.

This is before

And this is after the fix – voila

The need to mirror HTV
Most, but not all, HTV needs the design to be flipped or mirrored. You can normally distinguish HTV that requires flipping by the fact that it has a plastic-like carrier sheet on it. Some brands do not have this and simply iron straight onto your project with no need to flip.
NOTE: Shiny side goes down on the mat! This is the carrier sheet side.
When you forget to flip
If your design does not have any text included in it you may get away with no issues at all if you forget to flip.
Forgetting to flip is the easiest thing in the world to do! If this happens to you, remember that you are not alone. The good news is that most people would not know which way the design was MEANT to be. It will be just like looking in a mirror.
If you forget to flip and you have text then this adds a whole new layer of issues and often has no resolution other than cutting the design again. SO annoying!
Consider whether the design is suitable to remove only the text section of the cut file and redo the text. Whether this is an option will totally depend on what the design is like.
Quirky Tips to fix this vinyl mistake!
I have also seen some awesome solutions using the mirrored design in a quirky manner. For example, one crafter used a wine saying planned for a t-shirt and still applied it so that it read back to front, It was correct in the mirror and she added a bit of extra text the right way around saying if you couldn’t read that perhaps you had been drinking too much.
Another example is a crafter who applied the unflipped version of the design to the back of her T-shirt and created a correct version for the front. It made the shirt quite a talking point.
Whether thinking outside of the box will save your unflipped design will, of course, depend on your project. If there is a vague chance you may be able to save the HTV it could be worth thinking of possible options. It doesn’t even need to be used on your original project and could be for a different one.
Need help with ideas? The Facebook groups are often a great help! People come up with some awesome ideas.
What if it is a complete disaster?
This happens, unfortunately. If your project is totalled then as a last resort you could try removing the HTV vinyl and reapplying a new piece of vinyl. This could be exactly the same design OR a design that covers the same area or more of the original design.
To remove the failed project you can apply heat and a lot of patience. It is quite a tedious task and the bigger the design is, the more tedious it is. Sorry.
However, it can also be a very successful solution for this mistake!
The start of removing the failed design

Design with the failed design removed

The original file was re-cut and applied.
TIP: I found it easier to use my dry iron to resolve this as my heat press is quite large (great for adult t-shirts) but was too cumbersome for the onesie.
If you have a failed project, vinyl or otherwise… spend a moment to think of options to recover it.
Until next time……
Happy creating,

Join me
If you haven’t already, pop in and say hi in our Facebook group
Scan N Cut ~ Let’s Create With Sue
Before you go…..DON’T forget to subscribe! I would love you to follow my journey helping you create along the way.

Check out other vinyl tutorials

Rejuvenate Old Jeans with HTV and Your ScanNCut
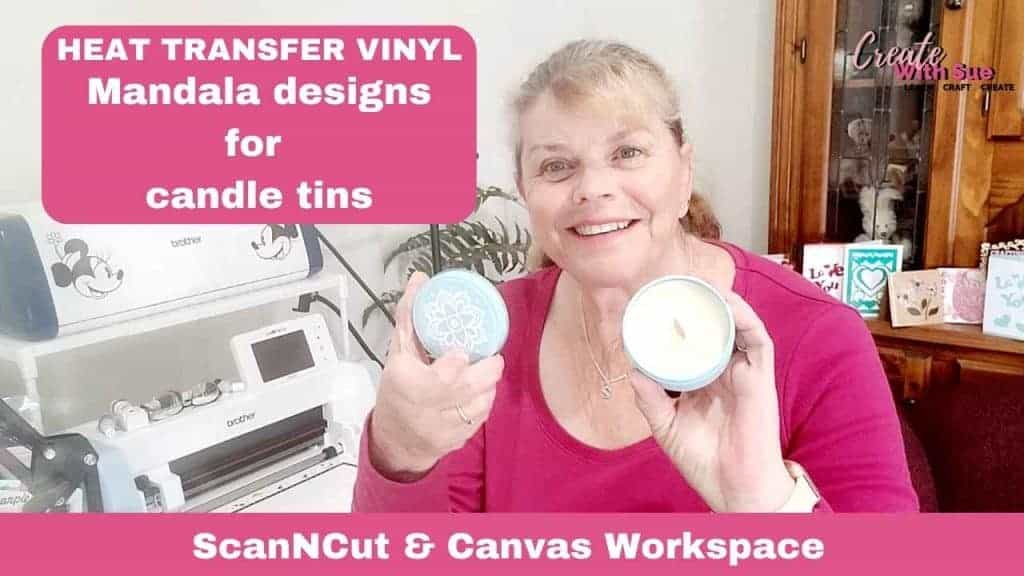
ScanNCut Vinyl Cutting Tutorial – Mandala HTV Candle Project
How to Create Stunning HTV Can Koozies
I’ve been busy making these HTV Can Koozies, and let me tell you, they are…

Personalizing Mugs With Vinyl – Scan N Cut

Zoom 3D Puff HTV – Tips for best results